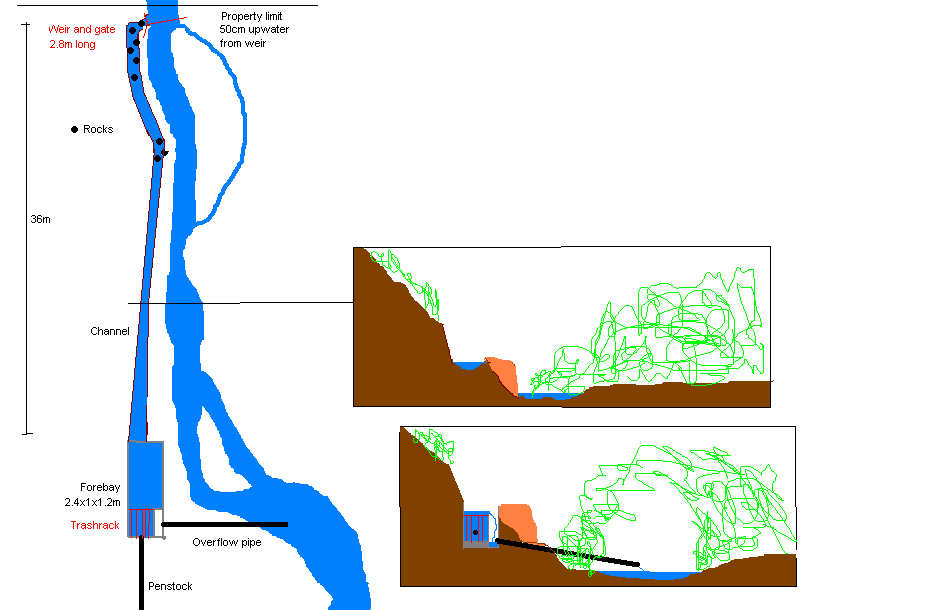
The saga of my water intake
My turbine is designed for a maximum flow of 50 liters per second.
The total head is 28 meters. In winter the stream has several times
as much water, but in summer it has very little water, so that the
turbine must run at lower power. Some water has to remain in the stream at all times.
The original concept of my intake was this: Divert a portion of the
creek (up to 70 l/s) into an open channel that conducts this water to a
forebay located safely away from the streambed. Do both the
sedimentation and filtering in the forebay. From there, run a long
penstock to the turbine. For this purpose, the forebay has a
sedimentation area and flush gate, a screen, and excess water
overflows there to carry away floating and suspended debris.
Since the site doesn't have much head, and in summer has very little
water, the entire intake should operate with as little head loss as
possible.
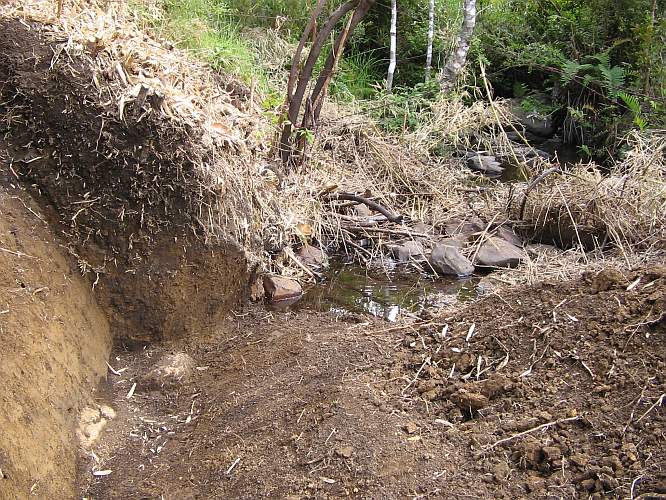
This shows the intake area, when work was beginning, in
early 2008. On the left is the beginning of the channel. The loose dirt
on the right is partially in the streambed, for the stream to carry
away later. There really was no other place to deposit it.
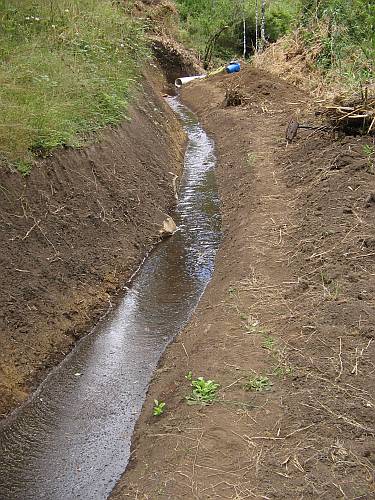
This shows the channel during the first test, to see if its slope is
correct. Water was put in by means of a pipe, taking it in further
upstream, a small stretch into the neighbor's property.
The creek flows parallel to the channel, under the vegetation on the right side of the photo.
The channel was lined with laminated plastic fabric, to keep the water
from seeping in and getting lost. This was done mainly for starting the
system, still in summer, when there was very little water.
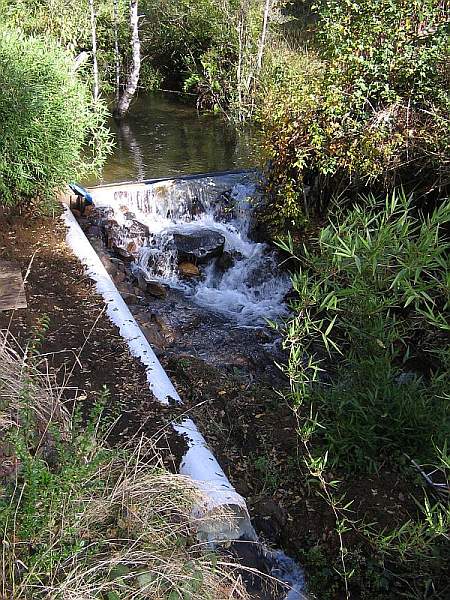
This photo shows the intake as it was in late autumn or early winter
that first year. I had put a simple wooden dam in, consisting just of
two boards with some minimal support. The channel would take all the
creek's water while there was little, and if the creek swell, it would
overflow the dam, regulating the water level and thus roughly
regulating the flow diverted into the channel.
While this implementation was very temporary, the principle looks correct, right? So I thought, at least.
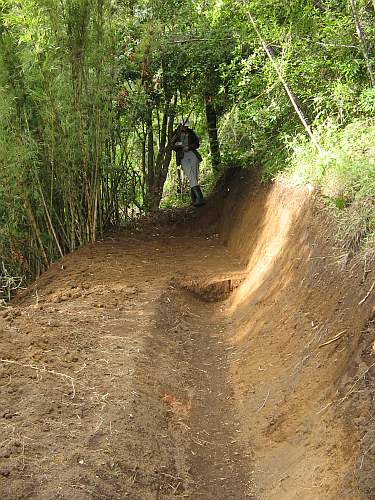
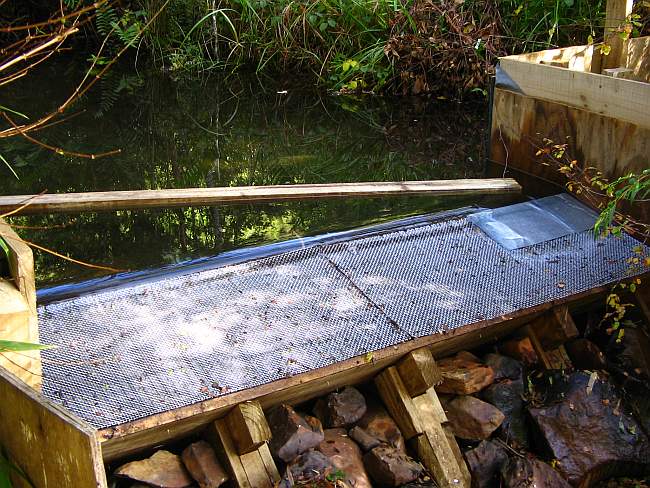
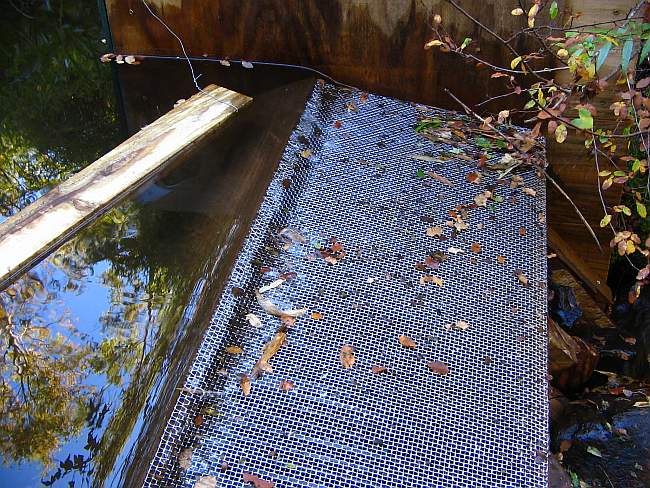
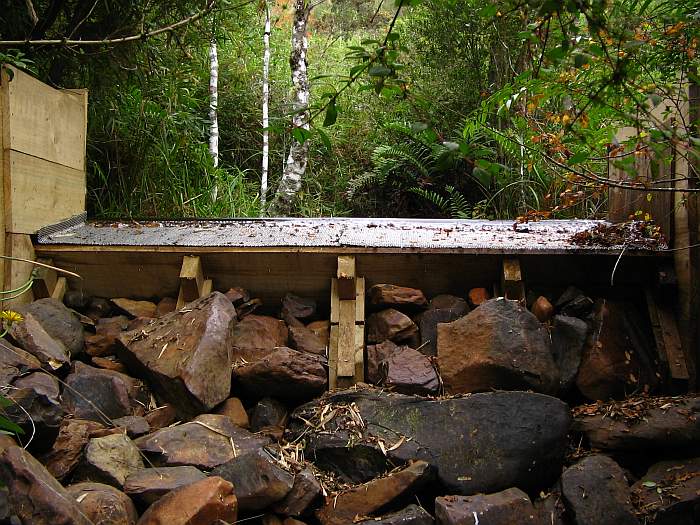
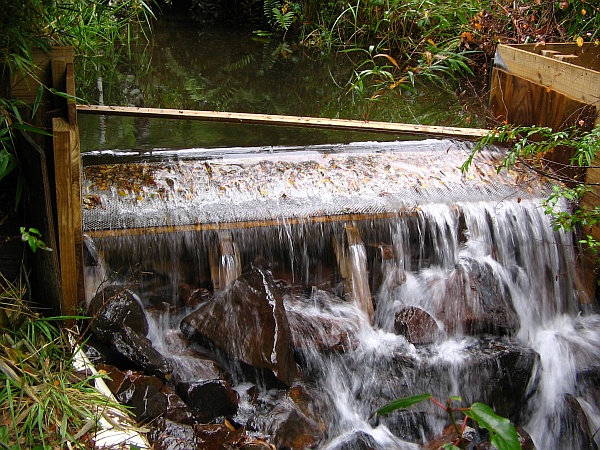
Let's now see the forebay. This photo shows the end of the
channel, and the location of the forebay, before beginning construction
of it. The person is standing where the penstock will start.
The height is such that the water level inside the forebay is supposed
to be just a little lower than the level of the creek at the intake.
The creek flows on the left of this photo, about 3 meters further down.
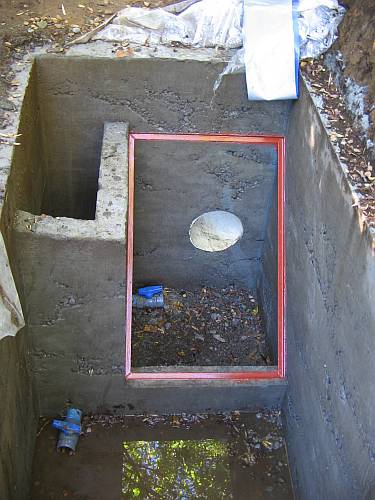
This shows most of the freshly build forebay. The concrete was
rather poor, because it was hard to mix it by hand, and compact it. But
it works.
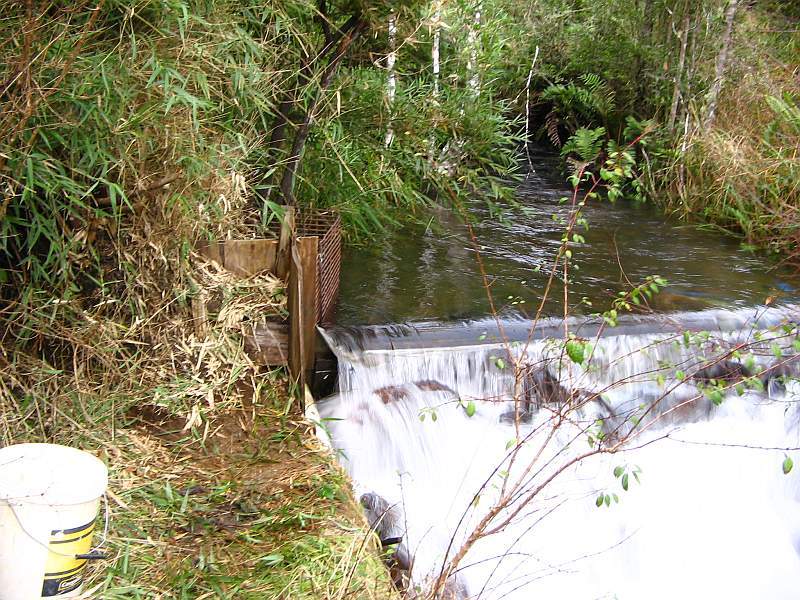
The reddish frame is for the screen. It sits at a 45 degree angle. The
shaft at the left has a drain pipe back into the stream. So this
regulates the water level by draining off excess water. There are two
63mm valves at the bottom, intended to flush out the sediment when
open, from the main sedimentation area and from the filtered area.
Nobody told me the flush gate had to be larger... I found out the hard
way! The valve on the left was later replaced by a nice big
rectangular hole with a steel gate in front of it. I had to specially buy a diamond saw disc to cut that hole into the concrete.
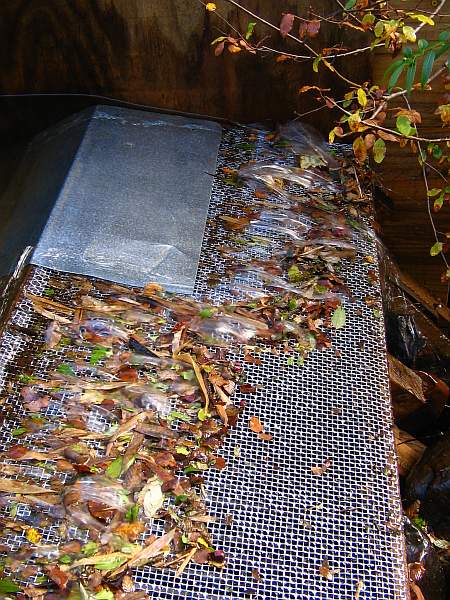
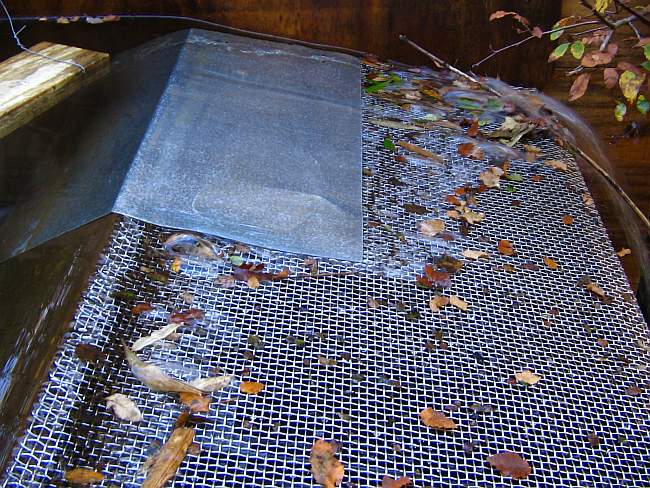
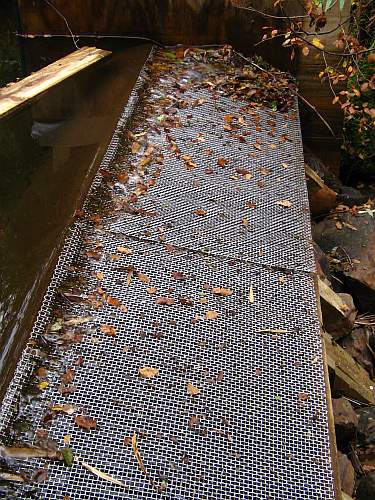
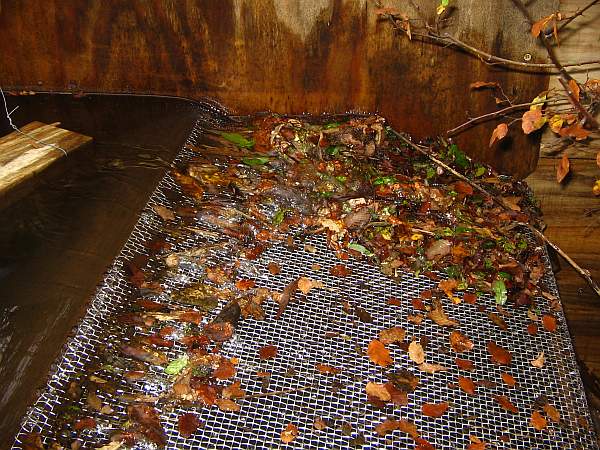
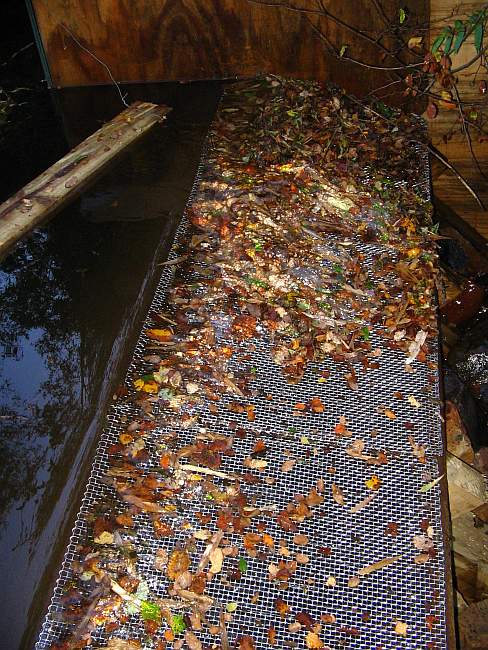
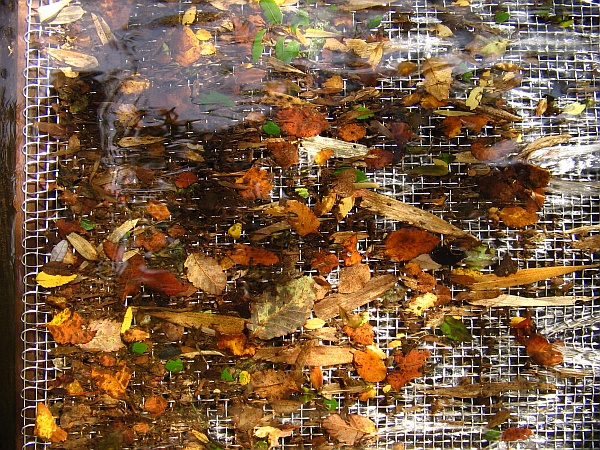
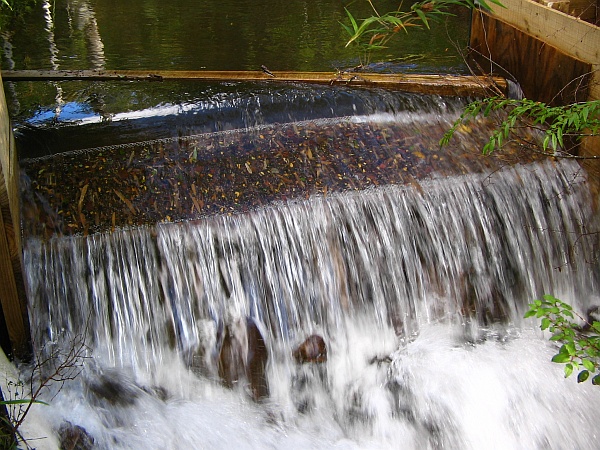
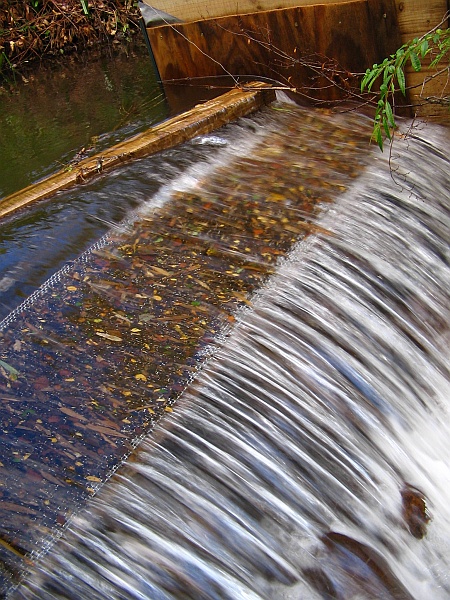
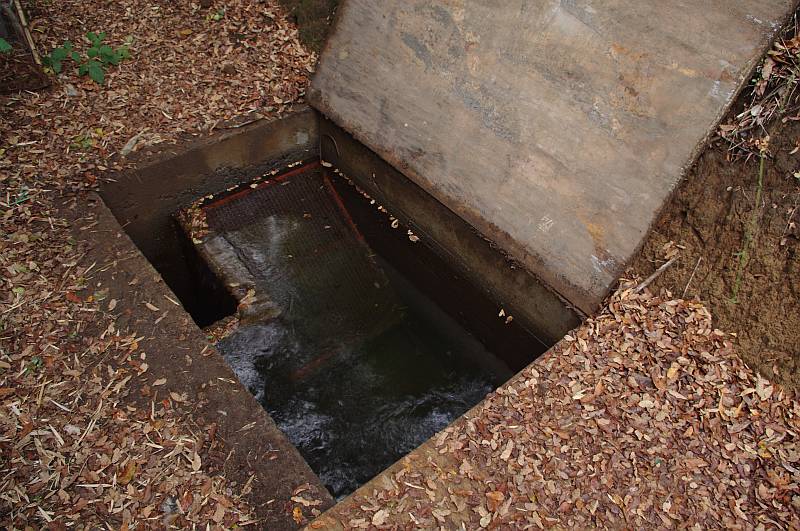 This
shows the forebay with its filter, operating in late summer during very
low water availability. This submerged, inclined screen works perfectly
well, that is, it is fully self-cleaning as long as two conditions are
met:
This
shows the forebay with its filter, operating in late summer during very
low water availability. This submerged, inclined screen works perfectly
well, that is, it is fully self-cleaning as long as two conditions are
met:
- There must be enough water overflowing the spill gate. About 20% is
enough when operating at low flow and with not too many leaves coming down the creek. 35% overflow
rate takes care even of severe amounts of leaves and other debris in the water.
- Absolutely no sediment may reach the filter. If the sediment in the
forebay builds up to a level reaching the filter, it clogs almost
instantly.
As long as the flush gate is opened often
enough (about three times per year, mostly at the start of winter),
this filter works well and is fully satisfactory. The problems
I have are at the intake.

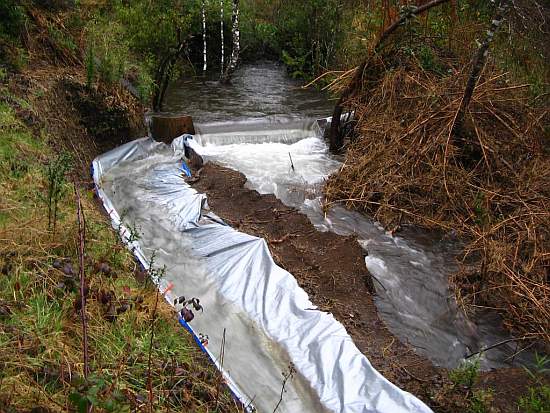
The problem I didn't foresee was that this tame looking creek
occasionally turns into a roaring monster! That happens only some
winters, and only for a day or two, but can be quite extreme. I have seen this creek swell to over
5000 liters per second, overflowing its banks. It was one event like
this, the first winter I ran my turbine, that put the whole intake area
under water, so that a huge amount of water got into my channel, making
it overflow and eroding it.
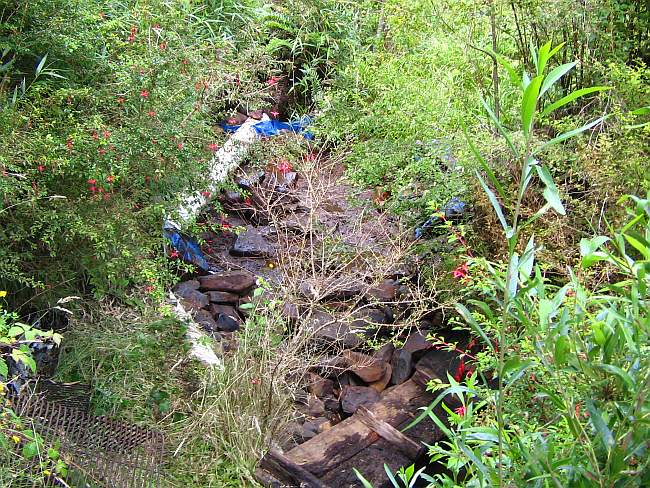
This photo shows the channel, still lined with the fabric, with three
places where it eroded away due to overflowing. Each of these events
caused a power cut, and forced me to do lots of dirty work in the mud under heavy rain,
to make provisional fixes and keep my turbine going.
It quickly became clear to me that I needed some way to strictly limit the flow in the channel.
This is the configuration I came up with, to somehow survive that
winter. I installed a gate at the entrance to the channel, regulating
it to get a reasonable flow. But the little wall of dirt between the
creek and the channel kept eroding away, and it was clear that
something better was needed, soon.
This shows a bigger repair that was necessary when this new gate too was
flooded, and once again I got almost the entire creek into my channel,
seriously overflowing its bank and totally eroding it away for a
significant distance.
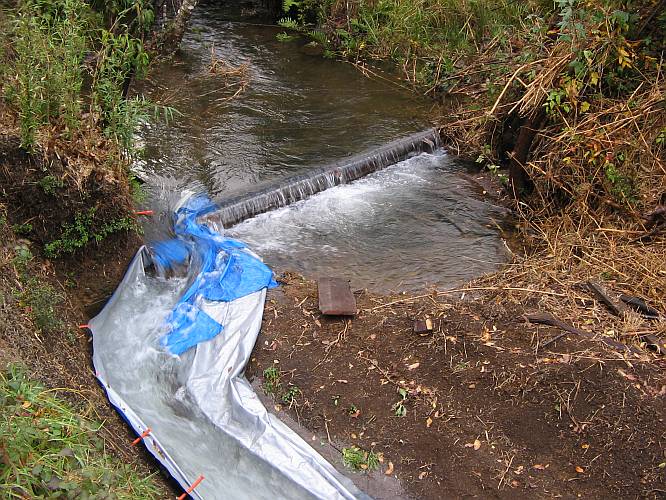
This drawing shows the configuration of the system at this stage, to
further clear up any doubts about it. Photos never show the whole
picture.
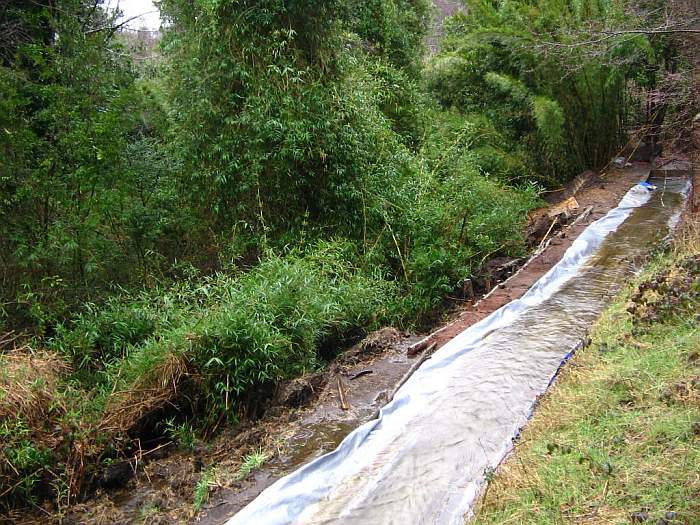
To prevent further flooding and damaging the channel, in 2010 I
installed a 6 meter section of pipe to replace the first section of
channel. It covers the area where the many rocks are. From the end of
that pipe downwards, the whole system is still like shown in the photos
above, except that the plastic lining has been removed, the vegetation
has regrown and is now stabilizing the banks with its roots, and the
channel has thoroughly soaked with water and fine clay and is now
essentially watertight.
Here you can see the freshly built piped intake system. Without
installing any gate, the pipe limits the flow nicely to about 70 l/s.
With a simple wooden gate placed in front of the pipe's mouth, I can
further reduce the flow rate. Typically I run it at about 40 to 50 l/s.
You can see that in these few years the creek has washed away all the
dirt thrown in its bed, down to the bare rocks. Also the cut-down
vegetation has largely been absorbed by nature, and new plants have
grown.
At the very bottom of the picture, the tube discharges the water into
the channel, which has now stabilized and is quite safe - as long as it
doesn't overflow!
But there was now a new and quite nasty problem: Every time the creek
has high flow after intense rain, it carries large sticks and chunks
of tree trunks, and these inevitably lodge in front of the pipe
mouth, blocking it badly enough to make my turbine shut down! It
typically happened in the middle of a very rainy night.
So I decided to install a coarse trash rack in front of the pipe inlet.
 Here you can see my model 2012 intake. It's the same thing with the
tube section, but with a big screen made from rebar. Clear spacing of
the bars is 20mm, and the total open area exposed to water is 12
times the tube's area.
Here you can see my model 2012 intake. It's the same thing with the
tube section, but with a big screen made from rebar. Clear spacing of
the bars is 20mm, and the total open area exposed to water is 12
times the tube's area.
AND IT CLOGS!!!!
I did never expect this coarse screen to clog. I supposed that it would
pass the sediment at the bottom, would also pass all those leaves that
don't flow down over the dam, and would reject the big sticks, which
would then also be washed away by the creek. NOT SO!!! While most
leaves pass, some get hung up from the bars. This slowly clogs the
screen, and at some point the sediment starts sealing the little space
remaining between the big layers of leaves. And then I have the next
turbine standstill. Of course, always in the night, during nasty
rainstorms.
I enduring the winters of 2012 and 2013 hiking here to clean that
screen every day during times of much debris, and every two to three
days during the rest of the winters. In summer, it's enough to clean it
once a month. Despite all this cleaning, I got about 5 power cuts each
winter due to this screen clogging.
So, something better was needed. But what?
Anyway my wooden planks were rotting, so I decided to build an entire
new intake, using impregnated wood, and integrate a screen into that
intake.
In march 2014 (that's late summer here), I built it. To be able to work
without shutting down the turbine for the duration of the construction,
I installed a bypass, to conduct all the little water available
straight into my existing pipe. For that, I used another section of the
same kind of pipe.
In this photo you can see the two pipe sections, a very provisional
intake made upstream in the neighbor's property, using plastic fabric
and rocks, and you can see the old dam and the old screen removed,
laying in the foreground. The rocks that supported the old wooden dam
are also very visible.
And you can also see, quite clearly, that nature has come back in
force, and I have some trouble even getting to the place! It's becoming a task for would-be Tarzans. But I avoid
cutting down plants as much as possible, because they are my allies:
Their roots stabilize this otherwise very weak soil.

As you can see, I built this new dam quite a bit stronger. In this photo
it looks deceivingly simple, but a large part was not yet there!
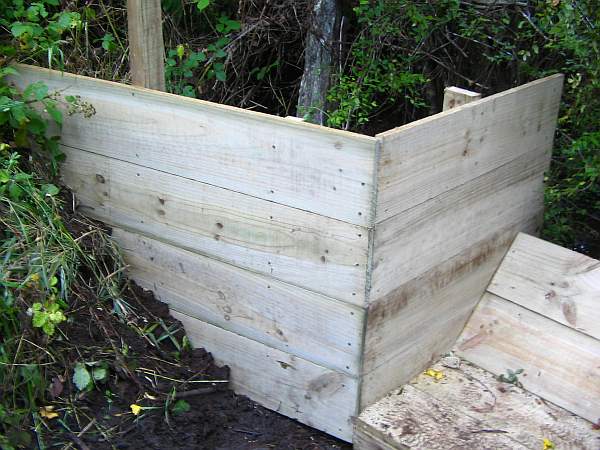
My old board dam always had trouble with water flowing by the side of
it, eroding the banks of the creek. The new one was built to avoid this
problem.
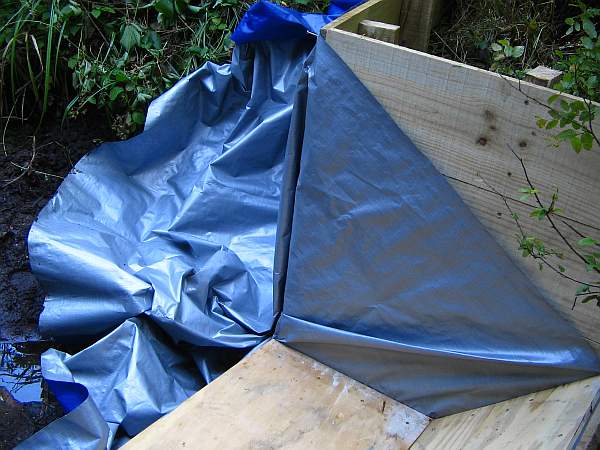
The dam is sealed with plastic fabric, sandwiched between the main boards and a layer of water resistant plywood.
Doing this with a large single piece of fabric, no cuts, no seams, with the
dam having a complicate shape, is a bit like a doing upscaled origami!
The same piece of fabric later seals the dam to the riverbed and banks. Some
rocks to weigh down the fabric, and lots of silt to seal and cover it,
are all that's needed to make a surprisingly watertight joint.
Now here is the clue: This intake actually has two
dams, forming a box at 90 degrees to the stream. The cover of this
water box will be formed by a screen, so that the screen is in the
place that gets the fastest water flow.
The photo shows the side where the structure connects to the pipe. It's not ready yet.
Note that both of the dams (sides of the box) are set at 45 degrees,
and that the bottom is wooden too, rather than just being the creek
bed, and has air under it. This is to direct the force vectors down at
such an angle that the structure is held in place just by friction
against the rocks it's standing on, both during normal operation with
the box full of water, and if the box is not full due to the screen
being clogged or any other reason. I came up with this solution,
because there was no way I could anchor the structure to the rocky
ground,
without resorting to big hammer drills and other such tools, which I
don't have.
The screen will be nearly horizontal. It would surely be better to
place it at least at 45 degrees, so the debris can fall off by gravity,
but unfortunately I see absolutely no way of doing this. I cannot
dam up the water even higher than now, because then it would simply
overflow its bank and flood the forest instead of getting into my pipe.
And also I cannot place the pipe any lower, because there are
too many big rocks which I cannot move. Anyway the forebay is only
slightly lower than this, so that's yet another reason why I can't
incline the filter more.
 In
april it started raining, the creek brought some more water, and I
installed my screen. Until then I had been running the new intake
without a screen, for a few weeks, while I got the steel and built the
screen.
In
april it started raining, the creek brought some more water, and I
installed my screen. Until then I had been running the new intake
without a screen, for a few weeks, while I got the steel and built the
screen.
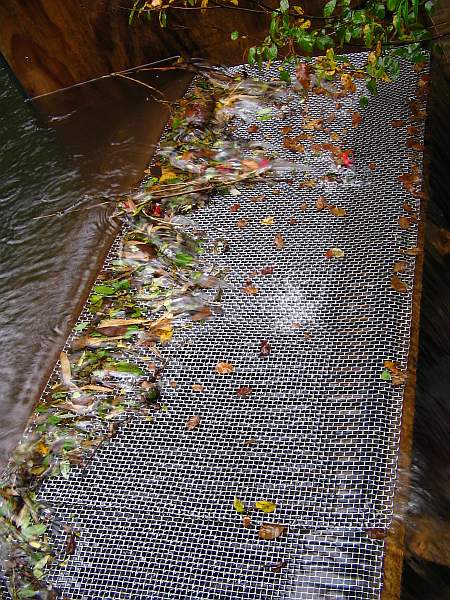
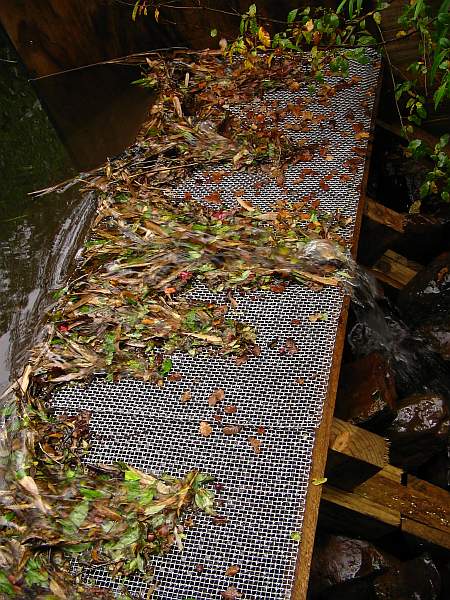
In this photo you can see the screen capturing all the water, while
debris accumulates on it, as expected. My hope was that if water found
the heaps of debris too high, it would push them overboard. One can
ever harbor hope, right?
If you twist your head to align it with the water level, you can see
how much (or how little!) slope the screen has. It's 5cm height
difference over it. The screen is 50 x 210cm. The stainless steel
screen is #4, that is one wire every quarter inch, with the wires being
0.8mm thick.
I had my doubts whether it may be better to place the screen fully
horizontal, so that as long a sthere is any overflow, the screen will
be flooded, keeping leaves from sticking to it. I then decided to go
for the shallow inclination instead, because I thought it would be
quite impractical to keep adjusting the gate so that the screen remains
flooded, despite the constantly varying flow rate of the creek.
And here is the unfortunate outcome of all that work: The water does not
push the debris overboard. The leaves and other stuff form a dense
layer that's watertight enough for the water to flow right over it and
go down the creek instead of into my intake, while the leaves happily
stay in place.
This was 9 days after installing the screen, in early autumn when the
leaves are just starting to fall. It can only get worse over the next
two or three months!
I still have hopes that when the creek has enough water again so that a
lot of water will flow over the filter, eventually the flow speed may
become high enough to wash away the debris and make the filter
self-cleaning. But I really would like it to self-clean throughout the
year, not just during the midst of winter!
One test I can still do is removing the stainless steel mesh, and leave
just the bars below. These are 3mm wide steel bars, set at 20mm
distance. They will still reject all big chunks of wood and large
sticks. But they may pass enough thinner sticks, and many leaves, so
that those sticks can lodge in front of the pipe mouth, the leaves then
sealing it off. And of course, the leaves will probably end up hanging
from the bars, and will block the screen just the same.
So, that's why I need help now, in the form of good ideas.
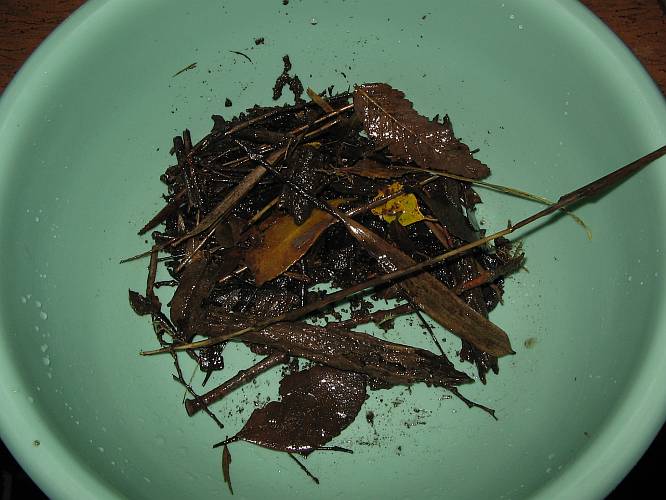
This is a sample of the stuff this creek brings in times of low flow. In times of high flow, large sticks and chunks
of wood are added, and also sediment in the form of dirt crumbs of all
sizes, from microscopic to about soccer ball size, complete with roots.
Many hair roots often come in the water, and the water gets very turbid during floods.
The biggest restriction for implementing a good solution is that I
really cannot get more head for the intake system. This means that all
screens that require high water velocity cannot be considered.
Another restriction is that there is no power at this place. Bringing
power here would require a 350 meter long transmission line through
dense forest, or else installing a solar panel, battery and regulator.
Due to the low head available between the intake dam and the forebay, a
picohydro system to provide some power is hardly feasible. Solar power
is quite restricted too, because the place is in a deep valley and gets
only about 3 hours of sun a day. Furthermore, in winter there is often
no sunny day for a full month! So panels would have to be dimensioned
to run on diffuse light from the clouds, and that needs big panels to
produce only a little bit of power.
I cannot build anything further upstream, because that's my neighbor's property. The limit is right where I built the intake.
All I ask for is some sort of screen that will reject sticks and
even larger things. It doesn't matter whether it rejects or passes
leaves, because the forebay's screen can take care of leaves easily.
Same thing for earth crumbs, hair roots, small sticks and the like. But
it should never clog, regardless what the creek throws at it, and
should not require frequent cleaning, better still it should
require no cleaning at all.
It has to be capable of capturing all the water, or very nearly all, in
times of low flow. Unless it removes all leaves and similar things too!
In that case it would be OK to leave the forebay running with no
surplus water, and let the intake filter have about 20% of overflow to
keep it clean.
Top flow rate needed in winter is 70 l/s. That's for 50 l/s through the
turbine, plus 20 l/s overflow at the forebay. But the actual maximum
flow I use normally in the turbine is just 30 l/s, with 40 or 50 going into the forebay . The rest is for
"future expansion", should I need to provide power for a second house,
or should it become possible someday to sell excess power to the grid.
The apron experiment

Following a suggestion by Fritz Oppliger, I installed a small apron
over a part of my filter, to see whether it helps, or makes things
worse. Such an apron will significantly increase the water speed over
the filter, hopefully being able to blast leaves away and keep a piece
of screen clear. The cost is some head, which in this case is
robbed from the filter, so that the total head used remains the same
but the filter area is reduced.
I cleaned the screen and then put this test apron on it. The sheet is held just by differential pressure.
Three days later, I went to see the results. Clearly, it doesn't work.
The leaves accumulate just the same, only that there is less surface on
which they can accumulate, so that the screen clogs faster. While the
non-aproned section of the screen still has some area left to
accumulate more trash, and still passes all the water it gets, the
aproned section is already wasting water. Despite the water jumping
fast and lively over the stuck leaves, it doesn't wash them away.
Test ended, results negative. Time for the next test!
The floater experiment
After cleaning away the accumulated trash, and following a suggestion
by Tony Goffe, I installed a floater upwater of the screen. I used just
a piece of wood rather than a capped PVC pipe, because I had it on
hand. It will probably soak up water and stop floating rather soon, but
maybe it lasts long enough for the test.
The left side of the floater is partially buried in the creek bank,
making a good seal, while the right side is loosely held by a piece of
wire, leaving about a 15cm wide water channel through which the
deflected floating debris should go.
I watched it in action for half an hour. It's a wind-less day, so few
leaves are falling, but the few I saw indeed were nicely deflected by
the floater, and went right where they are supposed to go!
For the time being I just left the apron in place, so all the debris
will accumulate in the lower right corner of the screen . That's fine
to see how much debris it is. If the floater concept works well enough,
I would cover the whole debris race with metal sheet, intentionally
loosing a well controlled fraction of the total water flow, but keeping
debris from accumulating and expanding onto the rest of the screen. I
will then also replace the wooden floater by a plastic one, that
doesn't soak and sink.
In I few days I will post the results.
And if I keep the floater, it remains to be seen what will happen
during a winter flood. I would expect the floater to capture lots of
large twigs and sticks, form a nest, and then somehow achieve freedom
and go down the creek...
Two days later: Indeed the floating leaves are obedient, and go
where the floater invites them to! A lot of leaves have accumulated on
the narrow portion of the screen where they go, clogging that small
section, while all the rest of the screen (about 3 times as much as
this photo shows) has remained unclogged, with only a few leaves on it.
The few leaves on the floter-protected area of the screen are mostly
those who fell right onto the screen, or into the water downstream of
the floater. But some leaves also arrive waterlogged enough to be
submerged, and pass under the floater.
Anyway at least 95% of the leaves are properly handled by this simple
device. This is good! The floater seems to be a keeper. I will
eventually replace the wooden beam by a PVC pipe, since the wooden
floater would eventually become a wooden diver.
I could install a sheet metal channel over the screen, where the leaves
go, to keep them from accumulating. But it doesn't seem necessary.
Without that sheet metal, the leaves take charge of sealing the screen
in that area, and the result is just the same, except that without the
sheet a little more water is captured, some of the time.
The apron was then removed, because the higher water speed it provides
was obviously doing nothing to better clean the leaves away.
There has been no rain in several days, and the creek's flow rate is
again getting quite low. So the current is slow, and some leaves stick
to the floater. It must be due to molecular attraction with the water.
I could observe an interesting phenomenom: When a leaf comes floating
down the stream, it starts being deviated sideway when it's about 20cm
upstream from the floater. Most leaves move roughly parallel to the
floater, at about 10cm distance, and then go through the narrow opening
at its end. But those leaves that happen to get too close to the
floater, get attracted, and stick in place.
This can be a minor problem, because leaves staying there will slowly
soak and get heavier, finally diving under the floater and ending up on
my screen. But it's only a minor problem really, because most leaves go
where they should.
Another two days later, the floater is still floating, and clearly
shows its worth: The screen area getting all the leaves has collected a
lot of leaves, while all the rest of the screen has only a few, and is
far from clogging. Most of the leaves on the protected area of the
screen fell down from the trees directly over it.
Autumn is in fulll blow now, about half of the trees are yellow/brown
and going bald fast (the others are evergreen ones). At the same time
there is little water, and the weather is quite cold, so I want all the
water I can get to provide power for heating. The intake screen is
capturing all the water, despite the large buildup of leaves at its
end. Of this water, I'm using roughly 70 to 80%, and returning the
excess from the forebay to the creek.
A closeup view of the leaf accumulation. The leaves slowly spill over
into the floater-protected area, and probably some are falling off the
filter when the water builds up and pushes them. Meanwhile, all or
almost all of the water is captured. This seems to work!
I did not clean anything manually, so I can observe how the system behaves on its own.
The creek's flow rate when I took this photo was 19 liters per second.
Winter is about to start, so I expect the first flood within a few
weeks.
And one more view of my intake structure, taken from downstream. Here
you can easily appreciate the heap of accumulated leaves, where
the floater puts them. Nice!
Two days later there was strong wind, and since it's autumn, massive
amounts of leaves fell into the creek. The floater deviated them to one
side, but the heap of leaves dispersed from there, covering about one
third of the screen.
This could of course be avoided by installing a race over the area of
the screen where the deviated leaves pass. But that costs some water.
As it is, instead, the system can still capture all the water, despite
the degree of clogging.
Some twigs also fell into the stream, and were promptly captured by the
floater. Then the twigs captured leaves, holding them for long enough
so they can soak full of water, and end up going under the twigs and
under floater, into the screen. This must have played a role in the
large area of the screen covered by leaves.
I cleaned the screen, and waited for things to come...
Another two days later I got a lot of rain. At last, the flow rate of
the creek got large enough that I have much more water than I need.
About two thirds of the water now flows over the screen, with the
remaining third going through the screen. You would think that this
should keep the screen clean? Not so! A lot of leaves have clogged all
the upper two thirds of the screen. Only the last third of it is
passing significant amounts of water. At least, that amount is amply
sufficient to feed the turbine, so water is welling back out of the
lowest 5cm of the screen.
The floater is now much less useful, because the heavy rain washed lots
of leaves into the stream, that had already fallen down long before.
They are soaked and partly rotten, and thus don't float on the surface.
Here is a detail of the debris collected by the screen. Lots of
assorted leaves in varying states of decay, some small chunks of wood,
and lots of fibrous stuff, that must be either hair roots or nervatures
of decayed leaves.
Basically the leaves accumulate wherever there is air under the screen,
while the areas in which the screen is fully immersed stay clean more
easily. This seems to indicate that placing the screen fully horizontal
would be best. But now winter has started, and there is too much water
to modify the intake system. Placing the filter horizontal will most
likely have to wait for next summer!
Another few days later, after torrential rain. It rained more than
100mm in one night, and in the morning there was a nice innocent blue
sky. The water level now stands 15cm above the upper edge of
the screen, which indicates a flow rate of about 200 l/s. The gate
regulating the flow into my tube is set at about 35 l/s - but I'm
getting barely 25 l/s through it, because the screen has
entirely covered with a dense layer of leaves and other debris,
and isn't passing any more water than that! I caught it just in time.
If I hadn't gone to the intake and cleaned it, after taking these
photos, I would have had a power outage later in the day.
You see? There is a big torrent of water flowing fast over the
screen, and the leaves seem like glued to the screen, because of the
rather small differential pressure! I had to work really hard
with a witch's flying apparatus, to unlock them. A single sweep is
definitely not enough! It does almost nothing.
So much for the ideas of a mechanized brush to clean away the leaves,
or for a water jet system. There is no way this would work!
Clearly, this setting of the screen does not work well. The
differential pressure through the screen must be made much, VERY MUCH
smaller, if we want turbulence and water friction wash away those
leaves!
Another view. Here you can also see the now useless floater, which is only serving to capture sticks.
And until now the sreen cloggers are just leaves... The real winter
floods, which also bring a few tons of sediment down the creek, haven't
even started yet!
Clearly this slightly inclined screen is not a good solution. But it's
better than what I had before! The old side intake would have clogged
in the middle of the night, during the intense rain.
I doubt that a screen like this, placed at a steeper angle, would be
any better. Because higher water speed doesn't seem to help at all,
as is evident in this photo, and gravity force acting on the
leaves is totally irrelevant when they are subjected to pressure
differentials and water flow speeds like these.
A fully horizontal screen might work better, because there would
normally never be any air under it, so the pressure differential
through the screen would be minimal.
The good thing of my wooden intake structure is that it can be easily
modified. But not while there are 200 l/s of water passing over it...
Maybe, a few years from now, I have found what works. Making changes in
summer, and then testing in winter whether they work. Or maybe I find
that nothing works!
Back to Implementing my
paradise.