When Provia turned blue
And what I did to get the correct colors back!
When Fuji released the new Provia 100F
film, I gave it a try and was hooked by its extremely fine grain, combined
with generally good performance. I made it my default film. All went well
for some time, but Provia 100F was never easy to get here in Chile. Supply
is erratic, and often outdated film is sold, at prices well above what fresh
film costs elsewhere. So I started importing my film from the US. Having
the film processed was another problem. Slide film use has been going down
in Chile, and at this time in my 120,000 inhabitant city there is no
single lab that would process slides! So I had to send the films to Santiago,
and often wait for a full month until getting the slides back!
That was bad enough. But one day I got a box of blue slides from the lab.
The sky was nice deep blue, but the clouds were light blue, the gray pavement
was bluish, the grass was green-blue, skin was a pretty funny but ugly pale
color, you get the idea... The entire film was screaming BLUE !!!
I didn't like that at all. I threw my slides into the trash can, and decided to never trust that lab again.
The next film went to a different lab. When it came back, surprise! Would you guess that it came out... blue?
It was at this time when I started suspecting that the film was from
a bad batch, or had been damaged in some way. But to discard the labs as
the reason for my Provia blues, I shot some test pics and sent that
film to the third and last lab. You won't guess how the film came out!
No, not blue! This time it was a greenish blue!
At least this hinted at the labs being indeed the source of the problem.
During a trip to Santiago, I visited them in person and asked the obvious
questions. Of course, sir, we use only fresh chemistry. Of course, sir, we use only high quality Kodak chemicals. Of course, sir, we care a lot for the proper temperature and pH. Of course, sir, we run test strips every day. Of course, sir, no other client has ever complained about bad colors. I showed them some of my slides. But these look very nice, sir, the colors are perfect!
Sure, blue clouds on blue sky. And blue grass. That may be good enough
for music, but not for photography! I reminded them that the worst kind of
blindness is not wanting to see, and left, pretty enraged, I must say.
I had heard that color film processing, and specially slides, was touchy
and quite complex. But I started to read about it. I learned that modern
E6 processing is a lot simpler than it used to be. Just to try, I had my
amateur radio friend Carlos, XQ2PPA/OK2PPA mail me a pack of Tetenal chemistry
good for six rolls, from the Czech Republic. After all, I had a Jobo tank
and spools, and could set up some temperature control.
The Tetenal kit arrived, the box pretty deformed and flattened during transport,
but the contents was fine. The instructions started with the recommendation
of using only stainless steel hardware, because plastic could adsorb traces
of the chemistry and contaminate the other baths. Oh well... my tank and
spools were plastic, and smelled of B&W chemistry. My photographer friend
Felipe, at that time still residing in Santiago, purchased and sent me a
100% stainless steel tank with two spools.
My first trial run of home slide processing was boldly done with films from
a vacation trip. After all, sending them to the "professional" labs would
likely ruin them, so I figured that I could as well ruin them at home...
I ran the process strictly as explained by the instructions that came with
the Tetenal kit. Temperature control was a bit handmade, timing was by stopwatch,
and agitation was by hand reversal every 15 seconds, which made me feel my
stupid arthritis.
When I opened the tank, I expected anything... But what came out was some
milky film, which was expected (it clears up while drying), but the black
looked black and the white looked clean white... I hung it up to dry, and
when it was ready, the slides looked perfect! No trace of a color cast! I
felt like a birthday kid!
I never learned if the blue results from the commercial labs were a product
of sloppiness, or if Provia 100F reacts badly to Kodak chemistry. Anyway,
I don't care now. The remaining slides of the trip were processed in the
same chemistry, and then I bought a 60-film kit of the same Tetenal chemistry,
which even was available in Santiago.
But I didn't want to spend an afternoon inverting the steel tank every 15
seconds, every time I had a few films to process. So I decided to build...
...a homemade semiautomatic Rotary Film Processor!
 Before deciding on building such a machine, I looked at what's available
commercially. There are many options, most of them made by Jobo, but a machine
with reasonable features is depressingly expensive! A simple processor which
is nothing more than a plastic tank, heater, thermostat, circulation pump,
and rotation device for the tank, costs 5 times as much as a fully featured
computer-controlled automatic laundry machine that has all these things and
several more, and is several times larger and more powerful! The prices seems
rudely out of proportion!
Before deciding on building such a machine, I looked at what's available
commercially. There are many options, most of them made by Jobo, but a machine
with reasonable features is depressingly expensive! A simple processor which
is nothing more than a plastic tank, heater, thermostat, circulation pump,
and rotation device for the tank, costs 5 times as much as a fully featured
computer-controlled automatic laundry machine that has all these things and
several more, and is several times larger and more powerful! The prices seems
rudely out of proportion!
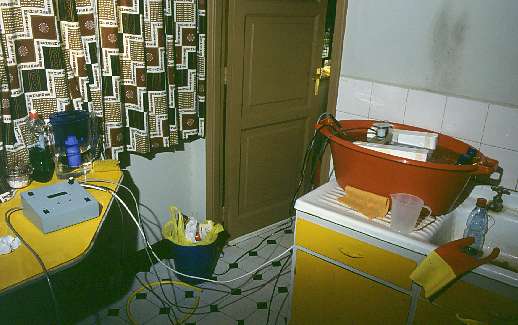
So, home brewing was in order, and the project was quickly executed. The
photo shows my homemade rotary processor on its first use. It consists of
two main assemblies: The red baby bathtub with heater, temperature sensor,
circulation pump, bottle holders, floating deck with the rotation mechanism,
is one. I place it conveniently on the kitchen sink. The other is the electronic
control unit, which sits on the desk at left, safe from water splashes.
 Most commercial processors lack the capability for providing tempered rinse
water. But all color processes require rinses with tempered water! So, the
poor guys who buy a 1000 dollar machine need to spend additional money for
their controlled warm water supply! To get rid of such a problem, I used
a 30 liter bathtub as a container, and simply take water from it for the
rinsing. To compensate for the falling water level as the processing takes
its way, the rotation device is mounted on styrofoam floats, cut from the
packaging of my latest computer, thus holding the tank always at the same
level of immersion.
Most commercial processors lack the capability for providing tempered rinse
water. But all color processes require rinses with tempered water! So, the
poor guys who buy a 1000 dollar machine need to spend additional money for
their controlled warm water supply! To get rid of such a problem, I used
a 30 liter bathtub as a container, and simply take water from it for the
rinsing. To compensate for the falling water level as the processing takes
its way, the rotation device is mounted on styrofoam floats, cut from the
packaging of my latest computer, thus holding the tank always at the same
level of immersion.
The plastic baby bathtub cost me a whopping 3 dollars!
I mix the chemistry in plastic half-liter soft drink bottles. I label them
simply with small scraps of masking tape: One scrap for the first bath, two
scraps for the second, three for the third - it's idiot proof, and the masking
tape is totally waterproof. The half-liter portions are good for 6 films,
and I use them up on a single day. The chemistry doesn't last long once mixed
and used - the first developer starts precipitating only hours after making
first contact with film! If the concentrates last long enough, I may be able
to use the full 60-film capacity of the kit, but that remains to be seen.
I would need the concentrates to last vastly longer than the promised six
months, in order to use them up. Anyway, I use butane gas from a camping
stove to displace air before closing the concentrate bottles. In the first
photo, you will notice the open door. It's because of the butane, and also
for the fumes given off by the chemistry, which are not very dense, but still
not exactly healthy to breathe.On the other hand, most of the time all containers
are closed. Only during filling and emptying the tank, can fumes escape.
 The stainless steel tank has no sealing, just metal-to-metal contact. So,
it leaks. And that's not nice. For that reason, I wrap the main joint in
electrical insulating tape. I use Scotch 33+, which is the best I have found,
and not only for this purpose. Highly recommended! It can be re-used many
times in this application. The tape not only seals the joint, but also eliminates
the risk of the tank opening due to a handling accident, and thus ruining
the films inside.
The stainless steel tank has no sealing, just metal-to-metal contact. So,
it leaks. And that's not nice. For that reason, I wrap the main joint in
electrical insulating tape. I use Scotch 33+, which is the best I have found,
and not only for this purpose. Highly recommended! It can be re-used many
times in this application. The tape not only seals the joint, but also eliminates
the risk of the tank opening due to a handling accident, and thus ruining
the films inside.
To seal the small lid of the tank, I made a silicone seal by pouring silicone
caulk into a polyethylene mold. Both this seal, and the electrical tape,
are external to the tank, so contact with the chemistry and thus the risk
of contamination is minimized.
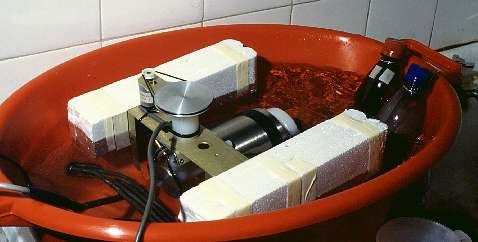
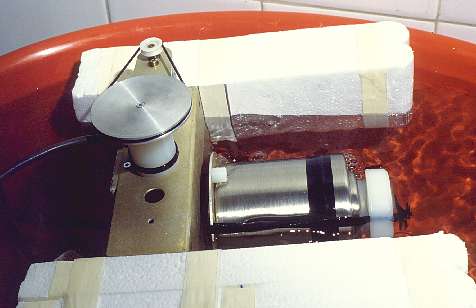
The rotation device is made on an old radio chassis. It uses a small tape
loading motor from an old VCR, while all the pulleys, axles, bushings and
the tank holder were made on my lathe. A two-stage belt reduction is used,
the lower belt running underwater and over two auxiliary rollers that allow
coupling the vertical drive axle to the horizontal tank axle. The vertical
drive axle allows to keep the water off the motor.
The tank is clamped to the rotating platform by the rubber-band-loaded
white plastic piece at the right, which has the precise shape of the tank's
lid and silicone seal. Mounting the tank takes half a second longer than
when using a magnetic mount, while dismounting it is much easier than with
a magnet. The mount is strong enough that the full tank can be lifted out
of the water by the rotation assembly, which is then held 90 degrees tilted
for easy tank handling.
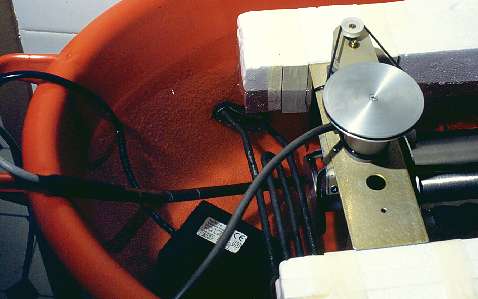 The black box with the label is the circulation pump. It's intended for indoor
fountains, and I bought it for around 15 dollars at a Home Center. It is
fully submergible and runs directly off line voltage - a reason to be very
careful not to damage its cord! This pump maintains a vigorous agitation
of the water bath, resulting in very homogeneous temperature.
The black box with the label is the circulation pump. It's intended for indoor
fountains, and I bought it for around 15 dollars at a Home Center. It is
fully submergible and runs directly off line voltage - a reason to be very
careful not to damage its cord! This pump maintains a vigorous agitation
of the water bath, resulting in very homogeneous temperature.
The snaking black tube is the heater. It's a 1950 Watt heater sold as universal
spare part in stores that service washing machines. It cost about 12 dollars,
and comes with its own expanding rubber seal, making it easy to obtain a
watertight fit. The power level may be a bit oversized, but that has the
advantage that the tub can be filled with cold tap water, and the heater
will quickly bring it up to working temperature. Once that temperature has
been reached, the high power is irrelevant, since the controller provides
fully linear phase control.
The rod with the cable coming from its end is the temperature sensor. It
uses a laser trimmed precision digital sensor, a DS18S20, that costs 5 dollars.
It's accurate enough to require no user calibration in this application,
and has a resolution of 1/16th degree Celsius. The sensor chip is immersed
in the oil that fills the copper tube, so it gets reasonably good and fast
thermal contact. Where the cable leaves the tubing, I pressed in a custom
made silicone seal, so no oil can seep out. A number of layers of shrink-wrap
stiffens the connection.
 The controller is based on a Basic Stamp microcontroller. It contains several
film processing algorithms in memory, which can be selected from a menu.
The controller performs temperature control using a proportional-integral
characteristic and full phase control of the heater, resulting in fast warmup
time with minimal overshoot, and stable processing temperature. The temperatures
do not need to be set by hand, but rather they are included in the program
for each process.
The controller is based on a Basic Stamp microcontroller. It contains several
film processing algorithms in memory, which can be selected from a menu.
The controller performs temperature control using a proportional-integral
characteristic and full phase control of the heater, resulting in fast warmup
time with minimal overshoot, and stable processing temperature. The temperatures
do not need to be set by hand, but rather they are included in the program
for each process.
It also controls the timing, displaying the remaining time for each of the
chemical baths, and beeping when the time is over. The wash cycles are not
timed, giving the user time to do them as he likes, rather than becoming
a slave of the time machine!
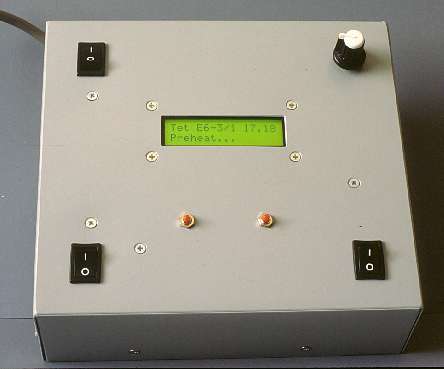
The rotation can be controlled by a switch (lower right), and the speed is
adjusted by the knob on top from about 20 to 70 rpm. The rotation sense reverses
every 30 seconds, with 1 second stop time in between.
The lower left switch controls the circulation pump, while the top left switch
is for main power. The two red pushbuttons have the functions of select and enter
while using menu functions, but both perform the same function when starting
the timing of a bath, so it doesn't matter which one you press!
The display as pictured here tells us that the selected process is Tetenal
E6, 3-bath, first pass, that the temperature is 17.18 degrees Celsius, and
that the process control is in preheat phase (of course, at that low temperature!).
The top line always keeps indicating a reminder of the process, and the current
temperature, while the bottom line tells which phase is running, how much
time remains in the current phase, and what has to be done next. Pretty idiot
proof. I made it for my own use, after all... :-)
An additional nice feature of this controller is that it can use a 12V battery
for backup, so that a power failure will not result in ruined slides. While
the chance of a power failure during processing is slim at my location, it
gives peace of mind to have that battery backup!
If you want to build your own processor based on this design, you can access
the construction article for this controller in the
Electronicus section, complete with the schematic diagram and the control
software. But be warned that this device uses several electrical devices
submerged in water, and you may well find yourself with one hand in the tub
and the other hand grasping a grounded water faucet. This creates the single
most dangerous situation you can possibly come across in the electrical world!
If you want to build such a processor, it is mandatory that you know what
you are doing, and that you do it right. That includes bonding all metal
pieces, sound earthing of the whole system, and the use of a fault
current protector (differential switch) in the circuit that's powering
this processor! Your life can well depend on it. I'm not the kind of guy
who warns everyone about all the stupid things they can do to kill themselves,
but in this case the warning is in order, because this project is specially
treacherous if incorrectly executed. Properly done, there is no risk. Last
time I checked, I still was alive!
How good are the results, you may ask? Well, the photos on this page were
scanned from slides developed in this machine, right after taking them. The
scans may look less than perfect, as the scanner is a pretty aged low-end
device, but I give you my word that the slides are excellent, with deep clean
blacks, the start of the film is completely transparent, the gradation
is rich, the colors are saturated and neutral, the grain is fine, there is
no dust (this was a real problem with several of the "professional" labs!),
and consistency over each film, and from one film to the next, or from one
session to the next, is impeccable. I'm really happy with home processing,
and with Tetenal chemistry!
And the cost? Chemistry, water and energy cost about 70% of having the film
developed by a lab. If I add the time (1 hour for 2 films), it ends up more
expensive, but hey, it's my leisure time, and that's free! And mounting the
slides at home costs 1/4 as much as having them mounted by a lab, and the
work is more carefully done, I assure you...
Back to the Homo ludens photographicus.