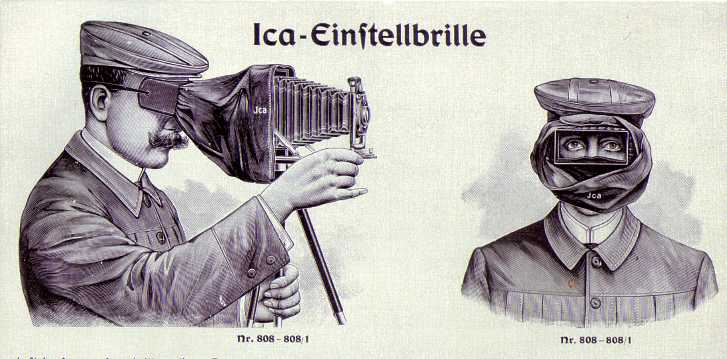
The best way to use a bellows camera was, and still is, the one pictured here. A matte screen was installed in place of the plate holder, and using the focusing goggles model #808, the photographer could set up the camera for the exact desired composition, adjust focus, judge depth of field, and so on. When ready, he would pull the aid off the camera, remove the matte screen, install the plate holder, and trigger the shutter.
The mustache was of course a basic feature of every self-respecting
gentleman of the time!
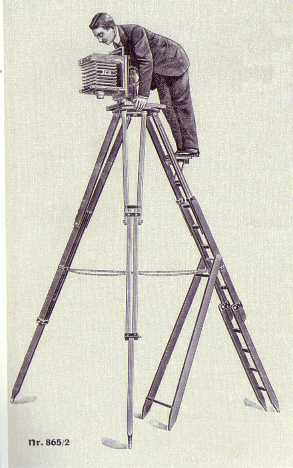 The Ica catalog has
several pages devoted to tripods. They came in all sizes and qualities,
and were made of ordinary woods, exotic woods, brass or steel. Telescoping
legs had up to seven sections. Some tripods could be disguised as walking
sticks, others as umbrellas. Some were extra-solid, others extra large,
still others were resistant to tropical climates. But the tripod I liked
most, by far, is this one, designed to enable a photographer to make bird-view
shots!
The Ica catalog has
several pages devoted to tripods. They came in all sizes and qualities,
and were made of ordinary woods, exotic woods, brass or steel. Telescoping
legs had up to seven sections. Some tripods could be disguised as walking
sticks, others as umbrellas. Some were extra-solid, others extra large,
still others were resistant to tropical climates. But the tripod I liked
most, by far, is this one, designed to enable a photographer to make bird-view
shots!
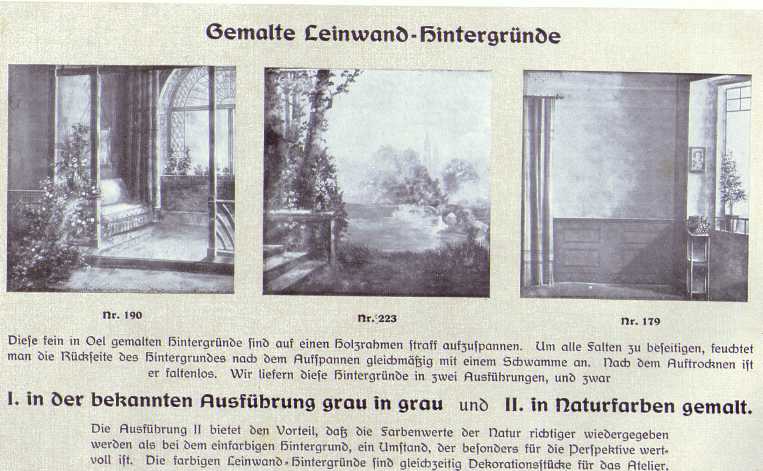
Considering the weight of 1913-style cameras, I can understand that photographers preferred to invite their clients into the studio for a portrait, rather than taking the camera out. But a flat wall is unsuitable as a background for a quality photograph of Uncle Robustus! So Ica offered oil-painted backgrounds for the studio. They came on folded canvas, and the customer had to moisten them and nail them onto a wooden frame. While drying, all the wrinkles flattened nicely.
These backgrounds were offered in two versions: In gray tones, suitable only as backgrounds; or in full color, which was more expensive but allowed to use them as decoration too! Both versions were carefully shaded.
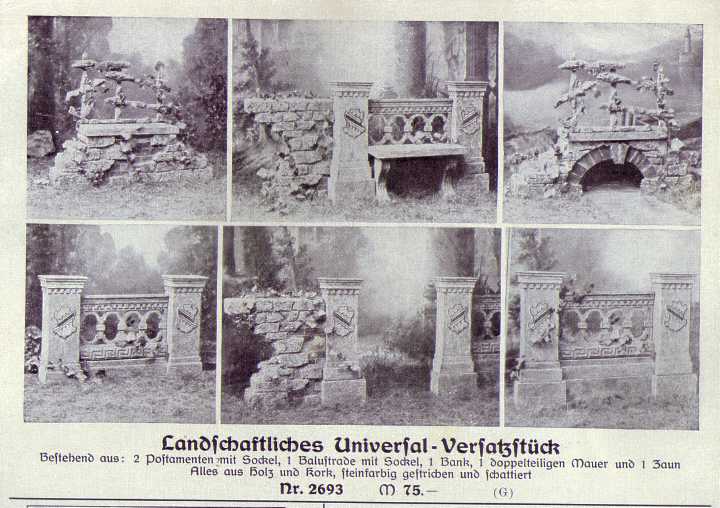
But painted backgrounds alone were not enough: For 75 Reichsmark, Ica could sell you a set of objects to be used around your victims during portraiture work! This set of two pillars on sockets, one balustrade with socket, one bench, a two-part wall and one fence was made of wood and cork, painted in the color of stone and carefully shaded. It could be set up in any required way, in front of a painted background.
When you watch photos of your ancestors sitting among such utensils
in a gorgeous landscape, keep in mind that both the utensils and the landscape
could be ordered straight from a catalog, and that only the ancestors were
real!
Film was not nearly as common as plates. Only one page was devoted to film! It could be bought in packs or blocks, with one individual sheet for each exposure, much like plates. It came in the same sizes too, up to 13x18cm. The price was more than twice that for similarly sized plates.
Roll film was available in widths of 64, 66, 71, 88, 93, 100, 118, 130, and 182mm. So much about standardization! The cost was about the same per picture as that of flat film, so it was over twice as expensive as using glass plates.
With photographic papers a similar situation happened as with glass plates, but paper cost only about a quarter as much as plates. It was available in glossy and satin versions. Most papers were thin, and required framing or at least being glued against some backing, but some strong papers were available too. There were special papers that allowed pulling off the coating. Most pictures in that time were gold-toned, and for this purpose some self-toning paper was sold that didn't require the toning bath.
A special paper for gas light processing came in 13 versions. These were combinations of matte, satin and glossy finishes, hard, medium and soft gradation, rough or smooth surface, and thin or thick backing. Of course, a lot more combination were possible and could be specially ordered in suitable quantities! Silver bromide paper was available too, in 11 different versions.
The above considers only the papers made by Ica. But they also distributed papers made by Schwerter, Kurz, Kraft&Steudel, Lenta, Rembrandt, and others. All taken together, you could order roughly 90 different kinds of paper from stock, and each in at least 8 different sizes!
Darkroom chemistry was available as individual chemicals; also as ready mixed developers, fixers, intensifiers, softeners, toners, bleachers, stoppers; and as complete kits for specific purposes. Ica made many of them, but they also sold third-party products.
Of all plates, papers, and chemistry, two items specially caught my attention:
 This is a kit for
making color slides. It contained two dozen glass plates with paper-type
emulsion on them, on which the user would make contact copies of glass
negatives; the special developer and fixer; 20 thin cover plates that would
be used to protect the emulsion on the developed slides (they assumed you
would loose at least 4 of the positives); 100 adhesive-coated black paper
strips to join each photo plate to its cover plate (the excess probably
accounted for glue strips that came off); 100 masks with a selection of
shapes, so you could chose the ones you wanted; and the best: A palette,
three paintbrushes and 7 jars of glossy paint for doing the coloring work!
This is a kit for
making color slides. It contained two dozen glass plates with paper-type
emulsion on them, on which the user would make contact copies of glass
negatives; the special developer and fixer; 20 thin cover plates that would
be used to protect the emulsion on the developed slides (they assumed you
would loose at least 4 of the positives); 100 adhesive-coated black paper
strips to join each photo plate to its cover plate (the excess probably
accounted for glue strips that came off); 100 masks with a selection of
shapes, so you could chose the ones you wanted; and the best: A palette,
three paintbrushes and 7 jars of glossy paint for doing the coloring work!
An "Instruction manual for the production of lantern images based on
your own photographs" was also included.
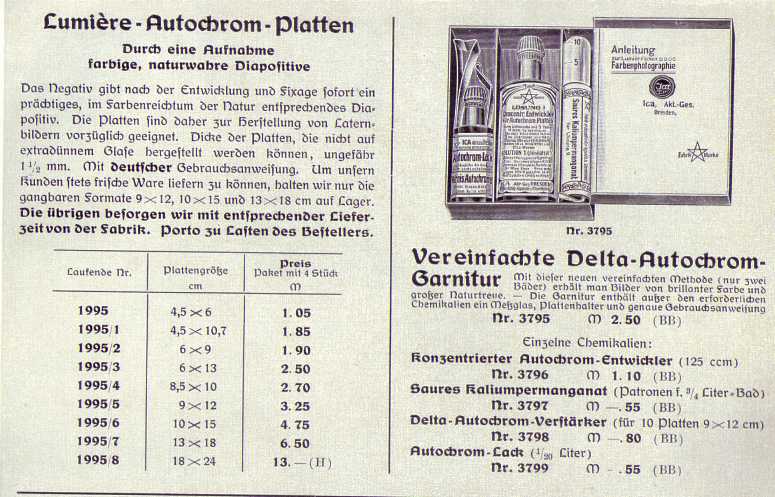
And this is quite different: This is real color photography, in 1913 style! The Lumière Autochrome process was simple enough to be used even during a voyage, and directly produced positive transparencies on glass plates, in reasonably natural colors! The process involved only two baths! A yellow filter was required during exposure. The shelf life of this material wasn't long, so Ica stocked only the most common formats, backordering the less common ones from the French manufacturer, on customer's requests.
The cost for color photography in 1913 was stiff: About 6 to 7 times
as much as for black&white negatives! Despite this, it was attractive
and widely used. The well known National Geographic Society equipped its
photographers of the time with Autochrome outfits, and sometimes they look
through their archives and publish an old Autochrome picture or two in
their modern magazine! Certainly, Fuji Provia 100F is better, but the old
Autochromes were impressively good, considering the time they were made,
and how much they must have faded before we get to see them!
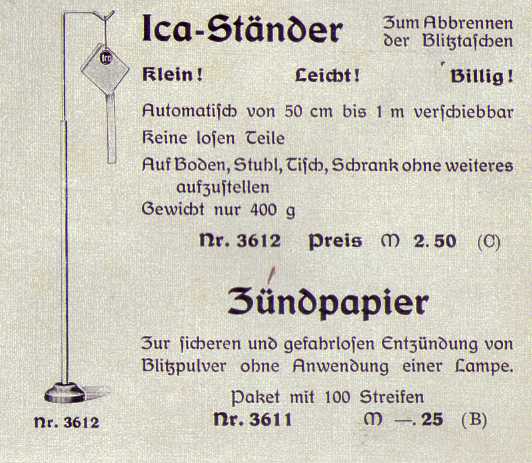 Welcome to 1913-style
flash photography! To make a flash exposure, you first set up the camera
and your victims. Then you hung up such a paper bag from this support,
which could be placed on the floor or on a table. You filled the bag with
the right amount of flash powder, depending on how much light you expected
to need. Then you put out all lights, asked the people to stand still,
and opened the camera shutter. Then you lit a match and set fire to the
bag's tail, or used the special igniting paper strips for the same purpose.
Then you ran.
Welcome to 1913-style
flash photography! To make a flash exposure, you first set up the camera
and your victims. Then you hung up such a paper bag from this support,
which could be placed on the floor or on a table. You filled the bag with
the right amount of flash powder, depending on how much light you expected
to need. Then you put out all lights, asked the people to stand still,
and opened the camera shutter. Then you lit a match and set fire to the
bag's tail, or used the special igniting paper strips for the same purpose.
Then you ran.
A second later, the powder exploded. If the load was right, the support
would fall over, but not be damaged. Too large a load could make the camera
fall over too, or blow out a window. In any case, you had to run back to
the camera through the smoke-filled room, and close the shutter before
your shocked victims lit the room lights!
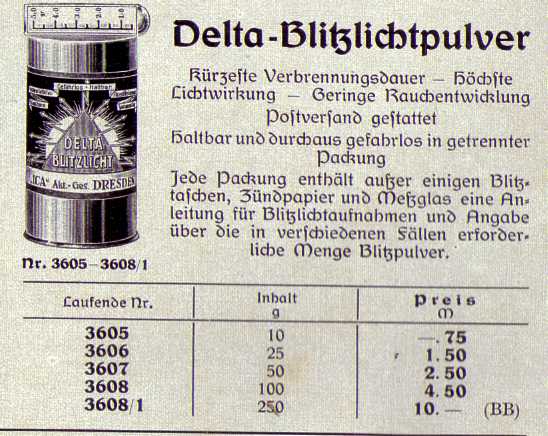 The flashes
came packaged in a can like this. The kit included the flash powder separated
into two parts, so it was safe to ship; some paper flash bags, ignition
strips and instructions.
The flashes
came packaged in a can like this. The kit included the flash powder separated
into two parts, so it was safe to ship; some paper flash bags, ignition
strips and instructions.
I guess that the flash powder was simply gunpowder with an aluminum or magnesium load, but I would like to hear of people who know the true recipe.
Instead of using paper bags, the powder could also be burned on a special
flash lamp, which had the shape of a sardine tin (and probably was one!).
But an uneven powder load could transform it into a cannon ball, or too
large a load could make it behave like a grenade, so I understand why the
more safety-conscious photographers preferred the paper bags!