
Four months behind schedule, finally the construction of my round house has started. Why round, you might ask? Well, why not round, I might ask back! A round house has distinct advantages in terms of thermal insulation, and structural stability. Given that the winters here are cold, and I want to keep the house comfortably warm using only the power my microhydro plant can deliver, I need excellent insulation. That alone is reason enough to make the house round.
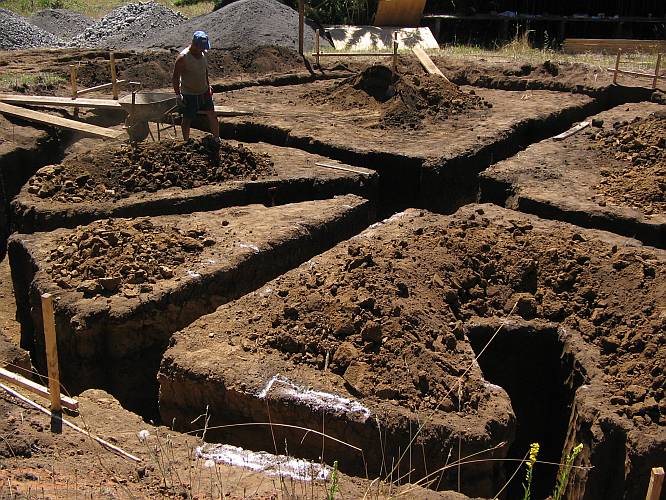
Here the building site has been staked out, with the height of the stakes marking the horizontal plane.
This machine dug the platform in about 10 hours. The earth was deposited 40 meters away, behind that tree that's behind the machine, where it does not cause trouble.

The first truck with gravel is arriving!

Unfortunately, this first delivery of sand and gravel I got was of very poor quality. It was all mixed, and contained a large quantity of dirt.

I put a sample in a bucket and put some water over it. Here you can see how the mud flows out! This material is unusable! I complained, and the next truckloads brought decent material.

And here is the first load of steel bars. We will still need some more.

The trenches for the foundations are 110cm deep. This rather large depth was thought necessary, because the ground is very soft. The wall foundations will be 50cm wide, and the pillars will rest on square pads varying in size according to the load on each pillar.
Pouring the concrete into the trenches for the lowest roots of my house.
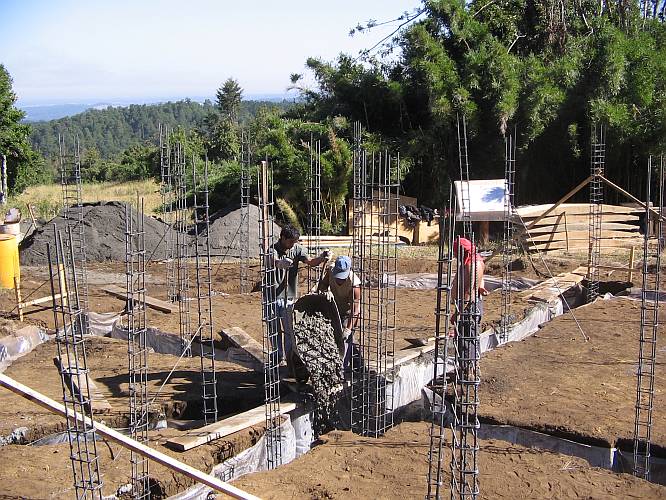
When this concrete had set, the steel structures were installed .

After installing the moulds (with round shape and all) around the steel, it was back to concrete pouring.

The concrete was mixed on site, because the place is too far away from a city to bring in ready-mixed concrete. The mixer got a brand new gasoline engine, because its existing electric motor did not run with our 2kW generators, and my water turbine is still not online!

The seventeen thousand bricks have arrived!

And soon the first of them were put to good use.

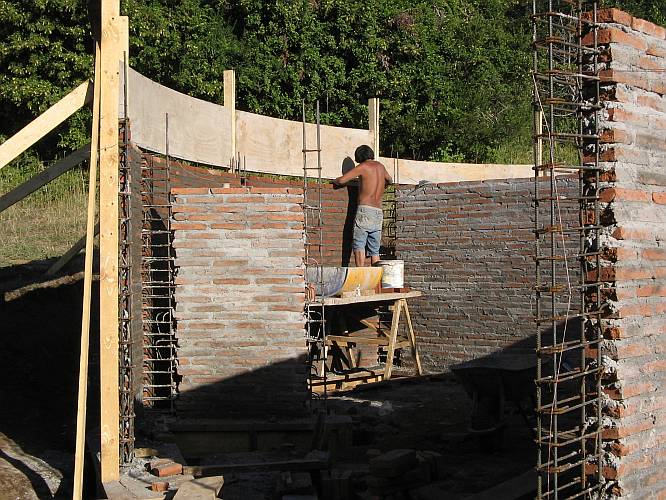
This is probably the photo my friends wanted to see most dearly: The round brick walls are being built! Some people told me that couldn't be done... Of course it can be done, and it isn't even difficult! The masons enjoyed this job, because it was getting a step outside their usual routine!
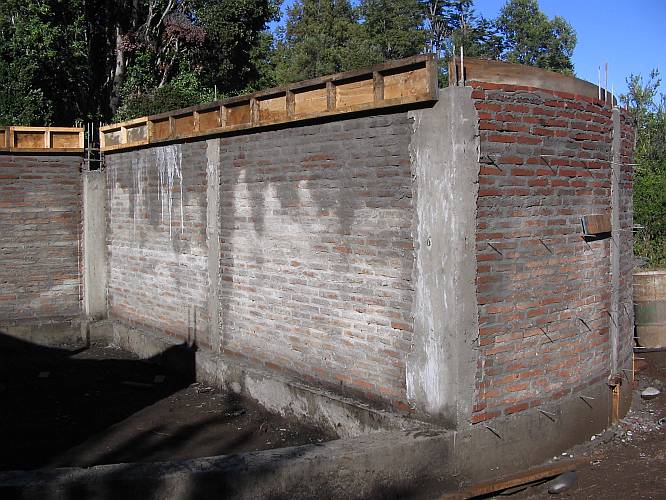
The bricks walls are standing, now the concrete pillars have to be filled.

And after filling the pillars, the workers immediately started making the wooden form for the concrete floor atop them.
This form was made from plywood supported on thick pine beams, which were mounted on wooden pillars, much cheaper then renting steel structures. The same wood parts will be re-used for the concrete ceiling. Here's the first vie ever of my living room!

Here you can appreciate my beautiful round house, as it was in april!

The steel specialists came to do their job quickly, and since the days were getting short, they worked deep into the night, under the shine of a metal halide lamp.

At last, the concrete is being poured!

It took two days to do this job, but after working into the night and then starting early the next day, the concrete should still set as one piece. The low temperature helps in this, as it slows down the setting. In this photo, the job is almost done!

The finishing touches. Later on, a finishing layer of fine concrete will be added over this coarse and rough structural layer.

As soon as the concrete has set, the masons went to work building the internal (straight) brick walls for the living area. They made three walls, fast, to get as much done as possible before the bad weather came in. They finished the third wall late in the evening, and by midnight we got a huge storm. Here is the sad result! The free-standing brick wall, with still wet and soft mortar, could not withstand the gale.

Two of the three wheelbarrows were among the victims. They were quite a bit flattened. The third one escaped, to serve as a witness to the amount of rain that poured down that night!

The wreckage was taken away, and it was decided to build the internal and external walls at the same time, more slowly, to give the layers of mortar more time to set.

So, slowly, three brick layers at a time, all around, the house is growing, and it resisted the next two storms without further damage.

The brick walls are almost ready.

A view of one corner of my soon-to-be living room.

And a view out of the other living room window, onto a roble tree in autumn colors.

Meanwhile, the fine sand for the stucco work is arriving. Slowly but surely we are running out of room for all the material! The more the house approaches completion, the more material is waiting to be processed, it seems!

All walls being ready, the wooden form for the ceiling is started now. At the same time, the walls of the first floor are being rendered, on the inside only, of course, since the outside will be covered with insulation and siding.

The wooden form for the ceiling concrete is ready. So is the long ramp over which the concrete will be brought up, by wheelbarrow. Atop the structure, the "ironmen" are trying to understand the layout of the rebar.

They understood it. Here it is, almost ready.

One tiring day later, the concrete has been poured.

As soon as it had set, construction of the roof structure began.

The eight main beams will be joined at the midpoint. For this purpose, a steel star was needed. And I requested this star to have a vertical projection going through the roof, to serve as safety anchor, antenna holder, lightning bar, and perhaps some additional use. We purchased the steel sheets cut to shape, and I welded them together. So if the roof collapses, it might be my fault... Here is the star, drying the anticorrosive paint. Doesn't it look like a rocket, ready for takeoff?

The first of the main beams is in place!

More beams are added.

The area under the roof will not be used, at least for now. But if I marry and produce a dozen kids, this place can be enabled as additional living area, and will have the best view!

Late afternoon at the roof...

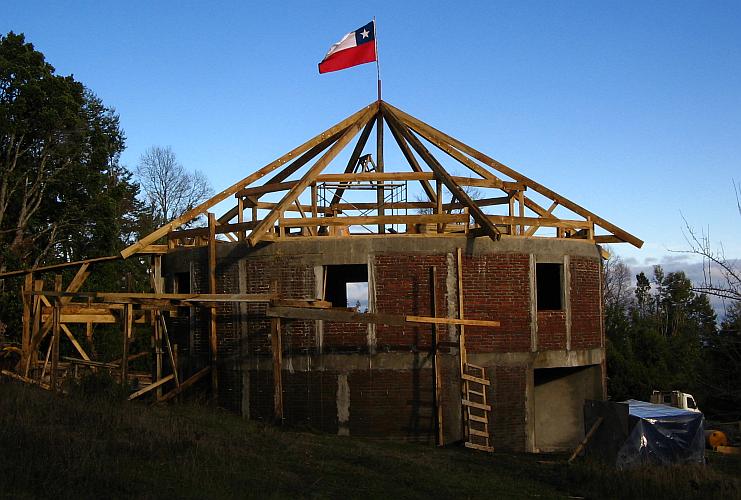
All main beams are in place, and the flag is flying, fulfilling an old tradition for newly built houses! In this way, the vertical tube of my steel star got its first use!
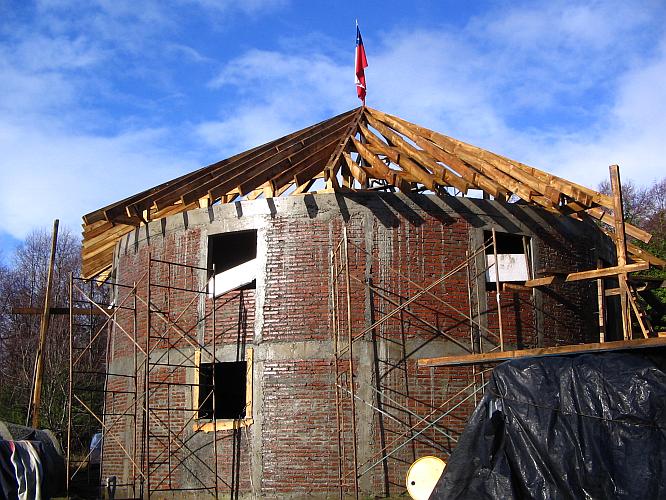
The roof structure is being filled out with the secondary beams. Note the wet walls. While most photos were made in good weather, most of the work progressed during rain, storm, icing, and at temperatures around the freezing point. It's mid winter. The white panels in the windows are intended to fend off the rain. While the roof construction continues, inside other workers are trying to render the walls, and the mortar is being washed off the walls by so much rain!
Here you can see one of my mortar throwers. The rendering is done using the ages-old ballistic method. This guy has owl's genes. He loves to work by night.

The roof structure is ready, except for some apertures left open, to pass the OSB boards through them.

Doesn't it look nice? Sometimes I think I should have covered this with transparent polycarbonate sheets, and used it as a solarium! But behold the heat in summer...

Our brave soldier stands by the waving flag, on the very summit of the roof.

The first OSB boards are being installed.

And then they were quickly covered with underlayment and asphalt shingles, trying to keep the OSB boards protected from the approaching rain! Still, they got wet a few times. In this time of the year, we rarely get more than one rainless day per week.

One eight of the roof is ready! This is actually the first part of the house to get its final look. Everything else seen until now still has to be covered by one or more layers of something else.

Did you notice that the windows grew a bit taller over the last several photos? If not, then you aren't watching my pictures with enough attention! Someone made a mistake and the windows ended up much smaller than what the plans said. So they had to be cut to size with a diamond saw...
When the roof was fully covered, metal straps were installed along the joints. These might help with waterproofing when there is high wind, but the main reason for them is some degree of lightning protection.

These straps were then covered by asphalt tiles too.

The rainwater will simply fall from the roof. Any more sophisticated rainwater collection system would probably become clogged with leaves, and get damaged by snow. But around the house a drainage system was made. First a layer of geotextile was deployed.

Patricio is soldering the water supply pipe. The large red worm is a drainage pipe for rainwater, with little holes in it.

The drainage pipe was surrounded with gravel and rocks. I hope this will not clog, and will keep the feet of my house dry! The drainage pipe connects to another pipe that simple ends downslope on the grass.

Every good house needs a good celebration, when the roof is ready! It keeps the workers happy and motivated. Normally this is done in the form of a barbecue, when the roof beams are in place. We delayed it until the roof was ready, but then... well, see!

A VERY happy worker...

After the roofing celebration, we promptly ordered a deft snowstorm, to duly test the new roof.

The snow gone, the house got its warm underwear. Ten centimeters of fiberglass insulation, applied in two overlapping layers, covered with Typar housewrap.

Omega-shaped profiles were installed in vertical orientation, at 60cm distance between them. They were bolted to J-bolts embedded in the mortar of the brick walls, and their tops were bolted to a support angle attached to the roof.

The eight Omega pieces closest to the roof corners are also used as lightning conductors, grounded in star fashion using three wires each.

Under the roof, the metal straps connect to these Omega pieces. All this is a very light duty lightning protection system, but it's better than having nothing. Since there are tall trees nearby, it's likely that any nearby lightning will discharge mainly into these trees, but it's good to protect the house from the lateral discharges. Usually in Chile nobody ever builds any lightning protection into a house, so mine is at least far better than the average! But probably it will not protect much from a direct strike.

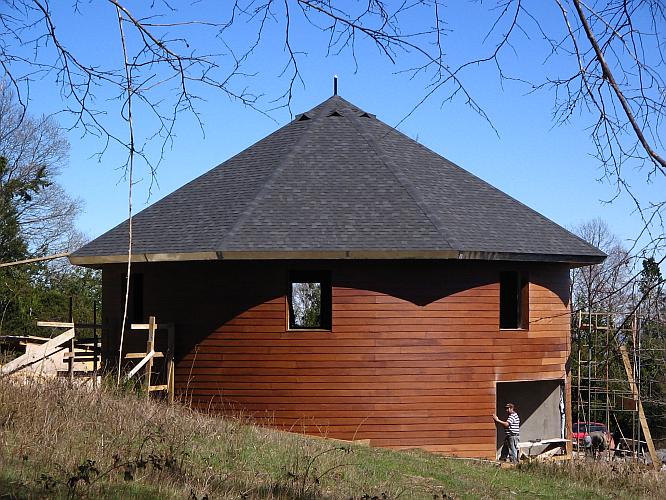
And now, at last, the house is getting its skin! It's made from pre-painted fibercement boards, which unfortunately try to emulate wood. I wanted to avoid using buiulding material that tries to look like something it isn't, but with the siding I had no choice: ALL siding materials I can buy try to look like wood! So, unfortunately, my house is wrapped in faked wood. It doesn't look too bad, but I would have preferred something different.

The bulk of the siding has been installed.

The window and door cutouts got fibercement planks screwed onto metal angle stock as a finish. The roof overhang was also finished with this material.

The finishing touch of the roof: A nicely turned cap for the center mast! This mast is a safety device, to engage safety ropes when climbing the roof.

Hey, this is starting to look like a house! A portion of the siding already got its second layer of paint.
The siding is complete and fully painted. Now we need windows! They are being made while I write this.

It is slightly inconvenient to get into the house balancing over wobbly plank ramps. So the construction of the stairs was undertaken next.

The stairs are ready, fitted with temporary steps, the steel part nicely painted, but... ops! When measuring, don Patricio forgot that the steps aren't infinitely thin! So they all ended up one step thickness too high, which makes the first step larger and the last smaller than the rest!
Who was the wise guy who recommended to measure twice and work just once? Might he be right?

Still, the stairs were provisionally put in place, to be fixed later... And meanwhile the concrete access ramp was built. It stands on two curved pillars, true to the theme of the round house.

The door was made from steel extrusion and sheet, for safety. It will be covered by fibercement on the outside and wood on the inside, with an insulating foam filling the voids.

Then the stairs structure was cut apart and welded again, in a more correct configuration. I say more correct, because it isn't completely correct! This time the steps ended up too much forward!
The side beams curved so much under the repeated welding that they had to be gently bent back into a straight shape, compressing them with an hydraulic jack under a beam of the house, and heating them to red hot.

The door too ended up in a harmonious curve, which unfortunately was in the opposite sense as that of the house... Here we see noble efforts and delicate tools, aimed at returning it into a somewhat straight shape!

During construction work, the material, debris and trash kept expanding, covering more and more area. Now it's time for the cleanup work. Once the area is free of concrete debris and reasonably free of rocks, the grass and other vegetation can grow back. In some places the layer of debris was over 40cm thick.

All trash that can be burned, was burned. It's still the easiest way to get rid of it. We had tons of timber residues, paper sacks, etc.

But my hopes that at last the dirty phase was coming to an end were in vain. The plaster master came, to dress my ceilings and walls in a nice, smooth layer of plaster, and there I learned the very definition of the word "messy"! Way over half of the plaster ends up where it shouldn't.

But along with making a tremendous mess, the plaster master artfully embellished my house with some plaster moldings, which add a sort of elegance to my otherwise rather unadorned house.

Something strange happened while the plaster master was at work. My house started getting populated! One after another, inhabitants started to show up! This one lived on the wall of my soon-to-be bedroom.

While this one, exhibiting pinocchean features, was caught in the living room...

...and the third seemed strangely familiar to me!

This elegant and sophisticated hand cleaning device was installed just at the side to the main entrance door. It will provide much usefuls service whenever I enter with dusty or muddy hands!

The tiling of the bathroom is being done.

And after gluing on the tiles, they have to be sealed. A messy business, just being started here!

In the kitchen, we even added a little bit of art! Note how high the tiles are, relative to the man. The reason is that they are high enough to allow mounting the working surfaces at a hight comfortable to me, and that the gentleman in the photo is about half a meter shorter than I am!

Three doors have been installed. The others have to wait. We ordered all six, of course, but unfortunately the provider sent three good doors, one damaged, and two of a totally different brand and model! When we complained, he said that he just didn't have six good doors of the same model in stock. And when would more doors arrive? He didn't know.

A round house deserves a curved garage door, right? Moreover, a well insulated house with the garage built in deserves a well insulated and airtight garage door. So far this has been the biggest challenge to don Patricio! He was close to throwing the towel on this. It seems that steel bends in any unexpected direction when it is welded. They had to try and fit and fix the pieces many times over.

It's definitely not a good idea to weld all these joints in one run, and then try the fit. After they had done the 4 main curved bars with totally wrong shape, and re-done them again with wrong shape, and were close to seeking specialist help, I talked them into cutting it up again, but doing just one section at a time, cooling down the steel, measuring the deviation, then welding the next section, and so on. This worked.

With the frame ready, the garage door was sheated in steel on the outside and plywood on the inside.

Between the steel and the wood, a filling of polyurethane foam was applied. This proved tricky, because the foam expanded very slowly at first, formed a hard barrier, and then continued expanding from the inside, warping the plywood.

After a long wait, finally the windows were delivered. Well, almost! The first floor window had a totally wrong size (40 cm off!) and couldn't be installed.

Also, one of the double glass panels has an ugly deep scratch. They promised to bring the correct window, and replace this panel. Let's hope it happens this year...

Meanwhile don Patricio completed the garage door! He proudly snaps some pictures. It's the first curved door he built!

At last, my faithful car can lodge under a roof and protected by walls and a door!

Meanwhile the workers are completing the front door.

Installation of the shower faucet proved to be a bit problematic. The old technique of installing pipes without measuring, and then bending them into position, was firing back. With a 15 degree difference between the center lines of the pipe connection, no combination faucet will fit!

So, off went the tiles, the wall was hacked open, the pipe bent into a different shape, the hole filled with mortar, the tiles reinstalled - and still it wasn't right! It took THREE iterations of the process. It's the Chilean way of doing things...

Anyway, don Patricio and his gang completed the task! Two and a half months overdue, they finally packed up their stuff!

Of course, before leaving, a last photo of the core crew had to be taken. Our young soldier, son of one of these guys, is missing in the photo, because he didn't come the last week! He would have deserved appearing in the picture too.

Before leaving, they even built a nice little porch, so I can open the door without getting wet when it rains. But I could not get them to really clean up the area around the house. It seems that they just don't see the debris and trash.
And the first floor window still hasn't arrived... A wooden frame with plastic lining does its job.

So, now one of my tasks is cleaning up roughly 1000 square meters of heavily polluted soil. Like here, where you can see brick rubble and mortar residue almost totally covering the soil. It will take me some time cleaning up all this. It has to be done basically with fingernails and patience.

Inside, I have to do a lot of finishing work: Painting, installing carpets, building closets and kitchen furniture, and installing the electrical system. But first, I have to dry the house. Having been built in winter time, the walls are still soaked. Minutes after the windows are closed, the relative humidity inside is 100%. The wind alone is not enough, I need some heating. But I don't have much energy available for that. So I installed a large blower in the attic, and a plastic hose of one meter diameter, to blow the sun-heated air down into the first floor. This is working well! Each day the house is a little bit drier.

But this came too late for the doors! In the high humidity, they deformed and two of them cracked! To rescue what can be rescued, I dismounted the doors and placed them horizontal, loosely wrapped in plastic, to let them equalize their moisture.

Then I stained and varnished the frames. This I had to do before any further work, in order to seal the wood pores and keep them from absorbing dust. Most of the wood reacted differently from the sample on which I had tried the stain, ending up significantly darker than desired. Specially here in contrast with the white plastered walls, the frames look very dark indeed!

But close up, under strong light like the camera flash, the beauty of this cedar wood shines!

Now I have to repair some little details in the plaster coat, such as this, and then comes the time to paint!

For that job, I already purchased about 130 liters of paint, and some other supplies.

The paint job was completed, carpeting too, and the electrical installation, but I still have to build all the closets, some kitchen furniture, make the definitive stairs, railings, and lots of other things! Since this is a lot of work, I hope you will understand that I'm not updating this page anymore...!
Back to Implementing my paradise.