General Electric HE-740
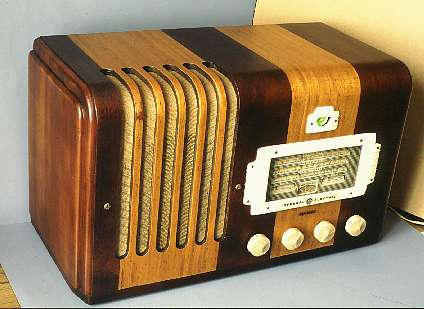
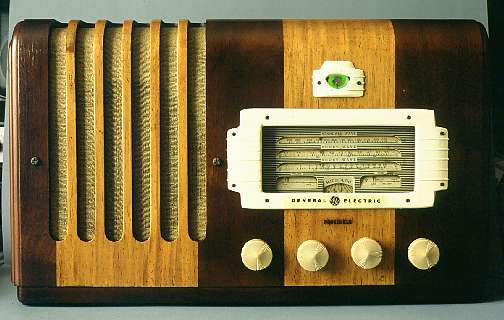 This is my second General Electric radio, an HE-740 export model, serial
number 10614. This photo shows it after restoration. It's an AC-DC radio
that uses two ballast "tubes" (octal based resistors), and has a pretty
good circuit intended to be sensitive and selective enough for good shortwave
performance.
This is my second General Electric radio, an HE-740 export model, serial
number 10614. This photo shows it after restoration. It's an AC-DC radio
that uses two ballast "tubes" (octal based resistors), and has a pretty
good circuit intended to be sensitive and selective enough for good shortwave
performance.
It uses an 6SK7 as RF preamp, a 6K8 converter, 6SK7 IF amp, 6SQ7 detector
and audio preamp, and a 25C6G audio power amplifier. A 25Z6 rectifier and
a 6U5 tuning eye complete the lineup to make a seven-tube, higher middle-class,
fairly large desktop radio. There is no date of manufacture printed anywhere,
but the style and the type of tubes date it roughly to 1941.
I got this radio in the most trivial way there is: Walking in a street,
the smell of dead, fouling rats wafted out of a store. I looked in, and
it was an antiques store. They seem to have magnets built in, and I must
have too much iron in me, as such stores inevitably draw me inside. The
smell was stronger in there, but I didn't care. I had the owner show me
a lot of funny things, expressing my interest in everything and nothing
in order not to drive up the price of any goody. We talked about antiques,
restoration thereof, and other philosophical matters.
Among the radios he had, most were useless "modern" models from the
1950s and later. But there was this General Electric. It had a deformed
plastic escutcheon, was pretty scratched, but looked restorable. As things
usually go, I ended up becoming its new owner. I paid, not much, and proudly
walked out of the store, the big radio under my arm, happy to escape the
smell of dead rats.
But the smell came with me. It came from the radio! By the time I was
arriving home, I was truly desperate, and about to toss the radio in a
dumpster and run away! But I controlled myself - after all, dead rats can
be removed. Once inside my home, in no time my home stunk of dead rats,
despite open windows and doors. I ripped out the chassis - no rats there.
I checked everything. No rats!
 The
chassis was not smelly. But the cabinet was. I decided it had to have been
soaked in rat's piss, and decided to wash it in turpentine. So I removed
the grille cloth, the plastic mask - and almost choked on the stink! It
was the plastic! This mask was made of casein polymer, one of the few plastics
that were around in 1941, and casein compounds have a tendency to rot in
humid environments. And rotting casein must be the most stinky substance
in existence! It could be used as dissuasive chemical weapon, since
it will make everyone run, being effective at least 10 miles against the
wind!
The
chassis was not smelly. But the cabinet was. I decided it had to have been
soaked in rat's piss, and decided to wash it in turpentine. So I removed
the grille cloth, the plastic mask - and almost choked on the stink! It
was the plastic! This mask was made of casein polymer, one of the few plastics
that were around in 1941, and casein compounds have a tendency to rot in
humid environments. And rotting casein must be the most stinky substance
in existence! It could be used as dissuasive chemical weapon, since
it will make everyone run, being effective at least 10 miles against the
wind!
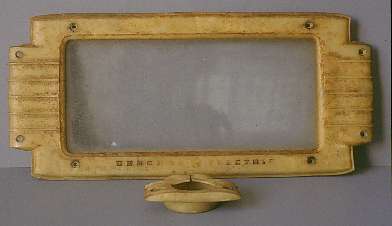
So, with a clothespin on my poor nose, I photographed the escutcheon
and also the tuning eye frame, both made of this horrible casein stuff,
and then removed both from the wider reach of human settlement. After this
operation, my home returned to normalcy, olfactory-wise. Fortunately, at
least the rotting casein stink doesn't stick much.
But I would have to make a fully new escutcheon and tuning eye frame.
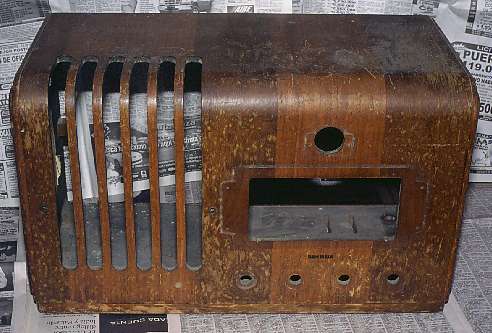 The
cabinet finish was beyond all hopes of recovery. Specially on the top,
where there was water damage from leaking flower pots. The only place where
the finish was still good was at the areas normally covered by the escutcheon.
It seems that the casein stink doesn't attack lacquer!
The
cabinet finish was beyond all hopes of recovery. Specially on the top,
where there was water damage from leaking flower pots. The only place where
the finish was still good was at the areas normally covered by the escutcheon.
It seems that the casein stink doesn't attack lacquer!
So, the usual routine was in order: Strip the finish with lacquer thinner,
analyze it, apply new one of the same kind. Here the problems started.
Firstly, it wasn't clear to me if the two colors were only because of different
woods, or if the darker wood had been stained before lacquering, or if
different sorts of lacquer had been applied. The lacquer came off with
difficulty, and it was hard to decide. Finally what came out under the
lacquer mystery was stripes of a dark wood, probably walnut, another cheesy
white one, while the sides were red cherry! It must have been made on a
friday afternoon, using leftovers from the week. I can't see any other
good reason to use cherry sides with a walnut front.
I think that the main front and top had just a single type of slightly
reddish lacquer, while the sides and the base had a first layer of dark
brown lacquer before the general coatings of reddish lacquer were sprayed
on. But this is just guesswork.
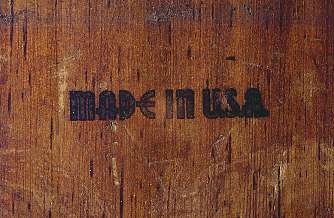 More problems
were to be found. The "MADE IN USA" label had been applied under the lacquer.
And the wood pores had been sealed with a black filler. So I had to be
careful stripping the lacquer, to avoid damaging the label, if possible.
And preserving the black filler was another desirable point, because the
white wood was extremely thin, like paper, which made it impossible to
apply new filler and then sand it flat. Problems after problems!
More problems
were to be found. The "MADE IN USA" label had been applied under the lacquer.
And the wood pores had been sealed with a black filler. So I had to be
careful stripping the lacquer, to avoid damaging the label, if possible.
And preserving the black filler was another desirable point, because the
white wood was extremely thin, like paper, which made it impossible to
apply new filler and then sand it flat. Problems after problems!
I managed to strip the lacquer while preserving the label and most of
the filler. But then my problems only started! I found no way to tint lacquer
in the original color. I lacquered and re-stripped this radio 4 times.
Every time it ended up looking beautiful, or interesting, or eclectic,
or outright funny, but never did it look original! It was a frustrating
experience.
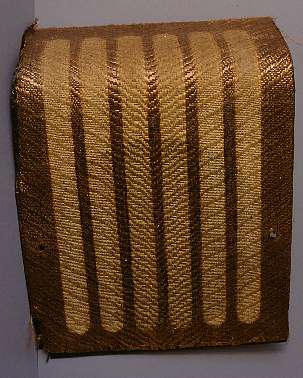 Finally I stopped
the lacquering-stripping-lacquering game when I hit a color that matched
the discolored grille cloth quite well. You can see the cloth here: The
areas that were covered by the wood are still in roughly original color,
while the exposed areas are severely bleached by the sun. I dry-cleaned
the cloth without removing it from the cardboard base, and decided that
even as discolored as it is, it will look better than using a totally different
modern replacement. So, I finished the cabinet to match this cloth, and
called it a day. Or rather, a week...
Finally I stopped
the lacquering-stripping-lacquering game when I hit a color that matched
the discolored grille cloth quite well. You can see the cloth here: The
areas that were covered by the wood are still in roughly original color,
while the exposed areas are severely bleached by the sun. I dry-cleaned
the cloth without removing it from the cardboard base, and decided that
even as discolored as it is, it will look better than using a totally different
modern replacement. So, I finished the cabinet to match this cloth, and
called it a day. Or rather, a week...
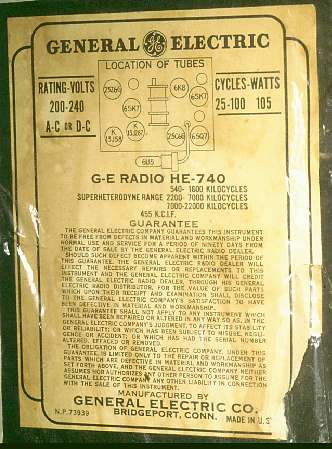 This label was
quite useful. I protected it with a plastic covering while working on the
cabinet, and then used it to learn what tubes I had to put in. Two were
missing, and another two were of totally wrong types. However these tubes
are still easy to find, and I had no trouble locating them.
This label was
quite useful. I protected it with a plastic covering while working on the
cabinet, and then used it to learn what tubes I had to put in. Two were
missing, and another two were of totally wrong types. However these tubes
are still easy to find, and I had no trouble locating them.
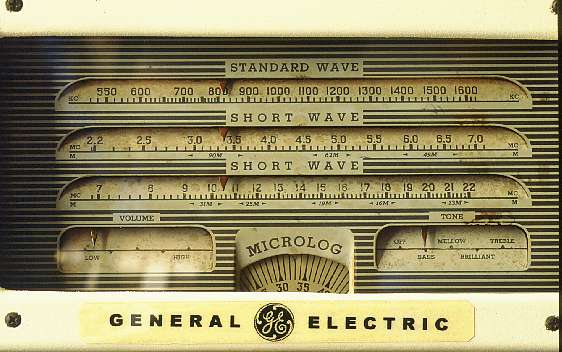
This radio was an export model, for countries that have a 220V mains
supply. It's interesting to note the wide frequency range for which this
radio is rated. Anyone knows which countries had a 25 Hz supply? Or anything
higher than 60Hz? I think that some areas in Germany still had 25Hz in
those years, but an American company would hardly make radios for export
to Germany during WW2!
General Electric's guarantee is valid for only 90 days, according
to this label. So, after 62 years, I didn't ask G.E. to fix the radio
for me, and started doing it myself... Sorry for the bad joke!
 Apart from
the missing and wrong tubes, this radio had a bunch of other problems.
A big one, and moreover a very typical one for radios of this vintage,
is that the tuning eye was exhausted. It glowed very dimly, barely noticeable
in a darkened room. But tuning eyes haven't been made since ages! I had
luck to find a few in the treasure chest left by a deceased friend and
radio amateur, so this problem was solved. But many restorers can't locate
certain types of tuning eyes any more.
Apart from
the missing and wrong tubes, this radio had a bunch of other problems.
A big one, and moreover a very typical one for radios of this vintage,
is that the tuning eye was exhausted. It glowed very dimly, barely noticeable
in a darkened room. But tuning eyes haven't been made since ages! I had
luck to find a few in the treasure chest left by a deceased friend and
radio amateur, so this problem was solved. But many restorers can't locate
certain types of tuning eyes any more.
But there were many more problems. The dial mechanism was one. It has
a vernier reduction, string-coupled to the variable capacitor, which in
turn drives the "Microlog" dial through a backlash-free gear mechanism.
The volume and tone controls drive small dial pointers on their own scales.
And all these mechanisms were hopelessly stuck due to rockified grease.
Also the strings were mostly bad. I spent the better part of an afternoon
fixing all this.
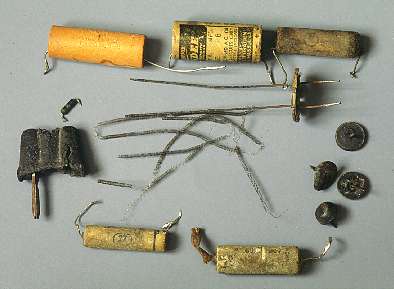 Here are a few
of the parts that had to be replaced. It's nothing new to have a bunch
of leaky paper capacitors in an old radio, and after previous experience
with my first G.E., which devotedly tried to set fire to my home when one
of those caps exploded, I'm now careful. I replaced all leaky caps that
were working in sensitive locations. The power plug had to go too. It just
was too crumbled to be saved, and also was missing one pin. A small 1 megaohm
resistor was open. And for additional safety I installed a fuse. American
radios of the time didn't have them, unlike their European counterparts
which tended to be much safer.
Here are a few
of the parts that had to be replaced. It's nothing new to have a bunch
of leaky paper capacitors in an old radio, and after previous experience
with my first G.E., which devotedly tried to set fire to my home when one
of those caps exploded, I'm now careful. I replaced all leaky caps that
were working in sensitive locations. The power plug had to go too. It just
was too crumbled to be saved, and also was missing one pin. A small 1 megaohm
resistor was open. And for additional safety I installed a fuse. American
radios of the time didn't have them, unlike their European counterparts
which tended to be much safer.
On the right are this radio's flat feet. It's quite common to see old
radios suffer from this deformity usually linked to humans! Unlike humans,
radios aren't often born with them, but after several decades their rubber
feet decay and flatten out, so that the nail shows through and scratches
any surface you set the radio on. So, out they went. I can still find very
original looking replacements!
The wiry things in the middle were a big problem. This radio uses two
ballast resistors in octal bases, enclosed by perforated steel screens.
The smaller one is connected in series with the entire input of the radio,
dropping the voltage to about 200. The bigger one goes in series with the
filament string. Since the filaments add up to only 80 Volt, and need 300mA,
the resistor has to drop the other 120 Volt and must dissipate about 40
Watt. It gets very hot, and over decades the screen rusted to dust,
caved in, the support for the nichrome wire failed, the wire touched the
sides, shorted, burned out, and the radio went dead. I had to repair this
- but I haven't been able to find a good supply of the very thin resistance
wire needed to make 400 Ohm with a reasonable length of wire! And the original
wire wasn't usable. Thousands of hours glowing red hot had made it so brittle
that it crumbled when just touching it.
The solution came from an old "universal replacement" filament dropping
resistor, which had the correct amount of the correct wire, wound in a
removable way. I took that wire and used it to reconstruct the octal ballast
resistor.
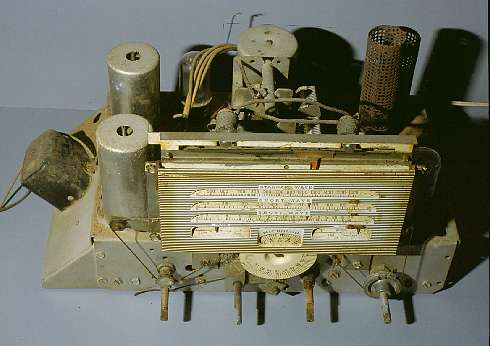
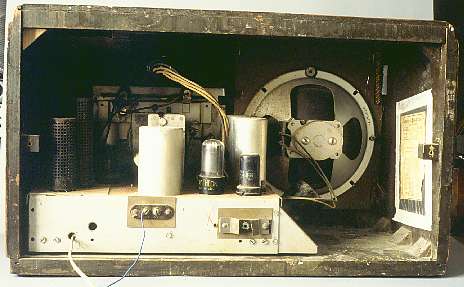 This is how
the radio looks inside. This picture was taken before cabinet refinishing,
but after fixing the chassis.
This is how
the radio looks inside. This picture was taken before cabinet refinishing,
but after fixing the chassis.
The hole near the power cable was drilled by a "modifier", probably
sometime in the 1950's, when there was a craze to throw out the old gramophones
and connect electric pickups to existing radios. This one had an RCA jack
mounted on a flange, and connected with 100V-rated capacitors to the circuit,
which can have the chassis live at 220V... so much for safety. I removed
that mess. I also removed a very strange modification: Someone had removed
the grid bias resistor (AGC link) for the RF pre amp, had directly grounded
the grid, and then connected a jumper from the antenna input directly to
the stator of the second RF tuning capacitor, thus bridging the pre amp.
Obviously, the pre amp now oscillated like crazy. What could possibly have
been the reason for that modification??? When one despairs
about the knowledge (or lack thereof) of modern service personnel,
it can be refreshing to see that in the "good old times" some radio technicians
could mess up big time too!
 Ready for the
photo! It doesn't look original, but at least it looks nice. Maybe sometime
later, when I'm old, retired, have lots of time, and "new" old radios are
no longer to be found, I might try my hand again and reach a more original
looking finish for this radio. For the time being, I'm tired of it and
will just enjoy it as it is now. To make it look original, it would need
to be stripped again, the sides and base stained, the whole thing paste-filled,
then sprayed with some reddish lacquer. The grille cloth would have to
be replaced, or perhaps stained, and my homemade escutcheon and tuning
eye frame should be improved. That's just too much work for now.
Ready for the
photo! It doesn't look original, but at least it looks nice. Maybe sometime
later, when I'm old, retired, have lots of time, and "new" old radios are
no longer to be found, I might try my hand again and reach a more original
looking finish for this radio. For the time being, I'm tired of it and
will just enjoy it as it is now. To make it look original, it would need
to be stripped again, the sides and base stained, the whole thing paste-filled,
then sprayed with some reddish lacquer. The grille cloth would have to
be replaced, or perhaps stained, and my homemade escutcheon and tuning
eye frame should be improved. That's just too much work for now.
 Face-on view. Doesn't
it look nice? The replacements for the rotten casein plastic parts were
made from plywood. I cut them with a hacksaw, patiently shaped them into
the strange shapes that were the fashion in 1941, glued on some strips
to emulate the original ones, and then spray-painted them with a light
beige paint that ended up being too light. I gave it a coarse finish to
mask the imperfections of the wood and of my sanding. So this is far from
original too.
Face-on view. Doesn't
it look nice? The replacements for the rotten casein plastic parts were
made from plywood. I cut them with a hacksaw, patiently shaped them into
the strange shapes that were the fashion in 1941, glued on some strips
to emulate the original ones, and then spray-painted them with a light
beige paint that ended up being too light. I gave it a coarse finish to
mask the imperfections of the wood and of my sanding. So this is far from
original too.
The knobs are original. Fortunately they were made of a better
plastic than the other parts, and came nicely through the times. They only
needed washing in the kitchen sink.
 The original escutcheon
had the brand name printed on, in gold lettering. I couldn't do that. What
I did was regenerating the label in the computer, using the font that came
closest to that used by G.E., and then I printed it in mirror-view on a
transparency sheet. This transparent label was glued, ink-down, onto my
wooden escutcheon, using double-sided tape. Cheap and dirty, but from two
meters distance it looks just great!
The original escutcheon
had the brand name printed on, in gold lettering. I couldn't do that. What
I did was regenerating the label in the computer, using the font that came
closest to that used by G.E., and then I printed it in mirror-view on a
transparency sheet. This transparent label was glued, ink-down, onto my
wooden escutcheon, using double-sided tape. Cheap and dirty, but from two
meters distance it looks just great!
I did not fully clean the dial. I cleaned away the dirt that would come
off easily, using only water and mild detergent, but the paint apparently
had been attacked by the casein fumes and was not further cleanable. I
tested in a hidden corner how far I could go cleaning, and when the paint
started getting off there, I stopped it. This is as clean as it gets, folks,
without having to redo the entire dial!
 For the end of this
story, here is the radio's eye. Don't you agree, there must be a soul behind
such an expressive eye? Oh well, yes, the glow of tubes is one thing. The
homely smell of roasted dust is another. The slight hum in the background
is another part of enjoying antique radios. But the mischievous look of
a tuning eye, in all its green splendor, proud sign of high tech of a long
gone era, this view so totally unknown to most people of my age, this sign
of lifelikeness in the high vacuum of empty-state electronics, rewards
me for all the effort invested in reviving old radios. It's not lost time,
after all. Look at this eye, and agree with me! Please?
For the end of this
story, here is the radio's eye. Don't you agree, there must be a soul behind
such an expressive eye? Oh well, yes, the glow of tubes is one thing. The
homely smell of roasted dust is another. The slight hum in the background
is another part of enjoying antique radios. But the mischievous look of
a tuning eye, in all its green splendor, proud sign of high tech of a long
gone era, this view so totally unknown to most people of my age, this sign
of lifelikeness in the high vacuum of empty-state electronics, rewards
me for all the effort invested in reviving old radios. It's not lost time,
after all. Look at this eye, and agree with me! Please?
Back to the homo ludens radiohistoricus
page.