Belmont 542
 Have you ever heard
about the Belmont Radio Corporation of Chicago, better known simply as
BRC? Belmont was a quite active radio manufacturer. They built some
outstanding radios.
Have you ever heard
about the Belmont Radio Corporation of Chicago, better known simply as
BRC? Belmont was a quite active radio manufacturer. They built some
outstanding radios.
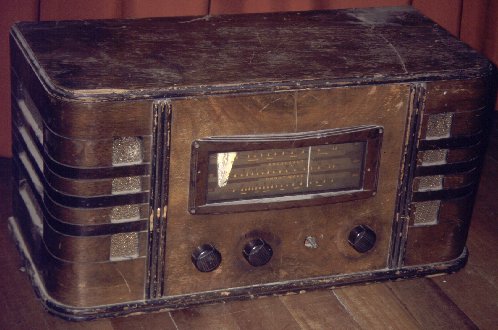
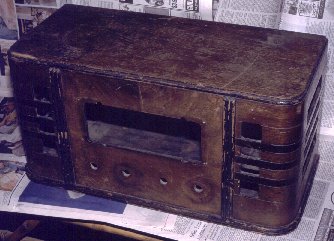
I came across this model 542 set in an antiques shop. The dealer had
no idea about the age or condition of the radio. He barely knew it was
a radio at all. I shuddered when I first saw it. Scratched, damaged, broken
phenolic escutcheon, one knob missing, speaker grille cloth of unrecognizable
color due to the thick dirt, and inside it was obviously in bad shape,
bearing the marks of many repairs and some mayor modifications. First I
just passed by it. But there was no other radio to be had, and I had a
bad case of restoratitis. The dealer was interested in getting rid of this
thing, it had been taken up room for too long without finding a buyer.
So, after the price had fallen to less than one third of the original figure,
I took this radio home. Then the fun started.
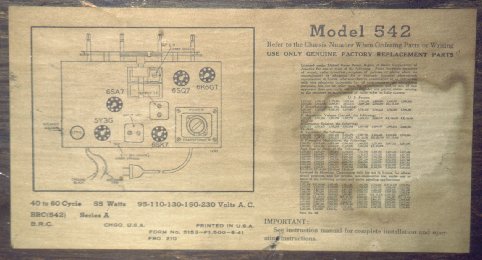 This label
is stuck to the bottom of the radio. It was worth much more than its weight
in gold (paper is lightweight, after all... :-). It identified the radio,
stated the date of manufacture (1941), and told about the tube layout,
a very important hint because all tubes in the radio were non original,
of totally different types.
This label
is stuck to the bottom of the radio. It was worth much more than its weight
in gold (paper is lightweight, after all... :-). It identified the radio,
stated the date of manufacture (1941), and told about the tube layout,
a very important hint because all tubes in the radio were non original,
of totally different types.
This radio was designed around a classic 5-tube circuit: A 6SA7 pentagrid
converter, 6SK7 IF amplifier, 6SQ7 detector, AGC and audio preamplifier,
and a 6K6GT power amplifier, with a 5Y3G rectifier in a transformer-type
multivoltage power supply. Note that the first three tubes are metal single
ended octal valves with 6.3 V filaments, while the power amplifier is a
compact glass tube and the rectifier is still of the older bulged shape.
These facts would have made unnecessary the dating on the paper!
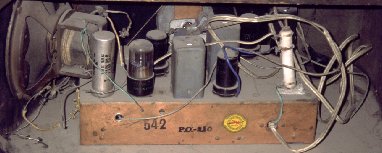 This
is how the radio looked inside when I got it. The thick dirt is normal
for an old radio, but that lot of loose wires is not, and the worst part
is the modified power supply. Do you see the white power resistor at the
right side? It is mounted with a rusty screw, on a piece of dust-shedding
asbestos (how do you like that?), over a metal sheet that closes the hole
where once the power transformer used to be. Another large piece of asbestos
had been nailed to the top of the cabinet, to protect it from the resistor's
heat! Someone had converted this radio from the original transformer-type
power supply to a DC-AC power supply, by removing the transformer, fitting
the dropping resistor, replacing all tubes by series-filament types, and
rewiring the entire radio.
This
is how the radio looked inside when I got it. The thick dirt is normal
for an old radio, but that lot of loose wires is not, and the worst part
is the modified power supply. Do you see the white power resistor at the
right side? It is mounted with a rusty screw, on a piece of dust-shedding
asbestos (how do you like that?), over a metal sheet that closes the hole
where once the power transformer used to be. Another large piece of asbestos
had been nailed to the top of the cabinet, to protect it from the resistor's
heat! Someone had converted this radio from the original transformer-type
power supply to a DC-AC power supply, by removing the transformer, fitting
the dropping resistor, replacing all tubes by series-filament types, and
rewiring the entire radio.
I was in doubt for some months. Should I restore the radio to original
condition? Or should I repair it, preserving the modification as part of
the radio's history?
The problem pretty much solved itself. The resistor produced so much
heat, and the modification was so badly done, that I decided to go the
longer route and turn the radio back to the original circuit. The decision
was quickly confirmed when I found, inside my very own junk box, a transformer
that fit this chassis perfectly, looked reasonably original, and even had
windings of the required ratings, except only for a 5 V filament winding
for the rectifier!
 So,
restoration started, and after some exhausting work the chassis looked
like this. All asbestos was carefully removed and discarded, together with
that ugly resistor and the rusty screw. Everything was thoroughly cleaned.
The transformer was installed. I got a set of exact tubes, except for the
rectifier: Instead of the 5V directly heated 5Y3G, I installed a 6ZY5G,
which is a dual diode with a 6.3V indirectly heated cathode, that can be
connected to the common 6.3 V heater chain. I rewired the radio to the
original circuit, which meant a lot of detective work and radio archaeology,
since I couldn't locate the original diagram, and had to guess the circuit
details.
So,
restoration started, and after some exhausting work the chassis looked
like this. All asbestos was carefully removed and discarded, together with
that ugly resistor and the rusty screw. Everything was thoroughly cleaned.
The transformer was installed. I got a set of exact tubes, except for the
rectifier: Instead of the 5V directly heated 5Y3G, I installed a 6ZY5G,
which is a dual diode with a 6.3V indirectly heated cathode, that can be
connected to the common 6.3 V heater chain. I rewired the radio to the
original circuit, which meant a lot of detective work and radio archaeology,
since I couldn't locate the original diagram, and had to guess the circuit
details.
When I was done with this work, the radio sort of worked, but had lousy
sensitivity, lots of distortion, and on short-wave it was dead. So, after
this restoration, the repair had to start... To my surprise, every single
paper capacitor was leaky! I had seen my share of leaky caps, but
I had never gotten a radio with all of them bad! So I took the thing seriously.
The electrolytic capacitors also were all dead, except for the main filter
capacitor, which had been replaced previously, apparently in the 1970's.
Being at it, I also checked the resistors, and found a lot of them to be
way off! In short, I had to basically rebuild the entire radio. It
kept a reasonably original look on top of the chassis (except for the wires,
I don't have any fabric covered wire left!), but below the chassis many
components are much more modern than they should be. I used lots of components
of the 1960's, but that's still a lot newer than the original ones.
At least, after the reconstruction this radio works flawlessly, and
is one of the most usable sets in my collection. I can use it for hours
without fearing a capacitor explosion.
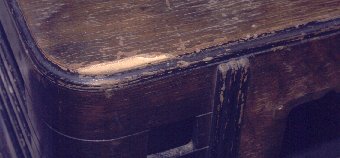 Then
the cabinet work started. Only in one corner, shown in this photo, was
some veneer missing. This hole was easy enough to fill in. Then I stripped
the radio, since there was nothing to save from the old finish. It was
just too worn.
Then
the cabinet work started. Only in one corner, shown in this photo, was
some veneer missing. This hole was easy enough to fill in. Then I stripped
the radio, since there was nothing to save from the old finish. It was
just too worn.
 My stripping
technique is simple: Strip the cabinet of all non-wooden parts, protect
labels with plastic foil. Cover the workspace with plastic foil and a lot
of newspapers. Get a supply of the proper solvent (lacquer thinner, for
most radios), a lot of paper towels, a large waste basket, and some soft
steel wool. Open all doors and windows, put on PVC gloves (latex will dissolve!),
and start. Dip the steel wool in solvent, apply generously, let soak, apply
more, wipe off with paper towels, repeat. Use the steel wool to help removing
thick dirt. It's messy, dirty, very smelly, but not difficult to do. Enjoy
the beautiful wood, as it emerges below decades worth of grit. Being wet
in solvent, it will give you a glimpse of how it will look once the new
lacquer has been applied. This particular radio has the front covered in
Mahogany veneer, and the rest in Teak. It's really beautiful!
My stripping
technique is simple: Strip the cabinet of all non-wooden parts, protect
labels with plastic foil. Cover the workspace with plastic foil and a lot
of newspapers. Get a supply of the proper solvent (lacquer thinner, for
most radios), a lot of paper towels, a large waste basket, and some soft
steel wool. Open all doors and windows, put on PVC gloves (latex will dissolve!),
and start. Dip the steel wool in solvent, apply generously, let soak, apply
more, wipe off with paper towels, repeat. Use the steel wool to help removing
thick dirt. It's messy, dirty, very smelly, but not difficult to do. Enjoy
the beautiful wood, as it emerges below decades worth of grit. Being wet
in solvent, it will give you a glimpse of how it will look once the new
lacquer has been applied. This particular radio has the front covered in
Mahogany veneer, and the rest in Teak. It's really beautiful!
Be sure you strip all lacquer off. Usually you need to apply stains,
and if some lacquer remains, the wood will not accept the stain. In this
radio, I had to apply walnut stain to the dark stripes of Teak on the sides,
and to all moldings. The rest of the surface is lacquered in natural color.
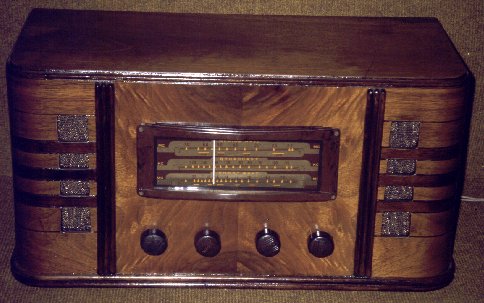 And here is
the outcome: A beautiful, restored 1941 radio. After staining the dark
areas, I applied 25 coats of lacquer, by french rubbing. The grille cloth
was washed and reinstalled. The broken escutcheon was a surprise: It was
very hard to force into its original shape! I had to manufacture a strong
steel brace, and install it behind the plastic, to keep the escutcheon
straight. This seems to be a common problem: I have seen photos of many
radios in other people's collections, that use this same type of plastic
escutcheon, and most of them were broken and crooked!
And here is
the outcome: A beautiful, restored 1941 radio. After staining the dark
areas, I applied 25 coats of lacquer, by french rubbing. The grille cloth
was washed and reinstalled. The broken escutcheon was a surprise: It was
very hard to force into its original shape! I had to manufacture a strong
steel brace, and install it behind the plastic, to keep the escutcheon
straight. This seems to be a common problem: I have seen photos of many
radios in other people's collections, that use this same type of plastic
escutcheon, and most of them were broken and crooked!
The missing knob was another issue. I manufactured a replica from epoxy
resin. It is not perfect, but acceptable. Can you see which of the four
knobs on the picture is the replica?
Here is the recipe for making knob copies: Clean the original
knob to clinical standards. Apply several layers of paste wax, and buff
them to high gloss. Take a small plastic container (I use yogurt beakers),
pour some water in it, about as high as the knob is. Slowly pour plaster
into the water, until no more plaster powder is absorbed. Remove the excess,
and use a spoon to homogenize the plaster mass. Be very careful to avoid
introducing air bubbles, and vibrate the mix to remove bubbles that may
already be in the mass.
Now take your waxed knob, and push it down into the plaster. Use some
large nuts, or whatever, to weigh it down and keep it just level with the
plaster mass. Let the plaster harden for some hours, then pull out the
knob. This is easy if you waxed it properly, and next to impossible if
you didn't. Remove the plastic beaker, and let the plaster dry fully. This
can take several days, but you can speed it up in an oven.
Now apply paste wax to the inner side of the plaster mold. You MUST
get a shiny, smooth surface! It can take many layers of paste wax, and
a lot of detail work, if the knob has fine decorations...
Now comes the big trick: Soak the plaster in water again! Once you pour
the epoxy resin, it warms during reaction. It can melt the wax, and then
the plaster would soak it up. The result is the resin bonding to the plaster,
and both your new knob and the plaster mold would be ready for the trash
can! By soaking the plaster in water, two things happen: The wet plaster
conducts the heat away more quickly, and if the wax melts anyway, it cannot
soak into the water-soaked plaster!
For epoxy resin, I use 10-minute epoxy glue, as sold in model building
shops. Use what you like best. Don't use quicker setting epoxy, because
it produces more heat and will certainly melt the wax!
I give my knobs the proper bakelite color by adding a pigment that here
in Chile is sold under the name of "colored earth". I have no idea how
that stuff is called in other countries, but it is sold in hardware stores
and usually employed to color cement, when installing tiles.
I use black and brown earth. I add small amounts of it to one component
of the epoxy glue, until I get precisely the same color the original bakelite
knob has. Just a little earth is enough. If you use too much, the knob
will be dull instead of shiny. When I'm done with one of the epoxy components,
I repeat the procedure with the other component. I can take my time, as
the two components are not yet mixed, and as a bonus the mixed color will
be an average of the two individual ones I made, so it will be even closer
to the original knob!
I place my waxed plaster mold on the table, and find some potentiometer
having the same rod type as those used in the radio. I wax the tip of the
rod, and make some stand to hang it precisely into the center of the mold.
Then I mix my colored epoxy, and pour it into the mold, just to level.
I re-center the rod and let the stuff harden. When it is quite hard, but
still a little bit rubbery, I pull it out of the plaster (easy) and then
pull out the rod (somewhat harder). Then I place my new knob in the oven,
and bake it at about 60 degrees Celsius for an hour or two. This makes
the epoxy harden much better and faster than at room temperature.
My Belmont radio uses just one knob made this way, the others are originals.
But some of my other radios have ALL knobs made by this method! The originals
came from friends in those cases.
If necessary, a hole can be drilled into the new knob, and tapped to
accept a setting screw. But in most cases this is not needed.
Back to the homo ludens radiohistoricus
page.