Down the Malleco
Many of my readers may wish to know how I use my foldable kayak. Well,
I don't cross the oceans with it... rather I use it as a platform for water
bird photography, for day trips on lakes, and on rivers. I usually have
the boat with me when I do my extensive summer trips. To give you an idea
of how the boat is used, here is an example of a trip down a small stream
that feeds the Malleco lake, followed by a crossing of the lake, and a
hike to the lake's surprising end.
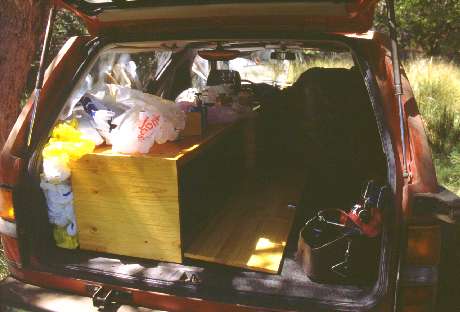 This is the rather
untidy interior of my car. The big wooden box is my secret weapon to transform
the car into a highly versatile 4WD camping vehicle. The box, custom-made
for this car and tailored to make best use of its inner shape, has three
compartments: The left side one is loaded from above, and employed to store
food and cooking utensils. The front compartment, right behind the driver's
seat, is front-loaded and holds all sorts of technical equipment: From
mud chains to photo gear, from an air compressor destined to inflate tires
to a rechargeable fluorescent lamp and its 12V charger. The top of the
box is a flat table, on which I can cook and eat; the table has a 2cm high
border, which will contain any liquids eventually spilled. And the bigger
of the three compartments, shown open in this photo, stores the boat.
This is the rather
untidy interior of my car. The big wooden box is my secret weapon to transform
the car into a highly versatile 4WD camping vehicle. The box, custom-made
for this car and tailored to make best use of its inner shape, has three
compartments: The left side one is loaded from above, and employed to store
food and cooking utensils. The front compartment, right behind the driver's
seat, is front-loaded and holds all sorts of technical equipment: From
mud chains to photo gear, from an air compressor destined to inflate tires
to a rechargeable fluorescent lamp and its 12V charger. The top of the
box is a flat table, on which I can cook and eat; the table has a 2cm high
border, which will contain any liquids eventually spilled. And the bigger
of the three compartments, shown open in this photo, stores the boat.
The right side of the car is held free, so that it serves as a bed.
With an air mattress and a geese dawn sleeping bag, it is very comfortable.
The car is equipped with HF and VHF radio transceivers, GPS, and even a
hot shower! But that's material for another story...
The untidy look comes from several dozen empty plastic bags. They serve
to hold food, trash, to separate items of clothing from technical stuff,
and also as cushions to hold everything in place inside the box during
travel, avoiding any rattling sounds. Plastic bags are truly a great invention!
:-)
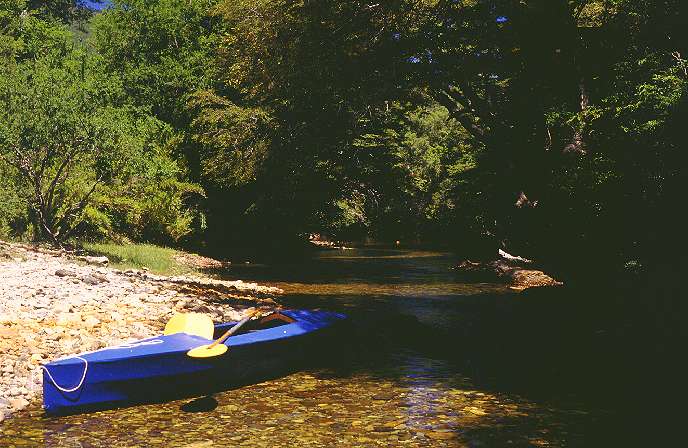
 I drove as close
to the river as I could get. There I unpacked the boat, carried it in its
bag to a place in the shadow near the river, and assembled it. As many
people have asked me how the assembly process is done, this time I made
a sequence of photos, that will show it.
I drove as close
to the river as I could get. There I unpacked the boat, carried it in its
bag to a place in the shadow near the river, and assembled it. As many
people have asked me how the assembly process is done, this time I made
a sequence of photos, that will show it.
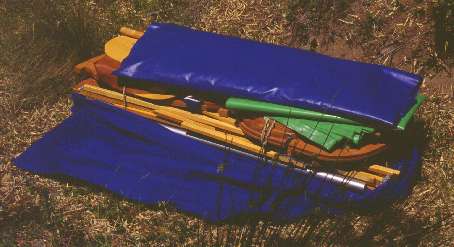
The disassembled boat is a compact package measuring 120cm length, 35cm
width and 25cm height. It stores in a simple blue fabric bag, shown open
here. The shiny blue bag on top holds the boat skin and the two safety
floats. The green plastic sheet is not a part of the boat, but simply used
as a clean surface to assemble the boat on, in order to avoid getting abrasive
sand and dirt between the skin and the structure.
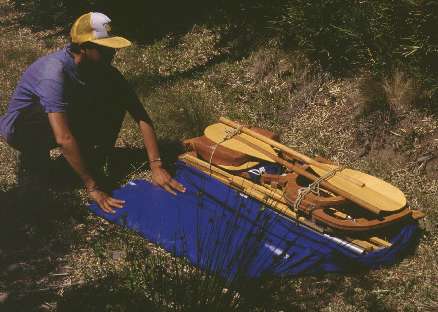 While driving to
the river, I picked up a Korean traveler who was sweatily walking up the
mountain, carrying a very heavy backpack. He camped next to the place I
picked, and served as good company during the ground-based parts of this
trip. Here he poses with the disassembled boat, wondering how it will look
once assembled. The green plastic has been taken away, and the bag with
the boat skin put on the side, so that you can see the compact arrangement
of the wooden parts in the package. The inverted boat's floor serves as
base for the stack; the two groups of eight runners, tied together by covernyl
strips, fill the space between the floor's carriers. This forms an almost
perfectly compact assembly. The two stevens with the front and aft sections
of the runners attached go on top of that, not as neatly packaged but still
compact enough. The ribs go on top of that, the disassembled paddle crowns
the stack, with the seat cushion and the back rest leveling the package.
The remaining long parts, which are the three keel sections, the cockpit
liners and the paddle center section, are used to fill voids in the
sides of the stack, and then everything is bound together with two ropes.
The bag with the wing nuts is loosely thrown between the ribs.
While driving to
the river, I picked up a Korean traveler who was sweatily walking up the
mountain, carrying a very heavy backpack. He camped next to the place I
picked, and served as good company during the ground-based parts of this
trip. Here he poses with the disassembled boat, wondering how it will look
once assembled. The green plastic has been taken away, and the bag with
the boat skin put on the side, so that you can see the compact arrangement
of the wooden parts in the package. The inverted boat's floor serves as
base for the stack; the two groups of eight runners, tied together by covernyl
strips, fill the space between the floor's carriers. This forms an almost
perfectly compact assembly. The two stevens with the front and aft sections
of the runners attached go on top of that, not as neatly packaged but still
compact enough. The ribs go on top of that, the disassembled paddle crowns
the stack, with the seat cushion and the back rest leveling the package.
The remaining long parts, which are the three keel sections, the cockpit
liners and the paddle center section, are used to fill voids in the
sides of the stack, and then everything is bound together with two ropes.
The bag with the wing nuts is loosely thrown between the ribs.
By the way, the paddle center section is now of aluminum. I made this
change after breaking the fully wooden paddle for the second time!
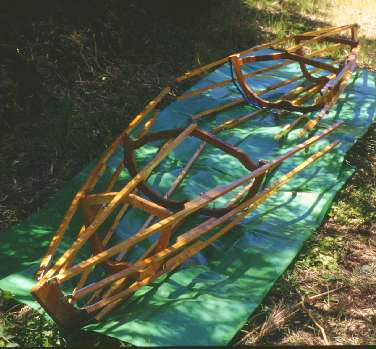
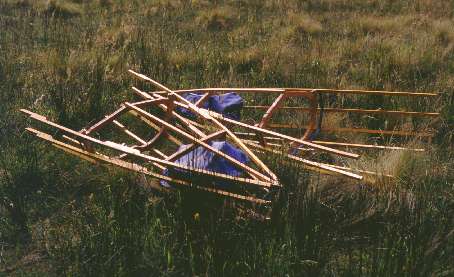 These are the two
halves of the structure. They are assembled to this extent before inserting
them into the skin. The blue bags are the two safety floats, which should
keep the boat and any contents at the surface in the event of an accident.
Fortunately, so far no such accident has ever happened, and I trust my
boat so much that I cross lakes carrying my full reflex photography equipment!
Still, the floats may some day safe my life, or at least some of the things
I carry in the boat. And they weren't expensive: I used scraps of the same
material I made the boat skin from, glued them into properly sized bags,
and installed bicycle tire valves. The valve inserts are removed to inflate
the bags by lung power. The bags are airtight enough to hold pressure for
weeks. I normally inflate them just to a very moderate filling, so that
they won't build up too much pressure when hot.
These are the two
halves of the structure. They are assembled to this extent before inserting
them into the skin. The blue bags are the two safety floats, which should
keep the boat and any contents at the surface in the event of an accident.
Fortunately, so far no such accident has ever happened, and I trust my
boat so much that I cross lakes carrying my full reflex photography equipment!
Still, the floats may some day safe my life, or at least some of the things
I carry in the boat. And they weren't expensive: I used scraps of the same
material I made the boat skin from, glued them into properly sized bags,
and installed bicycle tire valves. The valve inserts are removed to inflate
the bags by lung power. The bags are airtight enough to hold pressure for
weeks. I normally inflate them just to a very moderate filling, so that
they won't build up too much pressure when hot.
 This view was arranged
just for the photo. It shows how the two halves will mate. The keel center
section, middle rib, the floor, cockpit sides and back rest are installed
after putting these halves into the skin. The floats were removed to allow
full view of the structure.
This view was arranged
just for the photo. It shows how the two halves will mate. The keel center
section, middle rib, the floor, cockpit sides and back rest are installed
after putting these halves into the skin. The floats were removed to allow
full view of the structure.
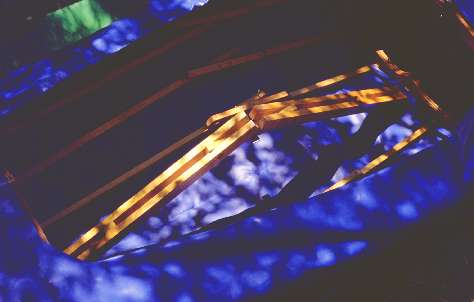
The different pieces of the boat are numbered, so that it's easy and
quick to find out which piece goes where. Furthermore, the runner sections
cannot get mixed up, because the front and aft pieces stay attached to
the stevens at all times, while the two groups of center sections are bound
together by strips of boat skin material, which also is the only thing
correctly spacing the runners - just the uppermost ones, and the
keel, are joined to the ribs. In this photo, the rear half of the
boat allows you to see one of these strips, 2cm in front of the rib. It
is tightly stretched. The strength of the material allows to screw it down
onto the wood without danger of ripping it open. The front section strip
is hidden by the rib.
 The structure has
been inserted into the skin. The runners still overlap each other by about
10cm, so that the boat skin is loose and wrinkly. It's important to properly
align the skin with the structure; if this is not done carefully, the skin
will be overstretched in some areas while remaining loose in others.
The structure has
been inserted into the skin. The runners still overlap each other by about
10cm, so that the boat skin is loose and wrinkly. It's important to properly
align the skin with the structure; if this is not done carefully, the skin
will be overstretched in some areas while remaining loose in others.
The second half of the structure barely fits through the opening in
the skin, but with proper care it can be inserted without submitting anything
to any significant force. On the other hand, bending the longer runners
a little bit makes insertion easier, and is perfectly tolerated by the
wood.
 This is the big
trick in most foldable boats: The stretching lever. This piece is engaged
to the front and aft keel sections and then pushed down. By gently putting
a part of one's weight on the lever, it will separate the structure halves
and apply a huge stretching force to the skin. Despite the strength of
the skin, the lower part of it (the one in contact with the water) is stretched
by 2%, making it feel as hard as an inflated tire. In fact, people often
ask me if this boat has inflatable walls! Thanks to the good stretching,
which causes flat, hard surfaces, the boat glides very well through the
water and can be paddled fast, with little effort. Such kayaks are among
the most efficient boats in existence.
This is the big
trick in most foldable boats: The stretching lever. This piece is engaged
to the front and aft keel sections and then pushed down. By gently putting
a part of one's weight on the lever, it will separate the structure halves
and apply a huge stretching force to the skin. Despite the strength of
the skin, the lower part of it (the one in contact with the water) is stretched
by 2%, making it feel as hard as an inflated tire. In fact, people often
ask me if this boat has inflatable walls! Thanks to the good stretching,
which causes flat, hard surfaces, the boat glides very well through the
water and can be paddled fast, with little effort. Such kayaks are among
the most efficient boats in existence.
Once the keel is pushed down, it's locked in place with small aluminum
flaps secured by wing nuts. Then the runners are joined; when necessary,
I use a simple stretching tool, built much like the keel center section,
to stretch the upper section of the boat in order to be able to effortlessly
join the runners.
 Then the middle
rib is installed, the side pieces of the cockpit are inserted into their
skin flaps, and bolted to the ribs #2, 3 and 4. These pieces do not have
any stretching mechanism, so that the boat skin on the top of the sides
remains loose and wrinkly. It may not look ideal, but does absolutely no
damage
Then the middle
rib is installed, the side pieces of the cockpit are inserted into their
skin flaps, and bolted to the ribs #2, 3 and 4. These pieces do not have
any stretching mechanism, so that the boat skin on the top of the sides
remains loose and wrinkly. It may not look ideal, but does absolutely no
damage
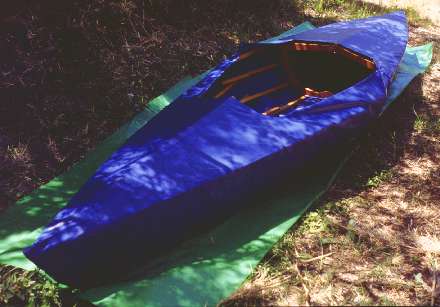
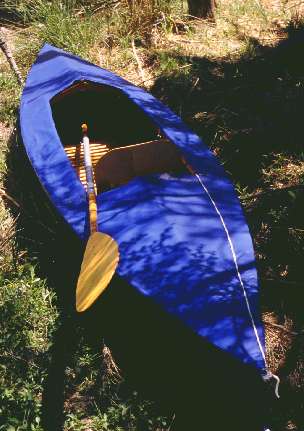
The last parts to be fitted are the floor, partly visible in this picture,
the seat cushion and the back rest. After joining the three parts of the
paddle, and attaching a small rope which is useful to guide the boat while
wading in shallow water before getting in, the boat is ready for use.
Depending on the kind of trip, more or less cargo is stowed below the
front and rear decks. This can include food, clothing, tent, sleeping bag,
photo gear, radio gear (XQ2FOD maritime mobile!), and other odd things.
Usually I use the back cargo area for those things I will need only when
stopping, such as the sleeping bag, while the front area is used for things
that may be needed during travel, above all the photo gear, but also the
radio, some food and drink, and so on. I also always bring along a towel.
When getting into the boat, I usually have to do it from the water, so
that my legs are dripping, and I hate having any water in the boat! So
I place the towel over the boat floor before getting in. Later, the towel
can be a useful sun shade over my legs, which otherwise tend to change
color into alarmingly red tones...
 One of the nice things
of a boat like this is that it can go where few others can. With me and
some cargo inside, the boat needs little more than 10cm of water depth
to stay free. It was mid summer, and the river was very low, so much
so that in some places it was not even 10cm deep, and I had to get
out and wade while letting the boat float free. Without me, 3cm of water
are enough to make the boat float, and even water jumping over some rocks
can carry the boat over them!
One of the nice things
of a boat like this is that it can go where few others can. With me and
some cargo inside, the boat needs little more than 10cm of water depth
to stay free. It was mid summer, and the river was very low, so much
so that in some places it was not even 10cm deep, and I had to get
out and wade while letting the boat float free. Without me, 3cm of water
are enough to make the boat float, and even water jumping over some rocks
can carry the boat over them!
The paddle was very carefully impregnated and varnished, so that it
holds up even after hitting the ground many times. In fact, often I use
the paddle more like a pushrod than a paddle, when traveling waters as
shallow!
This idyllic view was photographed during the first rest along the river.
I had just carried the boat over a place where the river went underground...
But from here on, I could stay in the boat until reaching open waters.
 In the marshes,
where the river opens into the lake, I found my Korean friend, who had
hiked and waded there and was enjoying the sunshine. I also rested a while
on this firmer ground, after being surprised by quicksand a little before.
Quicksand is nasty stuff: It's firm enough to hold a boat captive if it
runs aground, but not firm enough to allow the traveler to step out of
the boat and pull it off! So one has to stay inside, and rock the boat
until the sand gives way and the boat floats again.
In the marshes,
where the river opens into the lake, I found my Korean friend, who had
hiked and waded there and was enjoying the sunshine. I also rested a while
on this firmer ground, after being surprised by quicksand a little before.
Quicksand is nasty stuff: It's firm enough to hold a boat captive if it
runs aground, but not firm enough to allow the traveler to step out of
the boat and pull it off! So one has to stay inside, and rock the boat
until the sand gives way and the boat floats again.
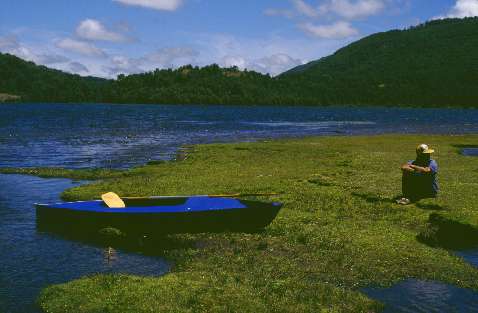
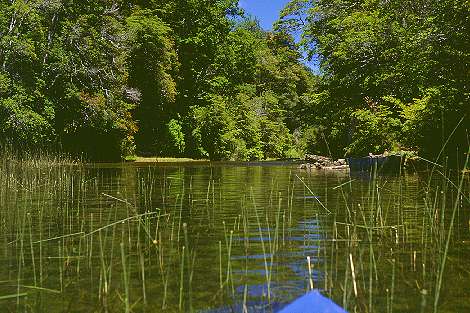
For the next three days I explored the lake. A few times I went into
deep waters, but most of the time I stayed close to the shore, as there
is more to see in such places.
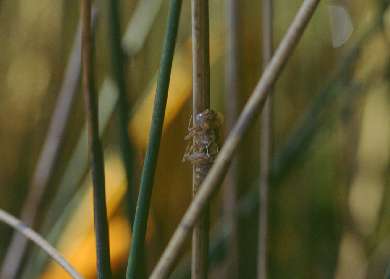 The reeds are an
ecosystem with many small wonders to discover. For example, this abandoned
dragonfly skin. Insects have rigid skins instead of an internal skeleton,
and their skin cannot really grow. So when the insects grow, they form
a new skin inside the old one, and one day they crack open the old skin,
slip out of it, and quickly expand before the new skin hardens in contact
with the air. The old skin was left parked on this reed, when its owner
flew away, clad in a new outfit. And days later came this crazy kayak-based
photographer and shot a picture...
The reeds are an
ecosystem with many small wonders to discover. For example, this abandoned
dragonfly skin. Insects have rigid skins instead of an internal skeleton,
and their skin cannot really grow. So when the insects grow, they form
a new skin inside the old one, and one day they crack open the old skin,
slip out of it, and quickly expand before the new skin hardens in contact
with the air. The old skin was left parked on this reed, when its owner
flew away, clad in a new outfit. And days later came this crazy kayak-based
photographer and shot a picture...
Reeds are a good parking place for a kayak. It's easy to slip in and
out, and while one is in them, they will keep the boat reasonably anchored.
When I get hungry during a trip, and there is no landable shore nearby,
I often park the boat in the reeds while eating.
By the way, staying at a fixed place in the reeds for longer than a
few minutes is almost a guarantee to see some more wildlife. The reeds
are full of all kinds of insects, birds, and other animals. I can stay
there for hours and just watch.
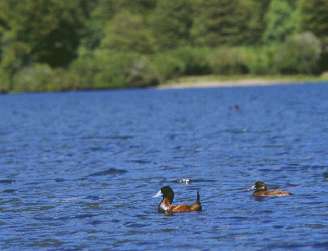 This kind of duck
is very common on Chilean lakes. Along with other ducks, assorted wild
geese, several kinds of cormorants, black-necked swans and a few other
birds, they are the crowd of the lake's feathered population.
This kind of duck
is very common on Chilean lakes. Along with other ducks, assorted wild
geese, several kinds of cormorants, black-necked swans and a few other
birds, they are the crowd of the lake's feathered population.
The boat allows to silently and smoothly come close to them. Unfortunately
these birds already had learned that some humans are dangerous, and didn't
let me come closer than this, as soon as I moved to make a photo. On other
lakes, harder to reach, I have found birds to be more trusting.
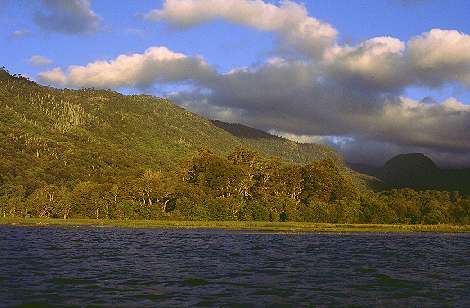 Towards the end of
the lake, the terrain is lower and the forest is a little less dense. The
forest at the shore is typical Chilean evergreen temperate rain forest,
while further up on the rocky mountain the conditions are suitable only
for specialist trees, like the characteristic Araucaria trees growing far
up on the crest, defending their foothold against storm, snow and time.
Towards the end of
the lake, the terrain is lower and the forest is a little less dense. The
forest at the shore is typical Chilean evergreen temperate rain forest,
while further up on the rocky mountain the conditions are suitable only
for specialist trees, like the characteristic Araucaria trees growing far
up on the crest, defending their foothold against storm, snow and time.
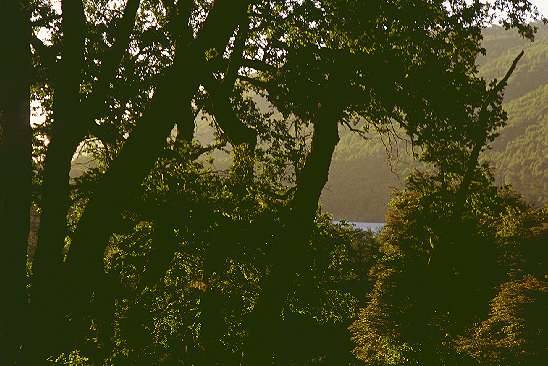
Evening is a good time for photography, and so I spent several evenings
out there, looking for lightings like this one. Noontime, with its
bluish light and burning sun, was mostly spent lying under some tree and
reading.
 At the end of the
lake there was this place. Like usual, the draft was noticeable even outside
this bay, but in here it got quite strong. Very soon it developed into
a fast flowing river. Note how the trees in the background seem to
be below the water! Obviously the terrain there takes a sharp drop.
At the end of the
lake there was this place. Like usual, the draft was noticeable even outside
this bay, but in here it got quite strong. Very soon it developed into
a fast flowing river. Note how the trees in the background seem to
be below the water! Obviously the terrain there takes a sharp drop.
It's always a good precaution not to get too close to such a place.
I stored the camera and very slowly went closer, until the noise told me
that there was either a rapid, or something more. So I went back, parked
the boat and went ashore, to explore the area.
 You can lure children
with sweets, and you can lure photographers with light! The setting sun
gave a great illumination through the slightly misty air, so I ended up
climbing the forested hill rather than checking out the outflow of the
lake. After shooting some evening photos, I had to return in what soon
became almost complete darkness. I found back to the boat, but just barely,
and crossed the lake, again, but this time in the faint light provided
by the stars.
You can lure children
with sweets, and you can lure photographers with light! The setting sun
gave a great illumination through the slightly misty air, so I ended up
climbing the forested hill rather than checking out the outflow of the
lake. After shooting some evening photos, I had to return in what soon
became almost complete darkness. I found back to the boat, but just barely,
and crossed the lake, again, but this time in the faint light provided
by the stars.
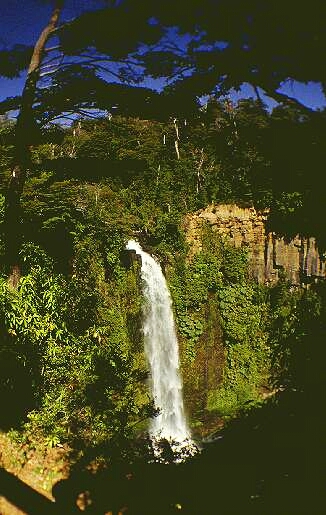 The next
day, I did my exploratory trip to the "rapids". And this is what I found!
It's the little-known Malleco waterfall. I think it was a good idea
to stop the boat before being sucked over the ridge and down into this
hole! When boating down a river, such care does pay, specially when the
river is unknown!
The next
day, I did my exploratory trip to the "rapids". And this is what I found!
It's the little-known Malleco waterfall. I think it was a good idea
to stop the boat before being sucked over the ridge and down into this
hole! When boating down a river, such care does pay, specially when the
river is unknown!
I spent three days boating the Malleco. Then I went up the shallow river,
the same way I came, and folded down the boat for the drive to another
body of water. I used the boat on several other lakes that summer.
Back to the homo ludens nauticus index.