There comes a moment in the life of almost any photographer, when
he is no longer satisfied with the sharpness of the pictures he makes.
Everyone else finds your photos just great, but you see the unsharp edges,
the blur here and there, the light washing around that twig, and you aren't
happy. Welcome to the support place for that widespread illness of homo
ludens photographicus, called Sharpitis!
Of course, you know as well as I do that sharpness is not the most important ingredient of a good photo. But still, it's just so nice to look at really sharp pictures! So, here you can read about my collected wisdom on getting the sharpest photos.
First of all, let's clear up a common mistake. Many people know that sharpness depends on many factors, and liken it to a chain, which is only as strong as its weakest link. Not so! Final sharpness of a photo will always, inevitable, be weaker than the weakest link in the chain! This is so because the final degree of unsharpness is a geometrical composition of all individual blur contributions. For the photographer it means that he has to care about all things that cause unsharpness, not only about the most important one! Only if one contribution is much more significant than all others, does it make sense to leave the others alone.
A photo can never be perfectly sharp. On the other hand, it can be "sharp enough": This happens when the final resolution of the photo is so much better than that the one the viewer with the best eyes can see, that even this privileged person cannot see any blurriness attributable to the photo. Of course, this depends a lot on the level of magnification used, and the distance from which the photo is seen. Age of the viewers also plays a big role! At the end of the story, there will always be someone able to see some blurriness, so it is worthwhile to strive for the very best sharpness possible!
The most important factors causing unsharpness are these:
It's a widespread myth that a photographer with myopic or astigmatic eye will necessarily misfocus. The focusing tools such as split-screen and matte screen are NOT sensitive to refraction errors in the eye! The only truth in this is that if you can't see the focusing screen sharply, then you can't correctly focus either! So, wear your prescription glasses if necessary, or use correction lenses on the viewfinder (not practical for astigmatic eyes!).
You say, you have automatic focusing, so you are free of this problem...?
Unfortunately you are worse off! Autofocusing is often less precise than
manual focusing. It has the advantage of speed, though, so it can produce
sharper pictures than a photographer taking a snapshot in a hurry with
manual focus might.
Many hobby photographers do this mistake time and again, and fail to understand it. The reason for your unsharp girlfriend is that photographic lenses have a reasonably flat field, not a spherical one. Suppose you were 4m away from her. When you focused on her, you adjusted the lens to 4m. When you then aim to place her on one side of the picture, your lens will be focused for the plane that is perpendicular to the lens axis, and 4m away. That plane is considerably behind your subject! If your girlfriend is at 30 degrees from the picture center, then the distance ratio is 0.86 (the cosine of the angle). So, your lens should have been focused to 3.46m, which is the distance along the lens axis to the plane which is perpendicular to the axis and passes through your girlfriend's face!
What can you do without using math in the field? Simple: Compose the picture first, and focus after that, while keeping the camera in the exact position at which you will shoot. That means, on most cameras you need to use the matte screen instead of the split-image tool. The reward for the slightly bigger effort will be a sharp girlfriend!
The more expensive autofocus cameras may be able to take care of this
problem, as long as they provide some way to decide correctly where you
want the focus to be. The cheaper autofocus cameras simply can't take this
kind of photo correctly using autofocus, since they measure focus only
in the center. If you have such an autofocus camera, switch off the autofocus
and focus manually. With a point-and-shoot camera that does not allow manual
focusing at all, the only hope is to look for an object that is at the
correct distance, focus there, and then compose. That object needs to be
closer than your subject is. And you will need some math, or at least some
guesstimation!
A lot depends on how steady a hand you have. If you can stand very still, with slightly spread legs, hold the camera with both hands, press your elbows against your body, hold your breath and time the triggering between two heart beats, then you should be able to go to considerably longer speeds with no detectable motion blur! I have used 1/15 with a 50mm lens with good results - but there is no guarantee! It's impossible to know if the picture will be usable. For safe, reliable motion-free pictures you may need to go as high as five times the rule of thumb, that is, using a 50mm lens at 1/250! Photographers suffering from Parkinson's disease need to go even higher, and strong wind may require very high shutter speeds too! It depends a lot on what degree of motion blur you can accept. No picture will be totally free of it; the issue is to reduce motion blur to an insignificant level. This level may vary a lot, according to conditions, and to quality expectations!
A tripod is a good tool to combat camera shake. A sand bag (often called
bean bag) is even better, since it won't resonate as the tripod does. Mirror
lock-up is a marvelous tool, but a fully mass-compensated mirror mechanism
is even better! It comes as a corollary that point-and-shoot cameras can
be a lot better than reflex cameras regarding shake! After all, they have
no heavy mirror slapping around. And flash photos are almost always free
of visible motion blur, because the flash duration is very short.
If a subject moves linearly at a relatively constant speed, like a car,
racing horse, airplane, runner, etc., then the best way to make a photo
is not to freeze the subject's motion, but to swing the camera along with
the subject. In this case, background blur will be given by the above calculation.
The lowest shutter speed you can use while still getting your subject sharp
is given by the accuracy of the camera motion. Typically this would be
10 to 20 times slower than when not moving the camera! If you can move
the camera rather accurately, a good rule of thumb is to apply the same
minimal speed as you would for a static subject with that lens!
The depth of field limitation is a basic fact which cannot be eliminated.
So, a good photographer includes it in the composition. Very good photos
can be made by intentionally letting the background blur while having the
subject sharp. It helps if the subject is rather flat! A very useful feature
that unfortunately is lacking on many cameras is depth of field preview.
It's simply a lever that closes down the diaphragm to the set value (it
is fully open during focusing in most reflex cameras), so that you can
see on the matte screen how your picture will really look. I would
not consider buying a reflex camera without this feature!
To stay clear of excessive sharpness penalty from aberration, it's a
good idea to use the smallest aperture you can - but read the next section
before doing that!
Wrong!
To produce that perfect image, the perfect lens would also need to have infinite aperture! Now try and buy a 50mm f/0 lens! Tell me if you find one! :-)
The problem is that the very fact that the lens diameter is not infinite causes image degradation. Light rays bend slightly at the borders of the lens, or the diaphragm, and this causes blur. This is a physical phenomenon called diffraction, and no lens manufacturer in the world can avoid it, unless he employs Harry Potter.
Diffraction gets worse as the aperture gets smaller. So, use the widest aperture you can - but read the previous section before doing that! :-)
With most 35mm photographic lenses, diffraction starts becoming noticeable at f/11 or so, dominates at f/16, and is terrible at f/22. Even smaller apertures are useless for 35mm work. Since diffraction depends on the angle spanned by the lens, wide angle lenses suffer more than tele lenses at a given aperture setting. You may get away shooting at f/16 with a 200mm lens, but with a 15mm you should avoid f/16 and even f/11!
Larger formats than 35mm tolerate smaller apertures, simply because
a larger amount of diffraction blur is acceptable on the larger frame!
Likewise, smaller formats are more affected, which is why typical digital
cameras with their very small CCDs (compared to 35mm film) have lenses
that stop down only to f/11 or so.
In all cameras I have ever seen, this distance is adjustable. In reflex cameras, either the mirror or (more commonly) the focusing screen has set screws that allow adjustment. As a camera ages, and the mirror hinges wear out, this adjustment must be corrected, or the camera will give badly focused pictures, however careful the photographer is! An especially bad case is when the mechanism wears in such a way that the mirror position becomes unpredictable. Such a camera must either be repaired or replaced.
Non-reflex cameras can be even more tricky, since they often don't even
focus through the main lens! But just as with the reflex camera, proper
alignment keeps things in check.
I wonder how much sharpness can be lost by diffusion of silver halide or dyes inside the gelatin. Not much information seems to be available on this.
After all these chilling news, I would invite you to do a simple exercise: Take some of your latest pictures, look at them, and repeat with me:
Given all the above, my pictures are incredibly sharp!!!
A good question is how much sharpness can be achieved, and how to achieve it. The simple answer is that a good lens, properly used on high quality material, may be able to resolve up to 100 lp/mm, meaning that objects sized 5 microns on the film will still be visible! Some people claim even slightly better values. On the other hand, most color photography work falls far short of this, and for much work such a resolution exceeds the real need.
In several occasions I have run lens tests, both for my own lenses, and for other people's ones. The process I use is this:
Two USAF resolution test charts are taped to a wall and photographed with the lenses under test at various aperture settings. The camera is mounted on a stiff tripod and all precautions are taken to minimize shake. The film used is fine grain black-and-white (Kodak T-Max 100). Under a microscope, the smallest discernible line image is identified and its size on the film is computed, for both test charts, on each image. The pictures are taken in such a way that one test chart is at the center, and the other at a specific distance from the center. Then curves can be drawn for each lens over its aperture range.
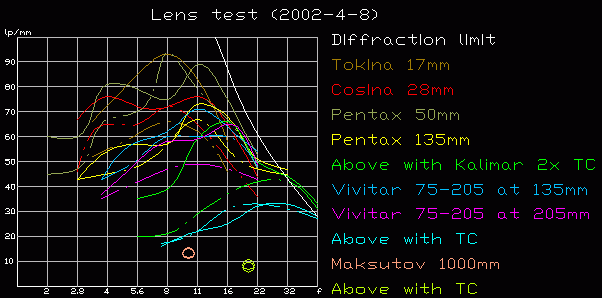
Below is a graph of my latest test, involving all reflex lenses I currently use (April 2002). The continuous lines represent data at image center, while the broken lines are data at 12mm radius. The criterion used to determine limiting resolution was "the smallest line pairs at which the lines could still have been counted by eye, in at least one orientation". This is not very scientific, and it tends to give slightly optimistic values, so take my data with a grain of salt. But at least, the graph should give an idea and be a reasonable comparison of my lenses!
The lenses tested here are the following, in order of focal length:
- Tokina 17mm f/3.5, Pentax-K mount
- Cosina 28mm f/2.8, Pentax-K mount
- Pentax SMC-M 50mm f/2, Pentax-K mount.
- Pentax SMC-A 135mm f/2.8, Pentax-KA mount
- Vivitar zoom, 75-205mm with macro, constant f/3.8, Pentax-K mount
- Russian (I don't know how to spell the brand) 1000mm f/10 Maksutov
catadioptric, Pentax-K adapter
- Kalimar 2x teleconverter, Pentax-K mount
The theoretical diffraction limit at image center was added to the graph, as a handy reference of performance vs. possibilities. The graph contains actual measured values, which include any measuring error, tripod shake effects, focusing errors, and so on.
As you can see, each lens starts from a certain resolution at full aperture, and when stopping down it improves, reaches a peak, and then again reduces quality because of diffraction. At first I was surprised by the two sharpness peaks exhibited by some lenses, and the drop in between. I asked an optical engineer about this, and he explained that such curves are perfectly normal: The higher peak is the "natural" one, and the other peak at larger aperture is where the designers aimed when calculating corrections for the aberrations! According to the optical engineer, this target aperture for best correction is often about 70%, which would be one stop down from fully open.
Some comments are in order. For example, note that the 50mm from about f/11 onwards tracks the theoretical limit quite closely. I would think that most of the difference between the limit and the actual curve is attributable to the losses in the film. The very high peak of the 50mm at 12mm center distance at f/8 is probably a measuring error, caused by fringe interference, or maybe at that aperture the focus changes, so that given the field curvature the image is better focused in the periphery than the center! I did not retouch focus between individual shots, and stopping down a lens can indeed change its focus a slight bit!
The very high resolution of the 17mm at center at f/8 seems to be true, given the rest of the curve. Unfortunately it looses a lot in the periphery, but this is to be expected from a lens as wide as this!
The 135mm lens stops down to a position marked f/32. But from the curve it is obvious that the true aperture at this setting cannot be smaller than f/26 or so, or it would have to be a Harry Potter lens to exceed the theoretical diffraction limit! The two curves taken with teleconverter also exceed the limit at small apertures. I suspect that this converter is not a full 2x, which would explain the effect.
Since the 1000mm has no aperture adjustment, it was plotted as a circle around the only data point, instead of a curve.
The test photos were made at distances of less than 1 meter for the 17mm lens, ranging to about 8 meters for the 135mm and longer lenses. But most long lenses will deliver best sharpness at infinity, or close to infinity setting! This may explain at least in part the generally lower performance of the longer lenses in my test. Maybe a test at the longest practical distance would place the longer lenses a bit higher!
This graph can give good advice at how to use the lenses. It's clear that the 17mm should be used at f/8 whenever practical, the 135mm at f/11, and when the latter is combined with the teleconverter it should be set at f/8, giving a true f/16. The 28mm and 50mm lenses provide good performance over the range of f/4 to f/11, giving more room for creativity than the other lenses. Unfortunately the graph also shows that the 1000mm lens is unsuitable for serious photography because of its very low resolution, and that the same is true, to a lesser extent, for the zoom/teleconverter combination.
The graph gives a good starting point for the optimal use of my lenses, but there is a lot more to making sharp photos! For example, the test almost eliminates shake and depth of field issues, which in most practical work are very important.
Keep in mind that this graph only shows limiting resolution of the lenses. Much more important for photo quality is the contrast delivered at about 10 lp/mm! I have measured this too, but the results can only be used as relative data, since I have no way to calibrate them. I used my film scanner to measure the ratio between the density of the centers of black and white lines at the 10 lp/mm groups, and graphed this data. There were very strong fringe interference phenomena, which, added to my scanner's nonlinearities, made some curves shoot far out of the graph and even bend backwards! I plotted them just as measured, limiting the graph to the interesting zone. You should visually smooth the peaky curves to get usable ones!
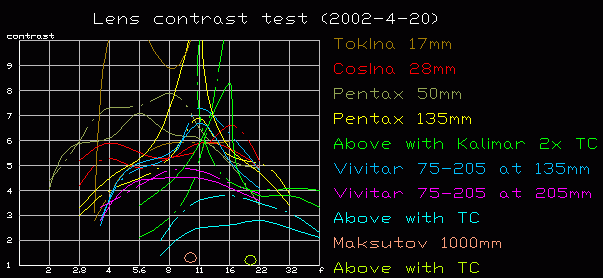
It's interesting to see that once the measurement quirks are discounted,
this graph tells pretty much the same as the sharpness test! This makes
me think that in practice one can use a contrast measurement just as well
as a limiting resolution measurement, to determine lens quality. But there
are some differences. The most notable one is that at fully open diaphragm,
the contrast drops more than the resolution. Another is that contrast is
often better in the periphery than at image center, while sharpness is
better near the center. The most notable exception to this is the Tokina
17mm, which shows extremely high contrast in the center, and only average
in the periphery.
On the other hand, if you want to project slides to a size of 1.5 x 1 meter, and have the audience sitting at 1.5 meter distance, which would be typical in a home slide show, the situation is different: People will be able to discern about 0.5 lp/mm on the screen, which translates to 21 lp/mm on film. Your slide needs to be clearly better than that, so that the final quality depends more on the projector. 40 lp/mm is a good value to aim at. This rules out teleconverter use almost completely, and leaves some lenses quite hard pressed. Keep in mind that 40 lp/mm comes close to the limit of many color films! The much higher values stated by film manufacturers (typically 120 to 160 lp/mm) are valid at very high subject contrast and very low resulting contrast on the film, which is not usable in practice.
A similar case as the slide is a negative that will be enlarged to a large print, if this print will be viewed from close distance. And when you want to crop a negative and enlarge only a part of it (for example for panoramic prints), even the best possible resolution may be too poor!
On the other hand, an image intended to be displayed on a computer screen has the lowest sharpness requirements of all. For example, all photos in my galleries ar scanned at 500 pixels vertical resolution (horizontal resolution varies according to the selected format). Most of them show an entire 35mm frame. 500 pixels can resolve roughly 160 line pairs, which on the original slides (horizontally oriented) would be less than 7 lp/mm! If the original slide resolves at least 15 lp/mm or so, the scan will be almost indistinguishable from that of a top quality slide!
Most people set their screens at 1024x768 pixels, or at most at 1280x1024. That would be the equivalent of roughly 10 to 12 lp/mm on 35mm film, so that an original having a resolution of 25 lp/mm is good enough to let the computer screen be the main limiting factor in image quality! That's also why so many people are happy with their 1 to 4 megapixel digital cameras - after all, a 1024x768 screen has less than 0.8 megapixels! Even considering that a pixel of a digital camera usually records only one color, a 3 to 4 megapixel camera can fill a 1024x768 screen just as well as an excellent scan of the best 35mm original!
So, people who only intend to make digital images for today's computer
monitors can forget this entire page. But those who still like to make
real photographs, and strive for high quality, need to consider points
like the ones presented here!
For any given lens, try to use it near its optimum aperture whenever practical. This optimum aperture is somewhere between two stops down from fully open, to about f/16. The optimum is more towards the open side of this range when the lens is of high quality and/or of short focal length, and more on the f/16 side when the lens is of low quality and long focal length.
Depart from this optimum aperture setting as required in each case. Some reasons to choose a smaller aperture are:
- you need more depth of field;
- there is too much light (a bad reason! Better use less sensitive
film!);
- you want to blur motion (waterfall photos) (this is really a "too
much light" situation!);
- you want to be able to focus carelessly and still get decent sharpness
(a very bad reason!).
Among the reasons to use a wider aperture are:
- you want less depth of field, to make a subject stand out from the
background;
- you don't have enough light (better use a tripod and go for a good
aperture setting!);
- the combination of wider aperture and faster shutter may give better
sharpness due to less shake;
- you need to freeze subject motion through fast shutter speed;
- using flash at a large distance (a stronger flash would be better!).
Avoid camera shake as much as possible. When hand-holding the camera, hold it with both hands, press the elbows against the body, lean against some support, don't breathe while taking the picture, time the shutter release between two heartbeats. Don't drink strong coffee before taking photos, if you are sensitive to coffeine. At any shutter speed that is not really high for the lens used, try to support the camera with a bean bag, press it against a wall/tree, or use a tripod. Do carry a small but sturdy table tripod among your basic outfit! It's very light and very useful! Such a tripod can be pressed against a wall too! If the camera is firmly supported, such as on a tripod, use a cable release, or better than that, either a wireless remote control or the self-timer. This will avoid shake introduced by touching the camera. Specially with reflex cameras, avoid shutter speeds in the neighborhood of 1/8 second even when using a tripod, since at such speeds the mirror shake is most noticeable! Either faster or slower speeds are better than 1/8 second!
Do not use filters when it isn't necessary. Many people have UV blocking filters or 1A color filters permanently on their lenses. This degrades image quality. The degradation comes not so much from optical imprecisions of the filters, which according to my tests are insignificant for a UV filter and produce less than 10% sharpness degradation for a polarizer. They come mainly from light loss, which, all other parameters being equal, forces the shutter speed to be slower and thus motion blur to increase. Most filters are uncoated, and thus loose 8% of the light by reflection alone! A typical decent quality UV filter will absorb perhaps another 4% of the light, making for a total loss of 12%, so that you will have 12% more motion blur when shooting at a given aperture. Polarizers typically loose two thirds of the light, so that shutter time will be three times slower and motion blur will be three times worse!
I don't mean to say that you should never use filters. Some filters, especially the polarizer, can often be extremely useful, offsetting the image degradation they introduce. The point is to avoid using them when they are not needed! Most modern films are not really UV sensitive, and the chance of any UV radiation to pass through the several different types of glass in a photo lens is slim indeed. So, UV filters are simply not needed! A 1A color correction filter may make sense when shooting slides that should look like sun-lit while in fact the scene is shadowed and lit by blue sky... but when shooting negatives, anyway the lab making the prints will destroy the subtle pink tone introduced by that filter! And the reason most people bring up to defend their use of UV or 1A filters, which is protecting the lens from scratches, makes sense only when photographing a sand storm. I have been shooting without such a lens protection for many years, I have cleaned my lenses countless times using a simple rag, and they are still in good shape.
Now think of how much flare an uncoated filter fully exposed at the very front of your lens can cause, compared to how little flare the multicoated lens elements back inside the tube can cause. My contrast tests made with the 50mm lens at f/2 (which is really an overly benign way to test!) show a 10 percent contrast loss for the UV filter, and a 20% loss for the polarizer! This should make you remove that UV filter now! If you absolutely want to stick something in front of your lens, get one of those collapsible rubber shades! It is cheaper than a filter, looks bigger if that's important to you, and can actually increase the quality of your pictures! Just be careful to avoid vignetting.
Check your camera periodically for focus accuracy, and especially check it if you have any suspicions that it may not be optimally adjusted!
When having subjects at different distances, choose an aperture that will give enough depth of field, and set the focus for an intermediate distance that is properly weighted for the relative importance of the subjects. Usually it's better to have more sharpness on the closer subjects, and often it's better take the decision and show just one subject sharply, intentionally blurring the other through a wide aperture setting!
Use good quality film. If using negatives, exert great care in selecting the lab that will do the enlargements. Don't be afraid to change lab if the quality is not good! If using slides, get a good projector and a grainless screen! It's absurd to buy a 500 dollar lens for the camera, use it at f/8 for best sharpness, and then project the slides through the wide-open 20 dollar lens of a low grade projector onto a coarse-grained pearl screen! And please, place the projector at screen center height, not on a low table!!!
And the most important recommendation for sharp pictures: Do focus accurately and correctly!!! Check focus just before shooting, because some lenses tend to move on their own! Trust the matte screen more than the split-image, and for off-center girlfriends, NEVER use the split image!
Back to homo ludens photographicus.