Making lenses at home
Once upon a time it just happened that I absolutely needed to build a slide
projector. Why build it, you might ask? Well, mostly for the fun of doing
it, but also because I didn't find any factory-made small, portable, inexpensive,
silent desktop backscreen projector for viewing slides with two or three
people.
To build this projector, I used a Praktica 50mm f/1.8 camera lens, which
I bought new for a very low price. But I also needed a condenser. For that,
I ordered some "educational" planconvex lenses from Edmund Scientific.
And educational they were! I learned that simple spherical planconvex lenses
make awfully bad condensers! The lesson taught me that I needed aspheric
ones. Edmund does sell good aspheric condenser lenses, but at such a price
that it would be cheaper to buy a complete simple projector and take its
condenser lenses out! So I decided to make the lenses. After all, I do
have a lathe, and patience...
 I purchased
a small piece of acryl plastic which is optically good enough to be used
for lenses. The manufacturer specified the refraction index. Armed with
this information and the refraction formula, and knowing where I wanted
my light rays to go, I wrote a simple BASIC program that calculated the
appropriate lens shape by infinitesimal approach. I let the computer print
out the shape on a paper, and then used my lathe, with a cutting tool prepared
with a slightly concave cutting edge, to make the coarse shape of the convex
surface. This was done by carefully guiding the tool holder over the paper
printed with the shape.
I purchased
a small piece of acryl plastic which is optically good enough to be used
for lenses. The manufacturer specified the refraction index. Armed with
this information and the refraction formula, and knowing where I wanted
my light rays to go, I wrote a simple BASIC program that calculated the
appropriate lens shape by infinitesimal approach. I let the computer print
out the shape on a paper, and then used my lathe, with a cutting tool prepared
with a slightly concave cutting edge, to make the coarse shape of the convex
surface. This was done by carefully guiding the tool holder over the paper
printed with the shape.
Acrylic is a very easy material to work with. Essentially the only caution
necessary is to work slow, or use good water cooling (which I can't). Otherwise
the tool heats up, the plastic melts, and you have to start anew.
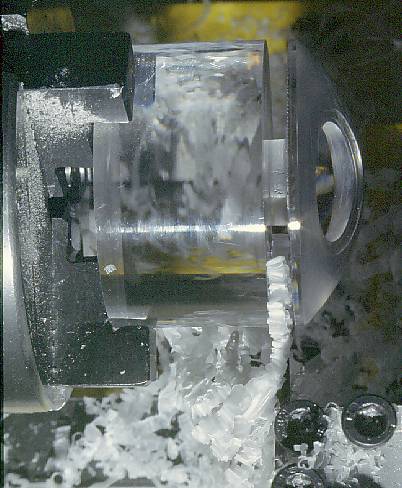
 After the coarse
shape was cut, I smoothed the surface using 120 grit sandpaper, dipped
in water for lubrication. The lathe ran while I moved the sandpaper, with
a cork-on-wood backing, radially over the surface. With this coarse grade,
very quickly all the tooling marks were gone, replaced by the finer scratches
of the sandpaper.
After the coarse
shape was cut, I smoothed the surface using 120 grit sandpaper, dipped
in water for lubrication. The lathe ran while I moved the sandpaper, with
a cork-on-wood backing, radially over the surface. With this coarse grade,
very quickly all the tooling marks were gone, replaced by the finer scratches
of the sandpaper.
Then I switched to progressively finer sandpaper, giving the lens just
a quick pass of each grade. I went through the whole spectrum of grits,
down to a 600 grit. All were lubricated with water, and each sandpaper
first got medium pressure, which then was reduced during the process.
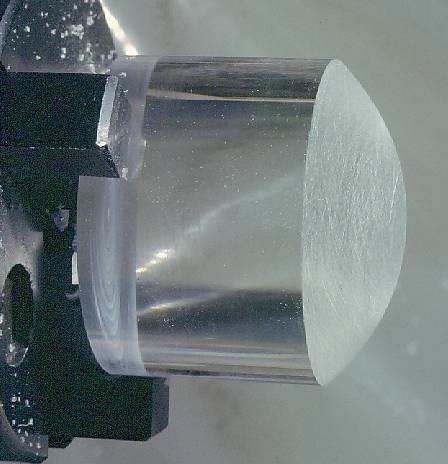
 After the last
sandpaper pass, the lens surface was polished, using first medium, and
then fine grade of polishing compound. The fine surface quality achieved
unfortunately does not show properly in this photo, because the surface
refracts light from the backside of the plastic , which is unfinished!
After the last
sandpaper pass, the lens surface was polished, using first medium, and
then fine grade of polishing compound. The fine surface quality achieved
unfortunately does not show properly in this photo, because the surface
refracts light from the backside of the plastic , which is unfinished!
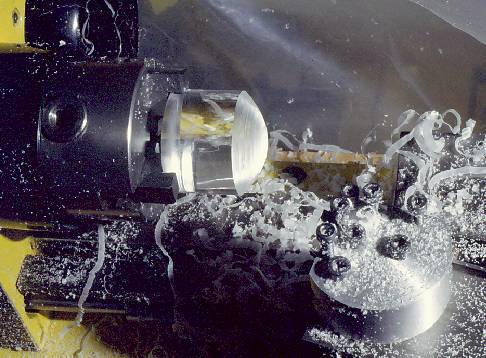
 Now the lathe
came into full use again, to cut the flat surface of the lens. Here you
can see a narrow frontal cutting tool eating its way into the plastic.
I gave it a clean and slightly rounded cutting edge on the right side too,
so that it leaves the flat surface of the lens good enough for hand finishing,
starting from 330 grit sandpaper.
Now the lathe
came into full use again, to cut the flat surface of the lens. Here you
can see a narrow frontal cutting tool eating its way into the plastic.
I gave it a clean and slightly rounded cutting edge on the right side too,
so that it leaves the flat surface of the lens good enough for hand finishing,
starting from 330 grit sandpaper.
This cutting operation has to be done with particular care, because
it's very easy to overheat the plastic and melt it. But the smell of warm
acrylic warns before it is too late!
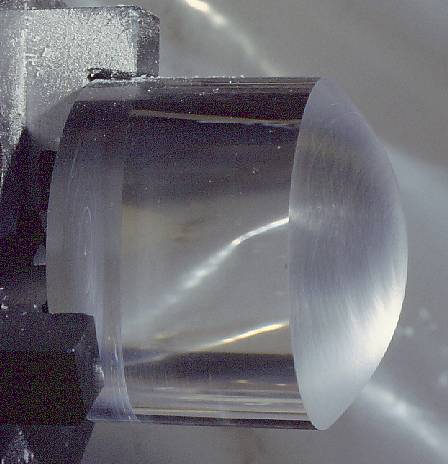
 The same process,
seen from the side! The funny window on the lens is not a hole, but the
remaining plastic core connecting the lens to the rest of the block!
In this photo the polished surface does show.
The same process,
seen from the side! The funny window on the lens is not a hole, but the
remaining plastic core connecting the lens to the rest of the block!
In this photo the polished surface does show.
I gave my lenses an edge thickness of only 1.5mm, because this allows
to make better use of the diameter of a condenser lens. These lenses
are 50mm in diameter, and the evenly illuminated circle measures 46mm.
This is pretty good. For comparison, the educational lenses of the same
diameter from Edmund Scientific, which are spherical and have a much thicker
edge, only give 37mm, which is not enough to illuminate a 35mm slide. Of
course, those lenses weren't made for this purpose... It was my error to
assume I could use them!
After cutting the lens off, I smoothed its flat side with sandpaper
laid on a flat surface, and finished with polishing compound, just like
on the convex side. A lot more patience was needed, because this was now
a fully manual operation! I didn't want to mount the lens in the lathe,
for fear of scratching the convex surface.
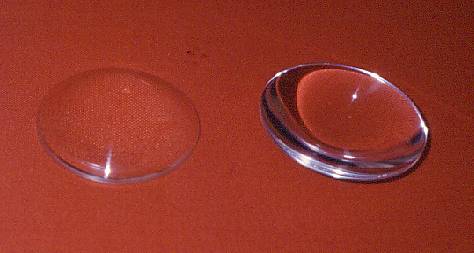 Here you can
see the finished product, previous to mounting. I hope you agree that they
look good!
Here you can
see the finished product, previous to mounting. I hope you agree that they
look good!
After cutting off the first lens, I made the second lens in exactly
the same way. This was routine now! And it was so much fun that I would
have made another, if the acrylic cylinder had been long enough!
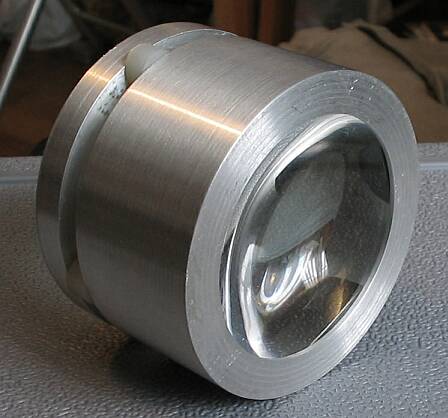 The lenses were
mounted in an aluminum barrel, made on the same lathe. The convex surfaces
of the lenses look at each other. Four narrow stiff black plastic strips
act as separators. The backside holds a heat filter (bought at Edmund Scientific),
while nylon separators maintain a 5mm gap between the heat filter and the
first lens. This allows free air convection on both sides of the filter,
which is enough to keep the lenses from warming up excessively with the
50 Watt halogen lamp. No noisy fan is needed.
The lenses were
mounted in an aluminum barrel, made on the same lathe. The convex surfaces
of the lenses look at each other. Four narrow stiff black plastic strips
act as separators. The backside holds a heat filter (bought at Edmund Scientific),
while nylon separators maintain a 5mm gap between the heat filter and the
first lens. This allows free air convection on both sides of the filter,
which is enough to keep the lenses from warming up excessively with the
50 Watt halogen lamp. No noisy fan is needed.
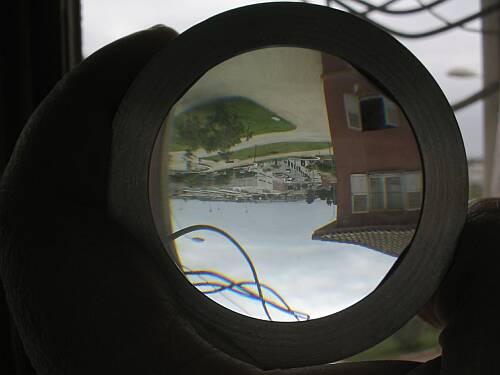 Here you can
see the optical quality of my condenser! This picture was made by holding
the condenser near the window and focusing a camera at the inverted image
in it. I would say that for a lens that isn't intended to form an image,
the image is quite good! The field distortion is strong, because the lens
design was done to evenly distribute light from a point source over a surface,
and not to create an image. There are also JPG compression artifacts in
this photo - don't attribute them to my beautiful lenses! :-)
Here you can
see the optical quality of my condenser! This picture was made by holding
the condenser near the window and focusing a camera at the inverted image
in it. I would say that for a lens that isn't intended to form an image,
the image is quite good! The field distortion is strong, because the lens
design was done to evenly distribute light from a point source over a surface,
and not to create an image. There are also JPG compression artifacts in
this photo - don't attribute them to my beautiful lenses! :-)
Even so, I would not try to make a true image forming lens by this method.
While lathe machining to a paper printout, followed by hand polishing,
certainly give results good enough for a condenser, just as certainly the
quality falls far short of what a camera lens would require.
Back to homo ludens photographicus.