My photographic equipment
Past and present
One of the greatest truths of photography is that the equipment matters
less than the person who uses it. But there is another equally great truth:
Without any equipment you cannot take even a single photo! So, let's discuss
cameras, lenses, filters, tripods, flashes, and the finer details.
 This was the first
camera I ever got. Don't get me wrong, I'm not that old! :-) This camera
was already old, and retired from active service, when I got it. It had
a bad shutter, and having spent several decades in a damp basement, was
rusty. I repaired the shutter (replacing a broken spring), but there was
a huge practical problem using it: This camera needs type 120 films, exposing
them in a format of 9x6cm, and taking photos in this style is extremely
expensive, specially considering that my only "income" at that age (11
years), was an allowance sized to buy an ice-cream once a month!
This was the first
camera I ever got. Don't get me wrong, I'm not that old! :-) This camera
was already old, and retired from active service, when I got it. It had
a bad shutter, and having spent several decades in a damp basement, was
rusty. I repaired the shutter (replacing a broken spring), but there was
a huge practical problem using it: This camera needs type 120 films, exposing
them in a format of 9x6cm, and taking photos in this style is extremely
expensive, specially considering that my only "income" at that age (11
years), was an allowance sized to buy an ice-cream once a month!
I never used this camera. Maybe someday I buy a 120 film and try it.
After all, nowadays my salary is large enough to buy several ice
creams a month!
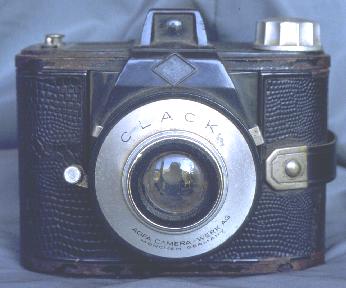
Like most low cost cameras of its day, this one had fixed shutter speed
(plus time exposure), and no coupling between the shutter and film advance,
so it was totally possible and even normal to forget winding the film and
making unwanted double exposures, or winding the film without shooting,
thus loosing a frame.
The lever at the left side of the camera (right side on the photo) moves
in two different aperture holes, giving the photographer the choice of
"sun" or "cloud" exposure. It also had a third position, where it moved
in a small close-focus lens aimed at about 1 meter. Otherwise, the focus
was fixed at infinity.
People in this time loved the sound of camera shutters. This Agfa is
justly named "CLACK"!
 Still in the
range of onomatopoeic cameras, this one is an Ansco "Clipper". The front
telescopes out for taking photos, and in for storage, making this camera
rather compact. Like the Agfa, this one has a fixed shutter speed plus
time exposure, but it has no choice at all of aperture or focus. It seems
to have been made in 1952.
Still in the
range of onomatopoeic cameras, this one is an Ansco "Clipper". The front
telescopes out for taking photos, and in for storage, making this camera
rather compact. Like the Agfa, this one has a fixed shutter speed plus
time exposure, but it has no choice at all of aperture or focus. It seems
to have been made in 1952.
Despite the fact that this camera is in good condition, I have not been
able to try it, because it needs type 616 film! Anyone ever heard of that?
The label inside the back cover even insists on using Ansco brand 616 film!
The picture format is a vertically oriented 5x6cm.
My first usable camera: The Balda 144-X
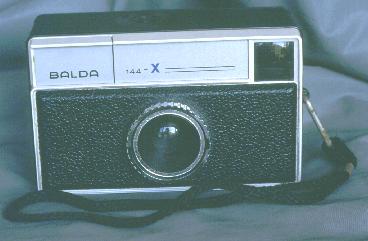 For Christmas 1977
I got my first usable, brand new camera! To my dismay it was this one:
Fixed focus, fixed aperture, fixed shutter, not even time exposure, and...
using square-format type 126 cassette film! I had hoped for something better,
that can use standard 35mm film, but my parents and the sales clerk didn't
trust this 12 year old boy, and so I got this very basic thing. But I will
not complain, it served me for several years, I had a lot of fun with it,
and made a number of good photos.
For Christmas 1977
I got my first usable, brand new camera! To my dismay it was this one:
Fixed focus, fixed aperture, fixed shutter, not even time exposure, and...
using square-format type 126 cassette film! I had hoped for something better,
that can use standard 35mm film, but my parents and the sales clerk didn't
trust this 12 year old boy, and so I got this very basic thing. But I will
not complain, it served me for several years, I had a lot of fun with it,
and made a number of good photos.
Or perhaps I will complain anyway: A 20-exposure cassette film cost
more than a 36 exposure 35mm one. And slide films in this format were hard
to find locally, so much that in some cases I had to ask someone to bring
me films from elsewhere. I could not be picky about brands, either, the
only slide film available was the Agfa CT-19. Later a Kodak Ektachrome
64 became available, but its color rendering was abysmal. I basically stuck
to the CT-19 as long as I had this camera, despite the very coarse grain
of that film.
The coarse grain was not so much of an disadvantage. The fact of having
no focus control, plus the other fact that cassette films have no backplane
and thus the emulsion floats around, never being at a constant distance
from the lens, guaranteed grossly unsharp photos, to which the coarse grain
actually added detail rather than obscuring it! :-)
The "X" in this camera's model number stands for type X flash cubes,
also known as "magicubes" in their time. For the younger among my readers,
who never in their life have seen them, I shall explain that these were
simply four single-use flash bulbs, each with its own reflector, arranged
in a cube. These bulbs were filled with magnesium wire and oxygen, and
probably some other igniting substance. The cube was plugged onto the top
of the camera. When pressing the shutter, a small pushrod shot out of the
camera, and disengaged a spring in the cube, which knocked against the
flash bulb's stem, setting off an explosion that would burn the magnesium,
produce a flash of light, melt down the bulb, reflector and front diffuser,
and release a cloud of smoke and smell. When advancing the film, the cube
turned 90 degrees, bringing the next flash bulb in position. After four
flashes the cube was discarded. This was a development of the older spring-less
flash cubes, which were triggered by a battery inside the camera. This
"X" system worked without batteries.
The system was reliable, the light was good, but the cost of using a
flash doubled the total cost of picturetaking, as five flash cubes cost
as much as a 20-exposure slide film. Bad news for my stressed pocket...
I would love to put a photo of such a flash cube here, but I don't have
any old magicube left! And they are found only in museums nowadays, if
at all!
As the fixed focus was too much of a limitation, I mounted a lens salvaged
from a toy telescope into a cardboard sleeve that fit on the camera's objective.
This lens had a focal distance of 39 cm. So I cut a copper wire to that
length, and this was my focusing device! For shooting a close-up, I would
stick the lens onto the camera, use the wire to place the camera at 39
cm from the object, estimate the parallax correction, and shoot. I made
many quite usable flower and insect photos employing this trick.
I used the Balda for almost 5 years, shooting almost 800 slides with
it. Most of my allowance went into photo material. In the "Early Masterworks"
section are some of the photos taken with this camera.
My mother's Agfa
My mother had gotten a nice Agfa camera for 35mm film when she married.
She never really used it. My father shot a few rolls of film with it when
my sister was born shortly later, and another few during a trip to Germany.
From then on the camera was collecting dust, but despite all my bugging,
started at the age of 8, my mother refused to let me use it. Until 1982,
when I was 16 years old, at two weeks from starting on a long trip with
the school class, and finding that my Balda had died! It was just impossible
to do that trip without a camera, and I turned everything upside down trying
to borrow one from friends, neighbors, and family members. This finally
softened my mother's hearth, and I got permission to take her Agfa on the
trip!
That camera had focus control, 0.9 meter to infinite, wow! And the shutter
was adjustable, it provided 1/200, 1/50, 1/25 and B! WOW!!!
And the aperture, can you believe it, was fully controllable from 2.8 through
22! TWO WOWS!
Of course it had no exposure meter, and no focusing device, so I would
have to estimate both the exposure and the distance. I had no problem with
that and brought back almost 300 slides from the trip! I messed up only
very few. I used Agfa CT-18 material, which despite having almost the same
sensitivity as the CT-19 used for the Balda, had much finer grain. And
the colors of that ancient CT material were more natural than anything
I have seen ever since.
I have no photo of this camera. Back then I did not take photos of my
equipment, being too poor to waste material on that, and now the camera
is no longer with us, because years later my brother used it, and left
it in a parked car, tempting someone to break in and steal it. I hope the
thief enjoys it as much as I did.
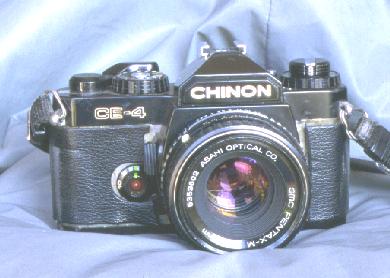
The Chinon CE-4
 I used my mother's
Agfa only for two months after the trip, because then my 17th birthday
came, and I had saved enough money to propose a dirty deal to my mother:
If she would give me as a birthday present the amount of money I was lacking
for my dream camera, I would give her back the Agfa! The deal worked out!
I used my mother's
Agfa only for two months after the trip, because then my 17th birthday
came, and I had saved enough money to propose a dirty deal to my mother:
If she would give me as a birthday present the amount of money I was lacking
for my dream camera, I would give her back the Agfa! The deal worked out!
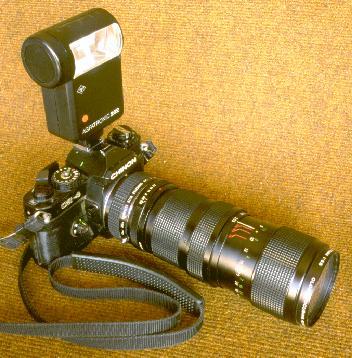
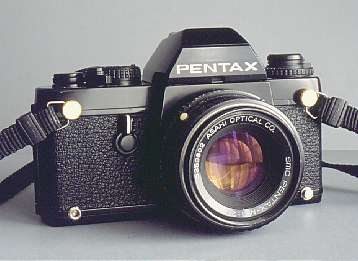
I had spent quite some time hanging around in photo shops, learning
about reflex cameras, making friends with the clerks, etc. And at one shop
this second-hand Chinon had shown up. It was in perfect condition (not
as battered as it looks in this photo, taken two decades later!), was cheap
for its features, and it provided all I needed to fulfill my wildest dreams:
Manual exposure from 4 seconds to 1/1000, automatic exposure over an even
wider range, multi-exposure, memory exposure, self-timer, viewfinder exposure
display, depth of field preview, flash connection both in hot shoe and
cable jack, and on and on! The lens mount was the standard Pentax-K, so
there was a wealth of low-cost lenses available, even locally! The clerk
told me that the camera was "as is", without a case, no instruction manual,
no strap, nothing, just the bare camera with a Pentax 50mm f/2 lens. I
didn't care for a manual or straps. Hey, this was a reflex camera, a real
reflex! For a price that looked within reach!
Well, thanks to my mother I got it. It's still my main camera. One month
after buying it, the former owner dropped by the store and delivered the
original box, instruction manual and shoulder strap, which he had finally
found! I got it when I stopped by the store some days later to buy
some film! So now it was complete.
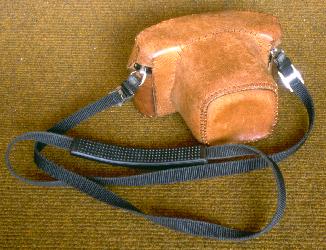 In order to protect
the camera, I wanted a leather case. But there were none for this camera's
exact size, so I made one. I used a small drill to make the holes before
sewing the leather. But the thread I used was too weak, and soon ripped,
so I replaced it by enameled copper wire. That kind of thread holds
up! The homemade leather case is still in perfect shape, after almost 20
years of use, as you can see in this photo.
In order to protect
the camera, I wanted a leather case. But there were none for this camera's
exact size, so I made one. I used a small drill to make the holes before
sewing the leather. But the thread I used was too weak, and soon ripped,
so I replaced it by enameled copper wire. That kind of thread holds
up! The homemade leather case is still in perfect shape, after almost 20
years of use, as you can see in this photo.
The case fits the camera snugly, but has a little extra space in front,
so I can put the 50 or 28mm lens on the camera, with a filter, and the
hood still closes.
But even leather has its limitations. One day I was traveling into the
mountains in an incredibly overloaded rural bus, the camera in front of
my stomach, carefully guarded. I counted about 110 people jammed into the
44-seat bus. Suddenly a very fat lady stepped on my foot. I tried to get
her off, but she stepped on someone else's foot, who also shook her off.
The fat lady lost balance, and crashed against me, leading to a chain reaction
that put 5 people to the ground in the aisle of the bus, jammed and all.
The lady ended up on top of me. That is, on top of my camera! My bones
escaped unbroken, I don't know how, but she broke the multi-exposure lever
off my camera.
After the trip I disassembled the top of the camera, drilled a 1mm hole
into the proper spot of the multi-exposure mechanism, and used cyanoacrilate
glue to install a new lever made from steel wire. It has held up well.
After this fix, the Chinon worked flawlessly for 12 years, until one
day the shutter got stuck. This happened in the desert, during a mountain
trip, and left me without a camera! I feel helpless when traveling without
one! Once home, I disassembled the camera, only to see the shutter snap
back and resume working... I couldn't make it fail, so I assumed it was
a one-time event, and reassembled the camera.
And as soon as I started using it, it locked up again.
This started a black period of time, lasting for a year, during which
I disassembled the camera a total of 11 times, searching for the cause
of the trouble. Always the camera would resume working before I had fully
disassembled it, keeping me from finding the reason of the problem. So,
on the 11th try I went for all of it, and disassembled the entire camera
mechanics to the level of individual pieces, intending to wash out any
hardened grease and put in fresh one. I left absolutely nothing assembled.
And deep in the shutter mechanism I found a tiny grain of sand...!!! After
reassembling it, the shutter never again failed.
It's a bit troublesome to do such a radical disassembly. You can loose
adjustment settings. I drew plans of everything, counted the amount of
turns some springs were wound up, etc. I returned everything to original
condition. Only the viewfinder focal plane position was impossible to keep
adjusted that way, and I had to readjust it later in a painstaking work,
after noticing that my pictures were unsharp even if I focused very carefully.
When the camera was 20 years old, it had the first and so far only failure
that can be attributed to the camera proper, not to external events like
dirt or fat ladies: I started getting small specks of undeveloped area
on my pictures! After a lot of detective work I found the reason. This
camera, like most, uses a self-adhesive black foam material to seal against
unwanted light, all around the back cover and at some other places too.
This foam material was decomposing, turning into a sticky, chewing-gum-like
substance! When opening the camera back, some of this stuff stuck to the
back, fell off and landed elsewhere, and some of it finally got stuck to
the film, keeping the chemicals from acting at those spots!
There was still no light leaking in, but it was clear that the seals
had to be replaced. I removed them by mechanical means, followed by alcohol
(for the camera, not for me!), and used a self-adhesive black velvet material
made by a German company to replace the original seals. Problem solved!
The last "repair" of my camera was done yesterday: After scanning these
photos, I judged that the camera was looking too bad, and so I gave it
a bit of attention, replacing the black vinyl covering at the two sides
of the lens. The original vinyl has hardened and shrunken, no longer covering
the metal parts, and in addition the glue also was dissolving, like the
black foam. I cut new vinyl coverings, cleaned away the old glue, and glued
on the new ones. The camera looks much better now!
By far most of the pictures on this web site were made with this camera.
It has shot almost 10,000 slides by now.
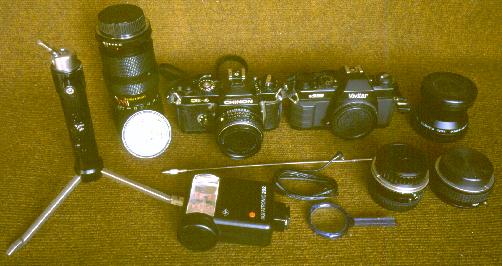
Lenses
A camera is no good without lenses. When I got the Chinon, the 50mm Pentax
lens was included, but the most attractive feature of reflex cameras is
the ability to use many different lenses. So I started buying some, almost
in all cases on special offers.
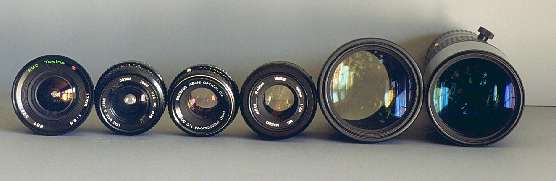
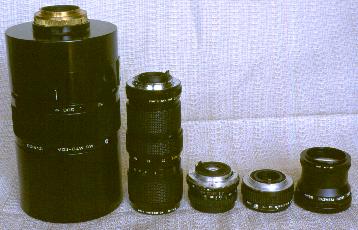 These are the
ones I use today. The second largest is the one I got first after getting
the camera. It's a Vivitar zoom that goes from 75 to 205mm, at a constant
aperture of f/3.8. Focusing and zoom controls are separated, as they should
be. It focuses down to about 20 cm when at 75mm focal length, being a moderate
macro lens too. It gives good optical quality and excellent color rendition.
Its main disadvantages are large size, and the fact that the front lens
turns with the focus control, making it a bit messy to use a polarizer.
But this is just a small disadvantage. My father bought this lens for me
on a special sale of "second choice" items. The flaw this one has is a
2mm long scratch on the front lens. For that reason it cost just a fraction
of the standard price! I closed the scratch with a drop of black paint,
and have never seen any effect of it on the photos.
These are the
ones I use today. The second largest is the one I got first after getting
the camera. It's a Vivitar zoom that goes from 75 to 205mm, at a constant
aperture of f/3.8. Focusing and zoom controls are separated, as they should
be. It focuses down to about 20 cm when at 75mm focal length, being a moderate
macro lens too. It gives good optical quality and excellent color rendition.
Its main disadvantages are large size, and the fact that the front lens
turns with the focus control, making it a bit messy to use a polarizer.
But this is just a small disadvantage. My father bought this lens for me
on a special sale of "second choice" items. The flaw this one has is a
2mm long scratch on the front lens. For that reason it cost just a fraction
of the standard price! I closed the scratch with a drop of black paint,
and have never seen any effect of it on the photos.
The small lens in the middle is the one I got next. It's a 28mm 1:2.8
wide angle lens, from the brand "Cosina". It was very cheap and looks low
quality. Indeed on time the iris mechanism got loose, requiring disassembly
and a few drops of glue, but it has a surprising optical quality! In a
test I made on ultra fine grain B/W film, it came out as my sharpest lens,
with a resolution in the range of 2 to 3 microns!
I spent some time using just these three lenses, covering 28 to 205mm,
before deciding to take a step further. I bought a 2x Kalimar teleconverter,
which is the smallest thing in this photo. This expanded the zoom to a
whopping 410mm focal distance, at an aperture slightly better than 1:8.
Because of increased aberrations, in fact it must be stopped down to 5.6
at least on the zoom, which is a real f/11, in order to get usable sharpness.
This limits the range of application quite a lot, but still I have done
a considerable number of good bird shots using the combination.
A very welcome feature of this teleconverter is that the entire optics
can be unscrewed, transforming it into an extension tube for close-up work.
In fact, I use it much more often as extension tube than as teleconverter!
Several years later I found the thing at the right side in the photo.
It's a Marumi semi-fisheye adapter that is mounted in front of a normal
lens. Combined with the 50mm lens, it gives a super wide angle view, with
some fisheye-like field distortion that can be concealed or emphasized,
depending on where you place the horizon and other straight lines. But
combined with the 28mm one, it gives a perfectly round full fish-eye image
that can be used for special effect photos.
This adapter is labeled "for video use". It's so unsharp in the corners
that in fact it should not be used even for video! In photography, which
requires better optical quality than video does, I can use it only by dramatically
stepping down. At f/11 it starts becoming acceptable, but usually I go
all the way to f/22, where it becomes decent... Still, for the odd
effect photo it's quite usable, and it was dirt cheap. One good aspect
of such a small focal distance is that you can shoot pictures at very low
shutter speed without needing a tripod, so the need to stop down is not
a large problem.
In my desires to get closer to my preferred models, the birds, I bought
the large russian Maksutov telescope at the left of the photo. It's a 1000mm,
f/10 catadioptric tele. It came with a removable screw mount for Zenith
cameras, so I designed an adapter for the Pentax-K bayonet, and a good
friend in a good mechanical workshop manufactured it for me. The adapter
even couples to the camera's aperture lever, so the automatic exposure
stays fully functional. Design and manufacture of the adapter were so accurate
that the focusing is precisely where it should be! This is not trivial
to achieve at such a focal distance.
 The bad news
is that the optical quality of this Maksutov is poor. It's rated at 27
microns resolution, which is ten times worse than my best lens. And while
normal lenses improve when stopping down, the Maksutov has no iris! Maybe
I add one in the future. For now, the only thing I did was disassembling
the lens and loosening the fasteners, to relief any tension on the optical
elements. This was recommended by several people who claim to have improved
their Maksutovs that way, but mine did not improve.
The bad news
is that the optical quality of this Maksutov is poor. It's rated at 27
microns resolution, which is ten times worse than my best lens. And while
normal lenses improve when stopping down, the Maksutov has no iris! Maybe
I add one in the future. For now, the only thing I did was disassembling
the lens and loosening the fasteners, to relief any tension on the optical
elements. This was recommended by several people who claim to have improved
their Maksutovs that way, but mine did not improve.
It's a real problem to use a lens this long. Despite being an f/10,
the real amount of light that gets through is roughly equivalent to an
f/16. At ISO100 and full sunlight this usually requires 1/125 second exposure
time, which is about 10 times more than what could be done free-handed!
So, all work with normal sensitivity film invariable requires a tripod.
And not just any tripod! It must be really beefy to hold this baby
still! So, using this lens means carrying along the lens itself, weighing
6 or 7 kg, and a sturdy tripod weighing twice as much. All that for a result
that can almost be matched by enlarging a section of a frame shot free-handed
through the zoom/teleconverter combination! You probably will understand
that I haven't used this lens very much. When I bought it, I expected better
performance to justify the bulkiness.
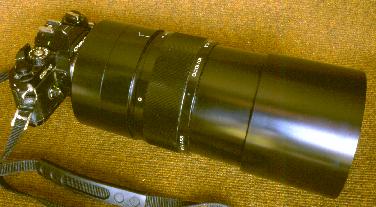
 So, this is
the better approach to bird photography. 410mm f/8, and a flash for lighting
up the shadows, as birds are most often to be found against the
sky! This is the setup I used for most of the bird photos I have ever made.
So, this is
the better approach to bird photography. 410mm f/8, and a flash for lighting
up the shadows, as birds are most often to be found against the
sky! This is the setup I used for most of the bird photos I have ever made.
This flash is an Agfa having a guide number of 22 for ISO100, while
being compact, and the beam is broad enough to be used with the 28mm
lens. It has no kind of automatism, but gives great color balance, much
better than that of some others. It takes 30 seconds or even more for recharging,
so it can not be used in situations requiring quick recycling. It's not
the case with birds, anyway they fly away after the flash fires...
I built a high power flash, that delivered a 100 Joule discharge into
a spiral-wound flash tube in a highly polished reflector. That one gave
a guide number of around 70 to 80! It used a rechargeable 12 Volt battery
and weighed 4 kg. It worked well, but was messy to carry around, and the
poor birds almost fell from the trees in shock when I took their portrait,
so I stopped using it.
Some more tricks
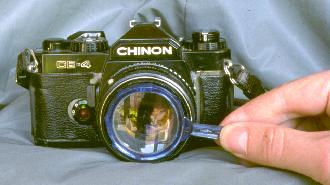 At some point the
macro zoom and the extension tube were no longer enough for real
close-up work. So I resorted to the same trick employed with the old Balda:
Adding an additional close-focus lens. With a reflex camera this is much
easier than it was with the Balda!
At some point the
macro zoom and the extension tube were no longer enough for real
close-up work. So I resorted to the same trick employed with the old Balda:
Adding an additional close-focus lens. With a reflex camera this is much
easier than it was with the Balda!
You can buy such lenses under the funny name of close-up "filters",
but that's unnecessarily expensive. I used a children's loupe instead.
It has a focal distance of around 8 cm, so with the standard 50mm lens
shown here it gives about 0.6 magnification. Unlike the extension tube,
it looses no light! And the optical quality is really good! Any aberrations
get diluted in the shallow depth of field, and thus are masked by the small
aperture used to get enough depth.
Of course this is not nearly the limit! I often use a combination of
this loupe with the extension tube. Just with the 50mm lens this gives
a magnification much greater than unity, and combining the zoom in macro
position with the extension tube and the loupe, I get frame-filling photos
of ants!
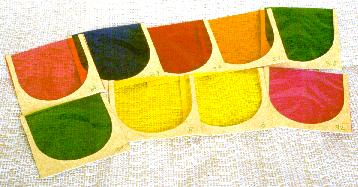 Color filters
are usually employed for black-and-white photography. But I do color slides
almost exclusively! Anyway I got some sheets of low-cost Kodak Wratten
gelatin filters, and mounted them in cardboard frames with one open side.
So I can hold them in front of the lens to tint a section of a photo. Used
sparingly, this is useful for effects. The distance, position and aperture
setting control the effect. More often I use them in front of the flash,
to tint the flash light used to clear up a shadow. This can correct blue
casts quite well! In addition, the dark filter you can see here is a blue
one that can correct the color temperature of incandescent lighting, for
use with daylight film. All these filters fit in a cardboard box 10mm thick.
Color filters
are usually employed for black-and-white photography. But I do color slides
almost exclusively! Anyway I got some sheets of low-cost Kodak Wratten
gelatin filters, and mounted them in cardboard frames with one open side.
So I can hold them in front of the lens to tint a section of a photo. Used
sparingly, this is useful for effects. The distance, position and aperture
setting control the effect. More often I use them in front of the flash,
to tint the flash light used to clear up a shadow. This can correct blue
casts quite well! In addition, the dark filter you can see here is a blue
one that can correct the color temperature of incandescent lighting, for
use with daylight film. All these filters fit in a cardboard box 10mm thick.
The big brown box
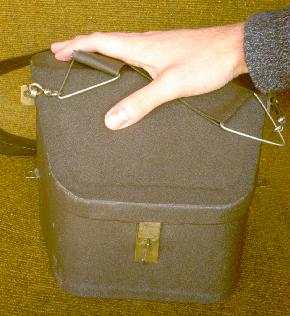 It has never stopped
surprising me how helpless most photographers are when it comes to carrying
along their stuff. Either they put lenses in pockets, plastic bags, have
them rolling around in the car, make diamond-strings with a dozen individual
packages dangling around, or they buy a coffin-size black bag with thick
padding in which everything bangs around and gets damaged and lost. I solved
this problem by building the box shown here. Despite its compact size,
it holds everything I need to carry around, and it has some unique advantages.
Let me brag a little:
It has never stopped
surprising me how helpless most photographers are when it comes to carrying
along their stuff. Either they put lenses in pockets, plastic bags, have
them rolling around in the car, make diamond-strings with a dozen individual
packages dangling around, or they buy a coffin-size black bag with thick
padding in which everything bangs around and gets damaged and lost. I solved
this problem by building the box shown here. Despite its compact size,
it holds everything I need to carry around, and it has some unique advantages.
Let me brag a little:
- It is totally rainproof. You can pour buckets of water over it, no
problem.
- Thrown into a river, it floats.
- The latch can be opened even with gloved fingers, but it will never
rip open by engaging in a shrub branch.
- It's strong enough to sit or stand on it.
- The four hooks are attached in the vertical and horizontal center
of gravity, eliminating swinging.
- It can be used with one strap as a simple bag, or with two straps.
In the latter configuration, one choice is passing each strap from one
upper hook over one's shoulder and back to the lower hook on the other
side. This gives a very comfortable setup, with the box firmly in front
of your stomach, with no swing at all, and no straps cutting your neck.
But when trekking with a backpack, I pass one strap from both upper hooks
over my shoulders to the backpack, and the other strap goes between the
two lower hooks and behind my back, to avoid bouncing. This pulls the backpack
forward, making for very comfortable carrying of both the backpack and
the photo box!
Using two straps gives the added advantage of safety, should one strap
rupture or disengage.
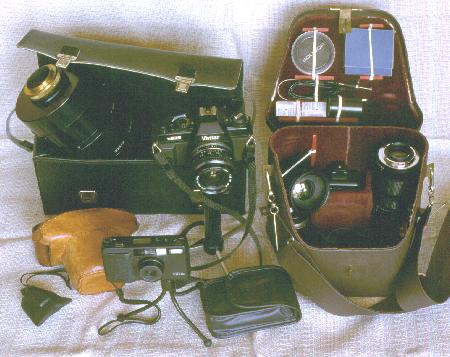
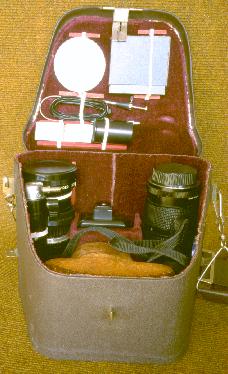 Inside, everything
is held in place by subdivisions, cushions and elastic straps. The box
was made for the exact things inside it, so I could tailor it precisely
to the proper size. Very little space is wasted. The box holds the Chinon
camera encased in its leather box, the 28mm, 50mm and 75-205mm lenses,
the teleconverter and the fish-eye converter, the flash, the close-up loupe,
polarizers for all lenses, the set of color filters, a miniature tripod,
a cable release, an extension cable for the flash, spare batteries for
the flash and the camera, and a spare film. Space is available for loosely
throwing in more spare films, if needed. When taking out the camera, there
is plenty of space for lens caps, lens combination assemblies, leaving
films and canisters when changing films, and so on.
Inside, everything
is held in place by subdivisions, cushions and elastic straps. The box
was made for the exact things inside it, so I could tailor it precisely
to the proper size. Very little space is wasted. The box holds the Chinon
camera encased in its leather box, the 28mm, 50mm and 75-205mm lenses,
the teleconverter and the fish-eye converter, the flash, the close-up loupe,
polarizers for all lenses, the set of color filters, a miniature tripod,
a cable release, an extension cable for the flash, spare batteries for
the flash and the camera, and a spare film. Space is available for loosely
throwing in more spare films, if needed. When taking out the camera, there
is plenty of space for lens caps, lens combination assemblies, leaving
films and canisters when changing films, and so on.
The box is made from 1mm aluminum sheet. The outside is covered in brown
vinyl, and the inside in dark red velvet, padded by foam where needed.
The hooks are brass and steel. The straps are the same vinyl used for the
covering. The empty box weighs a half kilogram, the contents weighs another
4 kg.
This box, exactly as shown here, is what I used to carry along on most
photo safaris. Nothing more, nothing less. Only in the last few years have
I added some more equipment on specific trips.
Did you notice something? Among all the equipment in this box, there
are no two things of the same brand! The camera is Chinon, the lenses are
Pentax, Vivitar, Cosina, Kalimar, Marumi, the filters are Soligor, Ampro
and Kodak, the flash is Agfa, the extension cable is Braun, the batteries
are Maxell and Duracell, the film is a Fuji, while the tripod, cable release
and loupe are unmarked but surely of different brands too! That's the great
thing about standards. It all fits together nicely.
The Vivitar spare camera
 When my beloved
Chinon went through its blues, and used to get stuck in the worst moments,
I realized how dependent I was on it. So I bought a backup camera. I wanted
a simple, low cost camera body that would fit my existing lenses and accessories,
and allow reliable work under difficult conditions. So I wanted a fully
mechanical camera. I found the one shown here. It has a mechanical shutter
that offers 1 second to 1/2000, no automatic exposure, but has a coupled
light meter with simple in-viewfinder indication of "too much - OK - too
little" light. If the batteries die, the exposure meter dies, but the camera
keeps working. This is a real advantage in the high mountains, where it
gets cold and batteries freeze more often than not.
When my beloved
Chinon went through its blues, and used to get stuck in the worst moments,
I realized how dependent I was on it. So I bought a backup camera. I wanted
a simple, low cost camera body that would fit my existing lenses and accessories,
and allow reliable work under difficult conditions. So I wanted a fully
mechanical camera. I found the one shown here. It has a mechanical shutter
that offers 1 second to 1/2000, no automatic exposure, but has a coupled
light meter with simple in-viewfinder indication of "too much - OK - too
little" light. If the batteries die, the exposure meter dies, but the camera
keeps working. This is a real advantage in the high mountains, where it
gets cold and batteries freeze more often than not.
Until managing to repair my Chinon's shutter, I used this camera as
backup when the Chinon got stuck, but since then it has seen little use.
On a few trips I have taken it along loaded with negative film, or with
high sensitivity slide film, but the fact is that everything worthwhile
I have done in photography has always been on low sensitivity slides, so
it was of no use to complicate matters with a second type of film. Nowadays
I take this camera on all mayor photo trips, empty, just as a backup.
 So, here is what
I would recommend to aspiring reflex photographers, to get in due time:
Two compatible camera bodies, a set of lenses covering as much focal distance
as reasonable (8 to 410mm for the equipment in this picture) with good
aperture, a close-up loupe, polarizers, a reasonably powerful flash with
extension cable, tripod and cable release.
So, here is what
I would recommend to aspiring reflex photographers, to get in due time:
Two compatible camera bodies, a set of lenses covering as much focal distance
as reasonable (8 to 410mm for the equipment in this picture) with good
aperture, a close-up loupe, polarizers, a reasonably powerful flash with
extension cable, tripod and cable release.
Point and shoot cameras
There came a moment in my life when I got tired of hauling along 5 kg of
photo gear, wherever I went. I started toying with the idea of buying a
compact "point and shoot" camera, to carry along at all times, on occasions
when the main activity would not be photography, but opportunities for
picture taking may come.
One thing was clear: As a long-time reflex photographer I was accustomed
to having different focal distances, lots of control, etc. I was spoiled,
you may say. In any case, if I was to buy a simple, compact, automatic
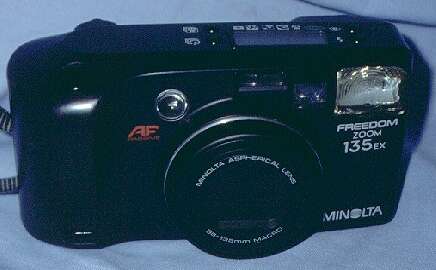
camera, it would have to be a rather good one. After looking over what
the market offered, I settled for what seemed to be the best choice, even
if at about US$600 it was rather expensive: A Minolta Freedom Zoom 135
EX. You may have heard the old joke: Nikon makes the best lenses, Minolta
makes the best bodies, Canon makes the most money. So I hoped that the
Minolta P&S would be well designed and soundly built.
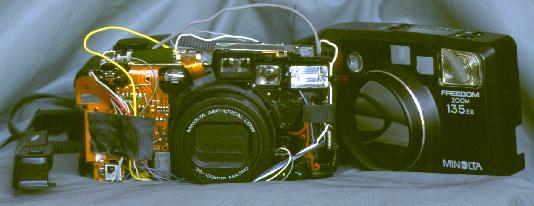 Unfortunately
I was wrong. This camera proved to be a disaster. It spent so much time
in repair, and so little in use, that I think it would be unfair to show
it off in any other condition than disassembled.
Unfortunately
I was wrong. This camera proved to be a disaster. It spent so much time
in repair, and so little in use, that I think it would be unfair to show
it off in any other condition than disassembled.
From the very first roll of film on there were problems with the autofocus.
On two or three frames out of each roll the focus was totally off. I don't
mean that the autofocus locked onto something else than I expected, as
such a case would be normal and common for many simple autofocus systems.
No, I mean that the focus was absolutely, totally, grossly away from any
object in the picture, so much that absolutely nothing was focused. I asked
for warranty service, but they told me that nothing was wrong and that
my camera was in perfect condition. I wonder if they did put in a film
at all. I don't think so.
The problem kept getting worse. When the warranty time (6 months) was
nearing its end, and I had shot 6 or 7 rolls of film, I was up to 5 or
6 frames out of a roll that were totally defocused. I brought the camera
in again, but they again told me that it was fine! I showed them the pictures,
among which I had some that showed in obvious ways that it was bad focus,
not shaking, what had blurred everything. Even then they did not accept
my point that the camera was faulty. So much for warranty.
With time I came to recognize the sound the camera made when focusing
wrongly. The focus motor ran for much longer than for any correctly focused
picture. Clearly it was running the lens to the closest focus position,
regardless of the real object distance! So, when I heard the characteristic
noise of bad focus, I shot that picture again. Using this method I managed
to loose little photo opportunities, but of course I was wasting film material.
 The first big
fault came 3 days after the warranty expired. I was climbing the Chillán
volcano, and when switching on the camera, I heard a sizzling noise, followed
by a blinking display. That means "error"! I switched off and on, the blinking
continued. I remembered the camera's manual advising to reset the microprocessor
in such cases by removing the batteries. So I did. The blinking was gone.
I switched on - ssssst - blinking again. Clear enough, I had no camera
for the rest of the mountain trip.
The first big
fault came 3 days after the warranty expired. I was climbing the Chillán
volcano, and when switching on the camera, I heard a sizzling noise, followed
by a blinking display. That means "error"! I switched off and on, the blinking
continued. I remembered the camera's manual advising to reset the microprocessor
in such cases by removing the batteries. So I did. The blinking was gone.
I switched on - ssssst - blinking again. Clear enough, I had no camera
for the rest of the mountain trip.
Back at home, and checking that the warranty had indeed expired, I opened
the camera myself. I had little hope of repairing such a problem, but I
had decided to give it a try. The photo gods were merciful, and the problem
was plainly visible: There had been high-voltage arcing at the pins of
the flash charge transformer, completely charring the printed circuit board
in that area! The carbonized material had become conductive, and high voltage
from the transformer was wreaking havoc.
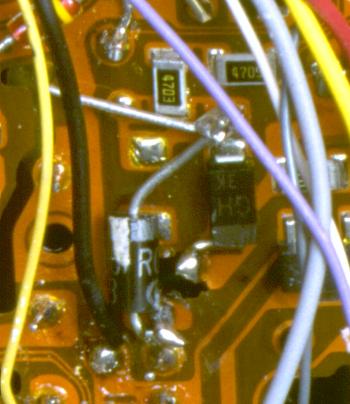
I cleaned away all blackened material, and installed some bridges, reinstalled
some components, in order to reconstruct the circuit. The result can be
seen in this photo. The hole at the right of the diode (the part with the
"R" on it) is where the arcing happened. The transformer is on the backside
of the board. As a size reference, this picture shows an area of about
18 x 22 mm.
After this repair, the blinking was gone and the camera again worked,
but the autofocus problem kept getting worse.
 In november
1999 I went to Germany. As the main purpose of the trip was professional,
I did not take along my reflex gear, and rather took just the Minolta.
I should not have done that! The autofocus problem had a crisis, and 2
out of every 3 pictures were misfocused. In addition, the camera developed
a new quirk: when pressing the shutter, it would move the focus motor to
the end of range, then move back - and shut the camera off, leaving the
lens open, not taking any picture! It made a characteristic sound, like
a "flop - - - flop". I lost so many photo opportunities to this new "feature",
that it almost drove me crazy! Of the 11 films shot in Germany, I
rescued about 150 pictures. The other 250 were totally out of focus. Add
this to the lost opportunities when the camera simply shut off, and you
will understand that my photographic results of this trip were very limited.
On the last day in Germany I bought a new camera, but it was too late to
save the trip, photographically speaking.
In november
1999 I went to Germany. As the main purpose of the trip was professional,
I did not take along my reflex gear, and rather took just the Minolta.
I should not have done that! The autofocus problem had a crisis, and 2
out of every 3 pictures were misfocused. In addition, the camera developed
a new quirk: when pressing the shutter, it would move the focus motor to
the end of range, then move back - and shut the camera off, leaving the
lens open, not taking any picture! It made a characteristic sound, like
a "flop - - - flop". I lost so many photo opportunities to this new "feature",
that it almost drove me crazy! Of the 11 films shot in Germany, I
rescued about 150 pictures. The other 250 were totally out of focus. Add
this to the lost opportunities when the camera simply shut off, and you
will understand that my photographic results of this trip were very limited.
On the last day in Germany I bought a new camera, but it was too late to
save the trip, photographically speaking.
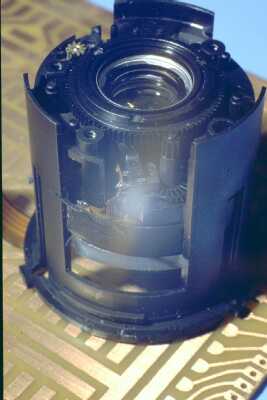
Once back home, I decided to give the Minolta a last try. My guess was
(and still is) that for some reason the focus encoder is not functioning
properly, loosing pulses. Maybe some grease from the gears spilled into
the encoder. So I disassembled the camera to the point shown here, so I
had the lens assembly free of the rest. This forced me to unsolder a lot
of cables, and remove almost everything else from the camera. I drew and
wrote down where everything goes...
After taking this photo, I took apart the zoom assembly, as the focus
mechanism is of course inside the lens. But, I was stopped by a nasty surprise:
The only way to get at the focus mechanism is by removing the front lens
from the tube, and this one is firmly cemented in place! The only way to
remove it seems to be breaking or cutting something. I tried to loosen
the cement, both mechanically and with solvents, to no avail.
Cutting the tube would make it almost impossible to assemble things
back in proper position, so I gave up. I reassembled the camera. It works
exactly like it did before disassembly, so at least I did not introduce
further trouble. But as it is unusable, I stored it away.
I have posted pleas for hints and help at several web sites, and have
tried to contact Minolta. Nothing happened. So it seems that I will never
bring this camera back to usable shape, and of course will never again
buy any Minolta product. It's a pity, because on the occasions when it
did work, this camera produced very sharp and well-exposed photos.
========= update!!! ========
 About a year after
storing away the Minolta, I had one of those days when one feels grim determination
to do whatever is necessary to win a game. I cleaned a big work space on
the desk, got hold of some trays, tools, a good light, and again disassembled
this camera. I had decided to get into the lens, even if it meant risking
breakage of the front lens. After all, the camera was worthless as it was.
About a year after
storing away the Minolta, I had one of those days when one feels grim determination
to do whatever is necessary to win a game. I cleaned a big work space on
the desk, got hold of some trays, tools, a good light, and again disassembled
this camera. I had decided to get into the lens, even if it meant risking
breakage of the front lens. After all, the camera was worthless as it was.
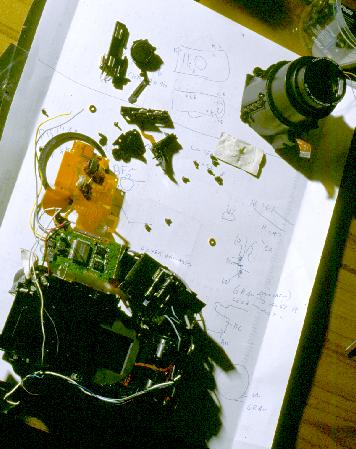
Here you can see four trays holding the pieces: The lower right one
has the shell and other big parts; the upper right one holds the film advance
and rewind gears, zoom motor assembly, and some other pieces; the upper
left one holds the main inner structure and most of the electronics. I
had to unsolder a lot of wires. Only when all this was off, could I remove
the lens assembly. The lower left tray finally holds the lens - disassembled!
I discovered three tiny hooks, very hard to make out, that hold the lens
together! So, after all, it was NOT necessary to take the front element
away!
After removing all the zoom mechanisms, I finally reached the core of
the lens, with the shutter/diaphragm and focus mechanics. Hooray!
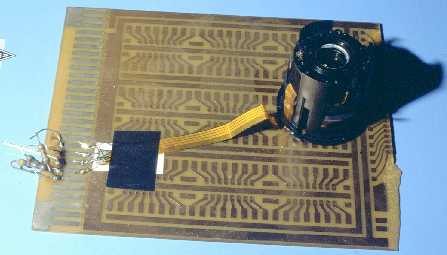 In order to find
what was happening, I installed the lens core on this test setup. The flat
connection strip was taped to a board, and thin, pointed wires were soldered
to the board and bent in the proper way to make contact on the extremely
narrow connection strips. After decoding the circuit diagram, I connected
a few resistors to properly power the encoder LED, and bias the two encoder
sensing elements. Then I hung my oscilloscope from the outputs and, moving
the encoder wheel by hand, observed the signals. I got two waves, nicely
phase shifted by about 90 degrees, which looked perfectly normal. I changed
bias values. All stayed normal. Then I applied a little coolant spray.
EUREKA! One of the signals went flat, the other one continued! I tapped
at the lens. The signal came back!
In order to find
what was happening, I installed the lens core on this test setup. The flat
connection strip was taped to a board, and thin, pointed wires were soldered
to the board and bent in the proper way to make contact on the extremely
narrow connection strips. After decoding the circuit diagram, I connected
a few resistors to properly power the encoder LED, and bias the two encoder
sensing elements. Then I hung my oscilloscope from the outputs and, moving
the encoder wheel by hand, observed the signals. I got two waves, nicely
phase shifted by about 90 degrees, which looked perfectly normal. I changed
bias values. All stayed normal. Then I applied a little coolant spray.
EUREKA! One of the signals went flat, the other one continued! I tapped
at the lens. The signal came back!
 You have to
get an idea of the scale to understand this well. The lens element you
are seeing here is the inner focusing element, and is a lot smaller than
the (removed) front lens. Look at the gear-coupled, slotted encoder wheel.
This is similar, but a lot smaller, than the typical encoders used in computer
mice. So, having the size reference, let's move to the other photo, the
closest I have of the big fault that caused me so many grief:
You have to
get an idea of the scale to understand this well. The lens element you
are seeing here is the inner focusing element, and is a lot smaller than
the (removed) front lens. Look at the gear-coupled, slotted encoder wheel.
This is similar, but a lot smaller, than the typical encoders used in computer
mice. So, having the size reference, let's move to the other photo, the
closest I have of the big fault that caused me so many grief:
 This image
was scanned and then computer-enhanced from a macro shot. look at the solder
joint in the foreground: Notice how the solder has properly wetted the
board, flowing out to a very thin rim. This solder joint is technically
fine, even if it looks a bit rough. But then look at the other one, in
the back: It looks nice and smooth, but notice the rim of it, which is
rounded, showing improper contact to the board! This is what we electronicians
call a "cold solder joint": when it was made, the board did not receive
enough heat to deoxidize and melt the solder. So, the solder only bonded
to the component wire, but did NOT bond at all to the board! Rather it
formed a little mound of solder, without any intimate contact. There is
conduction when the board happens to touch the solder, and the conduction
ceases as soon as the board lifts off. The slightest bending, stressing,
vibration, etc, made this connection conduct, or become an open circuit.
If it conducted, the camera worked. If it went into open circuit, the camera
autofocus system never saw the lens moving, and thus drove the motor and
the lens until the end, and back, sensing that something was wrong, shutting
the camera off. And if the contact was intermittent during the autofocusing,
the camera would miss some encoder pulses, drive the lens a little farther
forward than it should, and make a totally defocused photo!
This image
was scanned and then computer-enhanced from a macro shot. look at the solder
joint in the foreground: Notice how the solder has properly wetted the
board, flowing out to a very thin rim. This solder joint is technically
fine, even if it looks a bit rough. But then look at the other one, in
the back: It looks nice and smooth, but notice the rim of it, which is
rounded, showing improper contact to the board! This is what we electronicians
call a "cold solder joint": when it was made, the board did not receive
enough heat to deoxidize and melt the solder. So, the solder only bonded
to the component wire, but did NOT bond at all to the board! Rather it
formed a little mound of solder, without any intimate contact. There is
conduction when the board happens to touch the solder, and the conduction
ceases as soon as the board lifts off. The slightest bending, stressing,
vibration, etc, made this connection conduct, or become an open circuit.
If it conducted, the camera worked. If it went into open circuit, the camera
autofocus system never saw the lens moving, and thus drove the motor and
the lens until the end, and back, sensing that something was wrong, shutting
the camera off. And if the contact was intermittent during the autofocusing,
the camera would miss some encoder pulses, drive the lens a little farther
forward than it should, and make a totally defocused photo!
It's so ridiculous: I lost hundreds of photos, spent many hours of time,
and at the end the repair was as simple as touching this spot for one second,
with a properly heated soldering iron!
 Three hours
later, the camera was back in one piece. I tried it without film for about
a hundred shots at all distances. All seemed perfect. Then I put a film
in, shot through it, developed it: All photos were perfectly focused! So,
after all, this camera has gained the right to be portrayed in assembled
condition on this page!
Three hours
later, the camera was back in one piece. I tried it without film for about
a hundred shots at all distances. All seemed perfect. Then I put a film
in, shot through it, developed it: All photos were perfectly focused! So,
after all, this camera has gained the right to be portrayed in assembled
condition on this page!
Anyway, having the Ricoh, which is so much more practical, I gave away
the Minolta. I don't think I could trust it anymore, even if my mother,
who is using it now, has had no further problems with it.
========== End of update =========
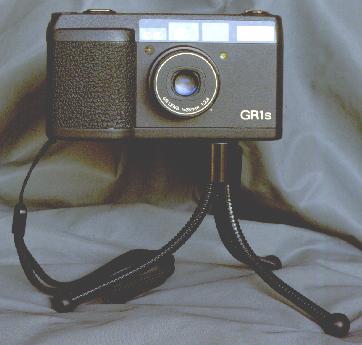 This is the camera
I bought on my last day in Germany, as a replacement for my first P&S.
It's the Ricoh GR1s. Look at this: :-)))))))))
So large is my smile! This camera is a delight! It was expensive too (about
US$500), but it has worked flawlessly, perfectly, delivering excellent
pictures, and it has a number of uncommon features!
This is the camera
I bought on my last day in Germany, as a replacement for my first P&S.
It's the Ricoh GR1s. Look at this: :-)))))))))
So large is my smile! This camera is a delight! It was expensive too (about
US$500), but it has worked flawlessly, perfectly, delivering excellent
pictures, and it has a number of uncommon features!
It was a cold and snowy november day when I visited Foto Sauter in Munich.
I asked a young salesman for a compact P&S camera that would work well,
and told him my problems with the Minolta. In addition, I asked if, being
the best photo equipment distributor in the bavarian capital, they had
a compact camera that had some means of manual control, for focus and exposure.
Or at least some way to know what the autofocus and exposure automatism
is doing! And that had a lens with good aperture, as I had noticed that
the Minolta's zoom lens was too dark for winter-time europe on ISO100 slide
film... The clerk thought for a moment, then asked me if I was willing
to pay dearly. I said, I was, as long as I could. He showed me a Leica.
It has a 40mm lens, f/3.5, if I remember it correctly. It had manual aperture
control, and a lot of other niceties. But it cost about US$1200. That was
a bit hefty. More hefty than what my pocket, grossly thinned by the exuberant
hotel prices in Munich, was able to produce. I simply couldn't. The clerk
told me he had nothing else in that line, sorry.
I was about to leave, when a lady from that same section of the store
came up. She mentioned the Ricoh. The clerk brought it, telling me that
it was a demo camera, freshly arrived from the manufacturer, brand new
model, and that he really didn't know its capabilities. He couldn't sell
it yet, but in a few days he would have some for sale.
I looked at the camera, played with it, asked to see the manual, checked
specs... This was a dream! The only backside was the lack of a zoom. Instead
this camera has a fixed wide angle lens, 28mm, with a full f/2.8 aperture!
Really, few compact cameras sport such an aperture!!! It has program and
aperture priority exposure, with full aperture control. Shutter speed is
shown in the viewfinder, focus distance too, and a frame for parallax correction
that activates according to distance. The camera allows unlimited time
exposure, a rare find among such small cameras! When shutting off
itself by timer, it keeps the settings, so shooting can resume at any instant.
There is an ample range of exposure compensation. A focus-set mode allows
something very close to manual focus, when needed. And, and, and...
And the size! 117 x 61 x 27 mm. I don't think there is a way to make a
much smaller 35mm camera! The height and thickness is set by the film cartridge,
and the width by the cartridge, frame size and film take-up area. It's
stunning how they could make it so small! And even while it is entirely
metallic, it weighs about 200 grams with battery and film... Take
that!
The bad thing: The guy would not sell it, it was a demo camera and not
yet registered in the computer. He told me to come back in three days.
But in three days I would already be back in Chile, I told him. Like Elvis
Presley said, "it's now or never"! To make it short: Customer service
in Germany is proverbial. They did go the extra length, made all paperwork,
entered the camera into the computer, removed the half-exposed test film
from it, put in a fresh battery, and sold me the camera! The first slides
I took with it were on the flight back to Chile, the next day, early morning,
out of the airplane window. Sunrise over the Andes mountains, gorgeous!
Soon later I added the micro tripod with flexible legs. This go-anywhere
combination soon later let me take my first lightning photos ever! The
compact Ricoh achieved what my reflex cameras missed several times!
When writing this, I have already taken about 10 rolls of film with
this camera. All pictures are perfect, not a single autofocus miss! This
Ricoh restored my trust in autofocus, so weakened by the faulty Minolta.
====== And a more sorry update =======
Unfortunately the Ricoh has developed a problem too, even if it does not
compromise its usability: The semitransparent mirror or prism that superposes
the LCD information onto the viewfinder image is apparently delaminating.
An ugly diagonal crack line runs through the viewfinder image. I must place
my eye at two different angles to be able to see through the viewfinder
either above or below this crack line, and I cannot see the entire image
at any one time! These angles seem to change with temperature!
It's not a serious problem for using the camera, but it looks really
ugly and does make me take longer to properly compose a picture.
The bottom line of my point-and-shoot experience seems to be that compact,
highly capable cameras are simply not reliable.
=====================================
 So, here is the
global roundup of all my present photo gear, except only for the Chinon
camera and 50mm lens, used to take this picture (but the leather hood is
there!), and the large tripod, which does not appear at all on this page
because I used it for all photos...
So, here is the
global roundup of all my present photo gear, except only for the Chinon
camera and 50mm lens, used to take this picture (but the leather hood is
there!), and the large tripod, which does not appear at all on this page
because I used it for all photos...
I take the compact Ricoh wherever I go, generally with the flex tripod,
lens shade and spare films. The brown box with its contents goes on serious
photo trips, always within reach and under my watchful eye. The Vivitar
spare camera usually gets taken along too, in the suitcase. The large black
box with the Maksutov, and the large tripod, are added only on long, dedicated
photo trips, when I intend to take bird pictures from near the car. They
are too heavy to be carried further.
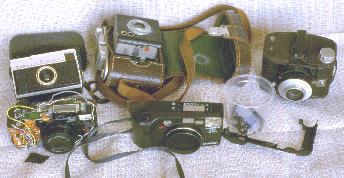 And this is
the gallery of retired cameras. The ancient Agfa Clack and Ansco Clipper,
the well-served Balda, and the ill-fated Minolta, disassembled as usual,
some of its guts in a plastic beaker.
And this is
the gallery of retired cameras. The ancient Agfa Clack and Ansco Clipper,
the well-served Balda, and the ill-fated Minolta, disassembled as usual,
some of its guts in a plastic beaker.
The future
I don't think that I will start with any other format than 35mm anytime
soon. Larger formats, while offering a lot more quality, are simply too
expensive and too cumbersome for my hobby use. I would employ them only
if I had to do professional work in photography. And smaller formats sacrifice
quality without giving any cost advantage, so I cannot see the slightest
reason to use them. Given the present situation of the worldwide photography
market, 35mm seems to be the format that will stay for another long time,
despite attempts to rule it out in favor of more modern ones.
Digital "photography" (yes, the term is correct, after all!) has not
yet attracted me so much, because of that very computerish syndrome of
"pay huge money for it today, and tomorrow it's obsolete". A few years
ago the resolution of digital cameras was low. Nowadays (2000) the best
of them can actually compete with the more modest levels of chemical photography
in terms of resolution, but not yet in terms of dynamic range. Maybe (even
probably) in some more years we will see digital cameras that can compete
with 35mm photography, which would require about 5000 x 3300 pixels per
frame, at a depth resolution of about 40 to 42 bits per pixel. If they
come in usable sizes, with usable features, being able to store a reasonable
amount of frames, and costing a sensible amount of money, then the moment
may have come to migrate to the new technology.
For now, I'm just considering the eventual replacement of my present
reflex gear, which is quite aged, and was never of high-end quality to
start with. But considering that it is still serving me well, I will invest
money in new gear only if I find something that fulfills all of
my rather strict desires. The following lists what I would expect of good
reflex photography equipment:
The camera body should have:
- Manual exposure in half steps or finer, and continuous auto exposure
with either aperture priority (preferred) or shutter priority;
- Vertical metal plane shutter;
- Shutter speed range of at least 30 seconds to 1/2000;
- Flash synchronization at 1/125 or faster;
- Wide light metering range (say, -3EV to 18EV at least);
- Selective and integral metering;
- Light meter should not be sensitive to light getting into viewfinder
(a very common problem!);
- Exposure memory;
- Mechanical unlimited time exposure (no battery drain during time exposure);
- Self timer;
- Flash connection both in hot shoe and extension socket;
- Multiple exposure capability;
- Manual film winding;
- A lens mount for which I can get good/cheap/abundant lenses;
- Shutter speed, aperture, self timer displayed in viewfinder;
- 100% viewfinder visibility;
- Depth of field preview;
- Good mass compensation of mirror, and/or mirror lock-up;
- Reasonably silent operation;
- Should allow some basic functionality even with dead batteries;
- Small size and low weight paired with reasonable robustness and longevity.
I DO NOT want:
- Autofocus;
- Motorized film winding;
- DX reading (it's OK if it can be overridden);
- Date/time imprinting.
For the lenses, I would like the following:
- Reasonable selection of focal distances covering about 20 to 400mm;
- Reasonable apertures (say, 2.8 at 28mm, 1.4 at 50mm, 2.8 at 200mm);
- Small size and weight to the extent possible for given apertures;
- As few different filter mounts as possible;
- Filters should not rotate with focus adjustment;
- In the case of zoom lenses, focal distance and focus adjustments should
be separate;
- Best available optical quality!
If anyone knows about a camera and lenses that fulfill these requirements,
while not being absurdly expensive, please let me know. Among all I have
seen, the camera that comes closest to my wishes seems to be the Leica
R8, and certainly there are enough good lenses for it, but it is definitely
not
a small and lightweight camera, and its price unfortunately does fall into
the "absurdly expensive" category. Except for these two "little" inconveniences,
the R8 with a nice set of Leica lenses would be my dream camera at this
time.
UPDATE! The future has arrived!
In March 2003, a fair time after writing the above, I made up my mind.
After toying with the idea of buying into the Nikon system, I did some comparative
lens tests and found that Nikon lenses are not generally better than
the others. Basically, what you pay is what you get, and for the K-mount
there are at least as many high quality lenses as for the Nikon mount. So
I decided to stay with the K-mount, replacing only those parts of my equipment
that needed it. I bought a new camera body, several lenses, and a macro bellows,
most of this second-hand.
 The new camera is a Pentax LX. It does not fully satisfy my dreams, but comes
reasonably close. Based on the list of features I wrote down in the list
above, let's see how the LX comes out:
The new camera is a Pentax LX. It does not fully satisfy my dreams, but comes
reasonably close. Based on the list of features I wrote down in the list
above, let's see how the LX comes out:
- It has manual exposure in half steps by using the aperture settings, while
the shutter goes in full steps only. It has continuous autoexposure with
aperture priority.
- It does not have a vertical metal shutter, but rather a horizontal
metal (titanium) shutter. I would have preferred vertical, for the faster
flash sync speed.
- The shutter speed range is guaranteed from 125 seconds to 1/2000, but in
practice it works down to 20 minutes and perhaps even more!
- Flash synchronization is only at 1/75 of a second. A significant minus point, consequence of the horizontal shutter.
- The light metering range is extremely wide, rated as EV -6.5 to 20, which
is the best I have ever seen in any camera! And the nicest part of this is
that the rated range is only what Pentax guarantees. There is no firm limit
built in, and recently I made some nighttime photos of starlit landscapes,
at EV -9, and the autoexposure worked flawlessly!
- It has only integral, center weighted metering. However, the metering pattern
is very well specified, so one can easily work around this lack of selective
metering. I have not missed it.
- The meter is totally insensitive to stray light entering the finder. This
camera uses through-mirror, off-the-curtain and off-the-film metering, and
has no sensors in the finder. It is really great to be finally free
of underexposed slides caused by light in the finder! Specially when the
camera is tripod-mounted, and no eye is blocking light from falling into
the finder!
- It lacks exposure memory. This is a serious drawback. I have found it a
lot less convenient to fiddle with the exposure compensation dial or use
manual exposure. It gets the job done, but exposure memory is much quicker
to work with.
- It does have mechanical unlimited time exposure. The batteries must be
removed to eliminate all battery drain, but that's just a minor inconvenience,
since long time exposures are anyway a slow activity.
- It has a self-timer, with stepless time delay from almost nothing to 10 seconds.
- It has flash connection both in the hot shoe and a connector on the side. And as a bonus, both connections support a dedicated TTL flash!
- It has a very nice, pretty unique random access multiexposure capability!
- It has manual film winding, smooth and silent.
- It has the standard Pentax-K lens mount and can use any K-mount lens ever
made. This gives access to several hundred different lenses made by dozens
of different manufacturers over more than 25 years, and fully compatible
lenses are still in full production. Lenses are widely available at all levels
of cost and quality. As a bonus, I can keep using all of my existing lenses
and accessories.
- The shutter speed and aperture are visible in the finder. The self-timer
is not, but since it is mechanical, it cannot be forgotten for the next shot,
so it doesn't matter that it doesn't show in the finder.
- It does not have 100% viewfinder visibility, but comes close enough at
95 x 98%. Also, the finder is large, and I can easily see it in its full
extension even through my 6-diopter astigmatic glasses! The finder can be
changed, and the focussing screen too. I don't see the need for alternative
finders and screens yet, but if something comes up, it's nice to have the
feature.
- It has depth of field preview.
- It has excellent mass compensation and mirror damping, and mirror lockup!
- It is quite silent, at least there are no whirring motors, or rather, no motors at all, and no beepers, .
- It allows a very good degree of functionality with dead batteries. Essentially,
all handheld speeds will work, from the flash sync speed to 1/2000. Time
exposure also works.
- It is the smallest professional camera available, having exactly the same
footprint as my Chinon. It is a bit heavier than the Chinon, but still lighter
than any other comparable camera. It is very robustly built and has a fame
for high reliability. It is specified for operation at extremely low temperatures.
A drawback is the so-called "sticky mirror problem", which consists simply
in decomposing rubber parts, like those any camera develops after 15 or 20
years. It's just that with most cameras this affects only the light seals
and mirror dampers, while the LX has many more rubber cushions to aid its
smooth and silent operation, and so develops more symptoms when the rubber
starts to decay. In any case, it can be repaired without too much trouble.
- Finally, it does not have any of the things which I don't want. And it
has some features which I consider a welcome bonus, such as its unique integrating
real-time autoexposure!
Lenses
 I discontinued the use of the zoom, the teleconverter, the fisheye converter,
and also the 135mm/2.8 which I had bought not long ago, the latter because
it didn't fit the new series very well and also because it has a filter mount
size that doesn't match any of the others.
I discontinued the use of the zoom, the teleconverter, the fisheye converter,
and also the 135mm/2.8 which I had bought not long ago, the latter because
it didn't fit the new series very well and also because it has a filter mount
size that doesn't match any of the others.
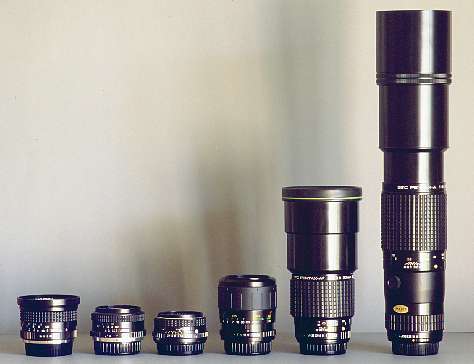
The new lens complement essentially satisfies all of my requirements written
down earlier. From left to right, we have a Tokina 17/3.5, Cosina 28/2.8,
Pentax SMC-M 50/2, Vivitar 100/3.5 macro, Pentax SMC-A* 200/2.8 ED, and Pentax
400/5.6. It's a nicely spaced series, covering a bit more than the entire
range originally expected, with reasonable to good apertures, and except
for the two widest angle ones they have the 1:2 focal length ratio which
I consider optimal. If ever I see the need, a 1.4x teleconverter would give
me the intermediate focal lengths. Specially the 200mm Pentax Asterisk series
lens is a wonderful chunk of glass!
The 28, 50 and 100mm lenses share a 49mm filter mount. The two long teles
share a 77mm mount. The 17mm lens has a 67mm mount, which is odd, but it
doesn't matter much because anyway I don't tend to use filters with that
lens. If ever needed, I will make or buy an adapter ring to use the 77mm
filters.
 Each lens has its idiosyncracies. The 17mm lens has a very well corrected
perspective, giving almost no visible distortion. But at such extreme focal
length, it is extremely sensitive to tilting. Just a little tilt, which doesn't
look bad in the finder, later shows up as a crazy convergence of lines on
the photo! It can be used to great effect, but for natural looking photos,
this lens must be held strictly straight. It is sharpest at f/8, reaching
very high quality there. The sharpness drops off dramatically to either side
of the aperture scale. The usable range for high quality photography is only
5.6 to 11.
Each lens has its idiosyncracies. The 17mm lens has a very well corrected
perspective, giving almost no visible distortion. But at such extreme focal
length, it is extremely sensitive to tilting. Just a little tilt, which doesn't
look bad in the finder, later shows up as a crazy convergence of lines on
the photo! It can be used to great effect, but for natural looking photos,
this lens must be held strictly straight. It is sharpest at f/8, reaching
very high quality there. The sharpness drops off dramatically to either side
of the aperture scale. The usable range for high quality photography is only
5.6 to 11.
The 28mm lens is optically excellent, even if mechanically poor. It gives
very high quality from f/4 to f/11, being best at f/8 and f/11, while even
fully open and at f/16 the quality is still high. f/22 is not a good idea
with any wide angle lens, as the diffraction becomes too terrible. On the
mechanical side of things, the front element ring had to be glued in place
so it won't come loose all the time; and the screws holding the diaphragm
also had to be glued in after ripping out. The paint markings on the aperture
scale are gone; some day I will repaint them.
The 50mm lens has me a bit puzzled. In resolution tests it ends up pretty
much at the top, but real photos shot at the more open apertures tend to
look soft. It does measure a relatively low contrast when fully open, but
not as dramatically as the visual results would suggest! But anyway, at its
optimal aperture of f/11 it performs nicely, and from f/4 to f/16 it delivers
good quality. f/2.8 drops sharply and is almost as bad as f/2. At 50mm, f/22
is of course still much degraded by diffraction.
The 100mm macro lens is a modern plastic wonder. The plastic barrel is twice
as bulky as the lens's aperture would require. It has play everywhere. When
I shake it, it rattles like a box full of marbles. The diaphragm mechanism
screeches. The filter thread feels pretty flimsy. At least the lens mount
is metal! On the good side, the optical quality is excellent, both for macro
and for normal distance work. It provides good quality images from full aperture
to f/16, with the optimal being around f/11, but f/8 being almost as good.
This lens focuses from infinity to a picture ratio of 2:1. Screwing on an
included close-up lens, it covers the range of 2:1 to 1:1. Of course, using
it on the bellows transforms it into a micro lens, achieving magnifications
of at least 1:3!
The 200mm lens is the most expensive in this group. It makes sense, since
using a 200mm lens handheld on ISO 100 slide film requires a wide aperture!
So the lens must firstly have this wide aperture, and secondly must
be good enough so that the wide aperture can actually be used! That calls
for a low dispersion lens, or for APO correction. I was happy to find that
this lens just satisfies my minimal quality requirements (40 lp/mm resolution
on slide film) at full aperture, and that at f/4 it is already in the "very
good" range! Optimal aperture is f/11, with f/8 being very close. The usable
range is f/2.8 to f/22, since at the longer focal lengths the diffraction
is less of a problem.
Finally, the 400mm lens is basically a tripod lens. It satisfies my quality
requirements only from f/11 to f/22, with the optimum being at f/16. It's
not a low dispersion lens, and that shows. Using a tripod, it handles very
nicely and produces good pictures since it can be stopped down enough, but
shooting fully open is disappointing in terms of image quality. Only in very
good light (full sunlight) can it be used handheld at acceptable apertures
on ISO 100 film, and I have recently shot some very nice pictures of Tricahue
parrots in this way.
The Even Bigger Brown Box
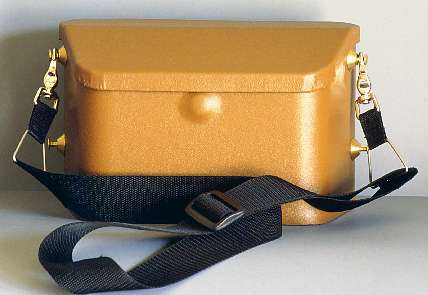 The Big Brown Box which I had built many years back, that held all my photo
gear until shortly ago, was rendered obsolete by the new purchases, which
simply didn't fit. But the concept of such a box had proven itself so well
that I decided to make a new box to basically the same design, just making
it a bit larger and improving on a few details such as the strap connections
and the lock. The result is pictured here, and I have named it the Even Bigger Brown Box.
It's 7cm wider than the old one, and the front is 5cm taller. The depth and
the total height are the same as the old one. The box holds everything except
for the 400mm lens, which is too large, and really useful only when combined
with the Mighty Manfred Manfrotto Tripod, which anyway is too large to be carried around to every place I visit!
The Big Brown Box which I had built many years back, that held all my photo
gear until shortly ago, was rendered obsolete by the new purchases, which
simply didn't fit. But the concept of such a box had proven itself so well
that I decided to make a new box to basically the same design, just making
it a bit larger and improving on a few details such as the strap connections
and the lock. The result is pictured here, and I have named it the Even Bigger Brown Box.
It's 7cm wider than the old one, and the front is 5cm taller. The depth and
the total height are the same as the old one. The box holds everything except
for the 400mm lens, which is too large, and really useful only when combined
with the Mighty Manfred Manfrotto Tripod, which anyway is too large to be carried around to every place I visit!
Now that I'm the proud owner of a lathe, I could make nicer strap supports,
and a more fancy lock, which snaps closed when the lid is pushed down, and
snaps open again when pressing on the belly button the box displays so proudly!
This button has a pretty stiff spring, so it's unlikely that it could be
accidentally triggered.
Another change is that in this box nothing is mounted to the inside of the
lid. The old box had filters and some other stuff installed in that way,
and this stuff fell off and needed to be put back in place too often for
comfort.
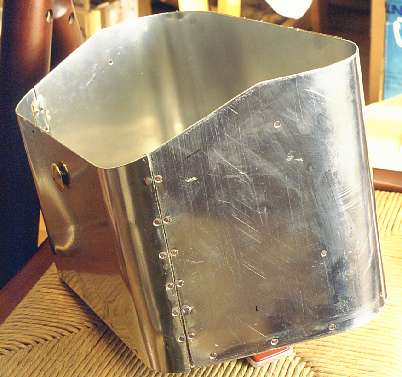 Just like the old one, this box too was crafted from 1mm thick aluminum sheet.
But unlike the old one, this box was not only glued but also riveted, using
small rivets made from copper wire.
Just like the old one, this box too was crafted from 1mm thick aluminum sheet.
But unlike the old one, this box was not only glued but also riveted, using
small rivets made from copper wire.
It is a bit tricky to use copper rivets on aluminum sheet, because copper
is harder than aluminum! But I couldn't find suitably sized aluminum rivets,
and aluminum wire is essentially unobtainable here! So I softened the copper
rivets in a flame, and then mounted them quickly while hot. Copper becomes
pretty buttery when hot!
This photo shows the raw box, ready for finishing. I cut the aluminum sheet
using metal hand shears, bent the right angles using a vise, and formed the
curves simply on my leg. A CAD program, or else a little thinking, are a
great help in working out the proper shapes to cut and bend!
After this photo was taken, I covered the box in brown leatherette on the
outside, and red velvet on the inside, sandwiching some plastic foam in the
places where cushions are needed. After the covering work was complete, I
glued in the internal divisions and part holders. The glue used for everything
was common neoprene contact cement. It bonds very firmly on aluminum, and
certainly works well on leatherette and soft fabric!
The leatherette was applied so that overlaps were reduced to the bare minimum,
and all overlaps are arranged in such a way that the box remains 100% rainproof.
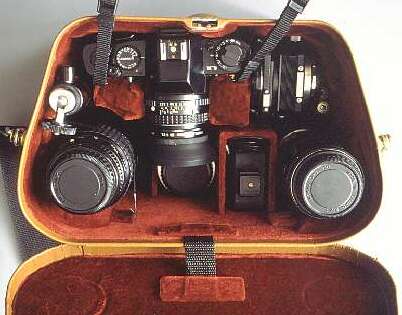 The finished box looks like this inside, seen from the top, as I would when
opening the box while carrying it in front of my belly. Since the camera
is still there, I had to use the P&S to make this photo, so excuse the
non-LX quality of the picture!
The finished box looks like this inside, seen from the top, as I would when
opening the box while carrying it in front of my belly. Since the camera
is still there, I had to use the P&S to make this photo, so excuse the
non-LX quality of the picture!
Everything is held in fixed places, all surfaces are covered in soft velvet,
and the ones that have to adapt to complex shapes are further cushioned with
foam under the velvet.
The camera can be placed in its holder with either the 28mm, the 50mm or
the 100mm lens mounted. The polarizer and the sun shade can also be left
in place.
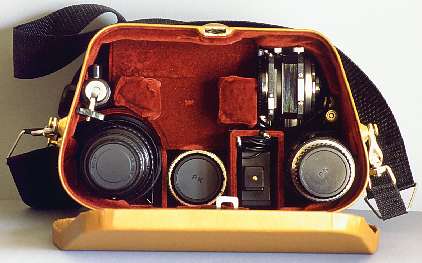 Now let's take the LX out, and this is how it looks. The cushioned camera holder is easily visible. It is
made as a mezzanine that can be taken out to access the gear stored below
it. But all those accessories that need to be accessed often, can be taken
out without lifting the mezzanine. On the left we have the 200mm lens, and
under it is a false floor that holds the 77mm polarizer. On the front of
it is a mini tripod with ball head. To the right of the 200mm lens is the
28mm lens, with the 49mm polarizer stored under it. The camera can be stored
with any lens except the 200mm mounted, since the camera lens can rest easily
on top of the stored 28mm lens. The polarizer and a lens shade can be left
on the camera too when storing it. There is enough room for this.
Now let's take the LX out, and this is how it looks. The cushioned camera holder is easily visible. It is
made as a mezzanine that can be taken out to access the gear stored below
it. But all those accessories that need to be accessed often, can be taken
out without lifting the mezzanine. On the left we have the 200mm lens, and
under it is a false floor that holds the 77mm polarizer. On the front of
it is a mini tripod with ball head. To the right of the 200mm lens is the
28mm lens, with the 49mm polarizer stored under it. The camera can be stored
with any lens except the 200mm mounted, since the camera lens can rest easily
on top of the stored 28mm lens. The polarizer and a lens shade can be left
on the camera too when storing it. There is enough room for this.
Right of the 28mm lens is the flash, complete with extension cable. At the
far right is a stack that has the 100mm lens on top, the 17mm lens at the
bottom, and the closeup adapter between the two.
In this way, all often-needed parts can be easily accessed, with the 17mm
lens, being the least used of all, being the only one that requires removing
another one from its top.
The bellows is visible on the front right, but taking it out requires removing the mezzanine.
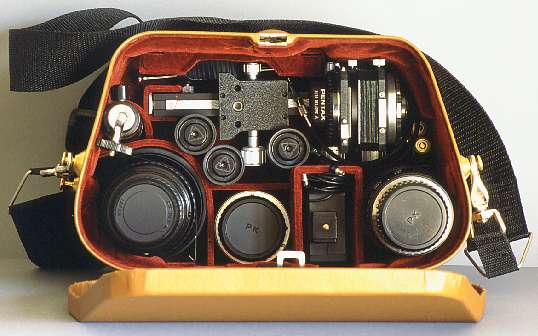 The mezzanine is simply lifted out of the box, as it clips to a support under
it. When it's out, it gives access to the cellar, which contains three spare
films, the complete bellows device, and the dual cable release.
The mezzanine is simply lifted out of the box, as it clips to a support under
it. When it's out, it gives access to the cellar, which contains three spare
films, the complete bellows device, and the dual cable release.
After the bellows has been taken out, access is free to the spare batteries
for the camera and the flash, which are mounted to the right-side wall. Someone
with thin fingers could probably access them with the bellows in place, but
I prefer taking out the bellows, which is quick enough, because it is simply
lifted straight up.
Everything in this box is firmly held in place. There are no loose parts to rattle around and dent each other.
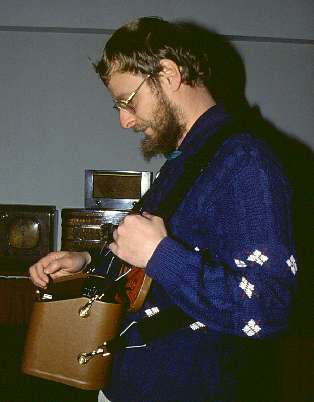 This box can be carried in several ways. The most comfortable for long walks
is the one pictured here. Two straps are used, running over my shoulders
and crossing on my back. This holds the box firmly in front of me, which
keeps it from getting bumped into anything while giving good balance and
easy access to the gear even while walking. The weight (pretty heavy at 5.5kg,
fully loaded) is distributed by the broad straps on both shoulders, and does
not strain the neck, a very important feature!
This box can be carried in several ways. The most comfortable for long walks
is the one pictured here. Two straps are used, running over my shoulders
and crossing on my back. This holds the box firmly in front of me, which
keeps it from getting bumped into anything while giving good balance and
easy access to the gear even while walking. The weight (pretty heavy at 5.5kg,
fully loaded) is distributed by the broad straps on both shoulders, and does
not strain the neck, a very important feature!
After taking the camera out, the box has lots of room to leave lens caps
and all those other things that start piling up during an involved photo
session! Also, the closed lid serves as a working platform when changing
film during walking.
The two strips have proven very reassuring when I'm hiking. It often involves
crossing narrow bridges, and generally getting into places where the event
of a ripping strap on a single-strapped box could easily cause the loss of
several thousand dollars worth of photo gear! Two straps mean welcome insurance.
Also, they make theft a lot harder.
As stated above, the box is fully rainproof and can be carried on long mountain
trips in all sorts of weather with no worries. It is strong enough to resist
strong impacts, and even people sitting on top of it.
When no long walk is involved, I prefer to carry the box only by one strap,
like any common bag, weighting down only one shoulder. It is quicker to pick
it up and set it down that way, but the heavy weight on just one shoulder
is not comfortable for more than a few minutes. When using just one strap,
the bottom attachment points stay unused.
A very sad update: My equipment was stolen!
In the afternoon of august 2nd, 2005, burglars demolished the front door
to my home and took everything they could carry and which seemed to have
value. Among the stolen items is almost everything shown on this page,
including the two Big Brown Boxes with all their contents.
Should you come across any of my stuff, please take the appropriate
measures to recover it! I live in Chile, so it's unlikely that my equipment
will turn up in faraway places, but my readers in Chile, Argentina, Bolivia,
Peru, and perhaps some other countries could get a chance to help me. If
you have browsed this web site, you know what photography means to me,
and the close relationship I have developed to my photo equipment.
Back to homo ludens photographicus.